Containers are just processes
check active processes:
ps -fC nginx
No nginx processes currently.
But if we ran:
docker run -d nginx:1.23.1
For Linux its the same as someone ran the NGINX on the host.
How to differentiate processes from Host and from a Container?
ps -ef --forest
The forest option allow us to see a hierarchy of processes.
root       33346       1  0 16:05 ?        00:00:00 /usr/bin/containerd-shim-runc-v2 -
root       33366   33346  0 16:05 ?        00:00:00  \_ nginx: master process nginx -g
systemd+   33418   33366  0 16:05 ?        00:00:00      \_ nginx: worker process
systemd+   33419   33366  0 16:05 ?        00:00:00      \_ nginx: worker process
This way we can see that our process Nginx comes from containerd!
Interacting with a container as a process
In linux /proc display information about the running process.
Lets list:
ls /proc
Each of the directories listed in /proc contain a variety of files and directories with information about that process
lets access our NGINX process information:
sudo ls /proc/33366/root

bin   docker-entrypoint.d   home   media  proc  sbin  tmp
boot  docker-entrypoint.sh  lib    mnt    root  srv   usr
dev   etc                   lib64  opt    run   sys   var
We can edit files inside the container by accessing the container’s root filesystem from the /proc directory on the host.
Create a file:
sudo touch /proc/33366/root/file_test
Confirmed the file is inside the container with docker command:
docker exec gracious_mcclintock ls -l file_test
-rw-r--r-- 1 root root 0 Jul 27 19:25 file_test
You can get the name of the container with docker ps
NOTE: This technique can be used to do things like edit configuration files in containers from the host.
If we can interact directly with the processes, we could also kill those processes without needing to use container tools for example.
killing our nginx container:
sudo kill 33366
check running containers:
docker ps
CONTAINER ID   IMAGE     COMMAND   CREATED   STATUS    PORTS     NAMES
Results
Anyone with access to host can use process lists to see information about running containers.
What’s very common for example, to read contents of env variables to search for secrets; We could do that the same way
sudo cat /proc/<process_number>/environ
Isolation
Ok, containers are just processes, but how can we isolate them from other container and from the host?
There are several layers that provide isolation, for example:
Namespaces
https://securitylabs.datadoghq.com/articles/container-security-fundamentals-part-2
Linux namespaces allow the operating system to provide a process with an isolated view of one or more system resources. Linux currently supports eight namespaces:
- Mount
- PID
- Network
- Cgroup
- IPC
- Time
- UTS
- User
Namespaces can be applied individually or in groups to one or more processes
We can use the lsns (list namespaces) command to view namespaces on the host. This utility comes as part of the util-linux package on most Linux distributions.
sudo lsns

        NS TYPE   NPROCS   PID USER             COMMAND
4026531834 time       75     1 root             /sbin/init
4026531835 cgroup     75     1 root             /sbin/init
4026531837 user       75     1 root             /sbin/init
4026531840 net        75     1 root             /sbin/init
4026532206 ipc        75     1 root             /sbin/init
4026532217 mnt        66     1 root             /sbin/init
4026532218 uts        72     1 root             /sbin/init
4026532219 pid        75     1 root             /sbin/init
4026532220 mnt         1    93 root             /lib/systemd/systemd-udevd
4026532221 uts         1    93 root             /lib/systemd/systemd-udevd
4026532222 mnt         1   297 systemd-resolve  /lib/systemd/systemd-resolved
4026532223 mnt         1   298 systemd-timesync /lib/systemd/systemd-timesyncd
4026532224 uts         1   298 systemd-timesync /lib/systemd/systemd-timesyncd
4026532284 uts         1   333 root             /lib/systemd/systemd-logind
4026532285 mnt         1   333 root             /lib/systemd/systemd-logind
4026532286 mnt         1   345 redis            /usr/bin/redis-server 127.0.0.1:6379
4026532287 mnt         4   347 root             /bin/sh /snap/cups/1100/scripts/run-cu
The column NPROCS shows that 75 processes are using the first set of namespaces on this host
You can ran ‘docker run -d nginx’ again and lsns will show more namespaces
Docker will by default make use of mnt, uts, ipc, pid and net namespaces when it creates a container
Mount
mnt namespace provides a process with an isolated view of the filesystem. When using this a new set of filesystem mounts is provided for the process in place of the ones it would receive by default.
The information of the filesystem can be found in:
cat /proc/<process_number>/mountinfo
Or using a tool like findmnt, which has better visuals:
findmnt -N <process_number>
You can grab the process number of your container by analyzing:
ps -ef --forest
But a better way is with docker inspect command:
docker inspect -f 'State.Pid' [CONTAINER]
In the first line of findmnt we can see where the mount is located:
TARGET                  SOURCE               FSTYPE  OPTIONS
/                       overlay              overlay rw,relatime,lowerdir=/var/lib/docker/
Meaning: where the Docker stores all of the image and container filesystem layers.
A good remainder is that all of the root filesystems used by the containers on a host will be in a directory managed by the container runtime tool (/var/lib/docker) by default.
Ensure strong filesystem permissions are in place on that directory and that’s being monitored for unauthorized access
Other great tool to interact with namespaces is nsenter:
sudo nsenter --target 34789 --mount ls /
bin   docker-entrypoint.d   home   media  proc  sbin  tmp
boot  docker-entrypoint.sh  lib    mnt    root  srv   usr
dev   etc                   lib64  opt    run   sys   var
PID
The PID namespace allows a process to have an isolated view of other processes running on the host. Containers use PID namespaces to ensure that they can only see and affect processes that are part of the contained application.
We can use nsenter to show the list of processes running inside a container.
Lets run the busybox with top (so the container doesn’t exit):
docker run --name busyback -d busybox top
Use docker inspect to get the PID:
docker inspect -f '' busyback
Now we can for list the processes inside the container:
sudo nsenter --target 35245 -m -p ps -ef
-mEnter the mount namespace of the target process. This means your view of the filesystem will match what the process with PID35245sees.
-pEnter the PID namespace of the target process. This means thepscommand will show the processes as they appear inside that namespace (not the host’s PID space).
ps -efOnce inside the namespaces, runps -ef, which lists all processes in full format as seen within that namespace.
sudo nsenter --target 35245 -m -p ps -ef
PID   USER     TIME  COMMAND
    1 root      0:00 top
    7 root      0:00 ps -ef
Another way to demonstrate the PID namespace is to use Linux’s unshare utility to run a program in a new set of namespaces.
sudo unshare --pid --fork --mount-proc /bin/bash
This will provide us with a bash shell in a new PID namespace
We can list the processes from this new shell directly:
# ps -ef
UID          PID    PPID  C STIME TTY          TIME CMD
root           1       0  0 22:47 pts/3    00:00:00 /bin/bash
root           7       1  0 22:47 pts/3    00:00:00 ps -ef
We can use the –pid flag on docker run for debug purposes in the process namespace of another container
Start a web server:
docker run -d --name=webserver nginx
Now start a debugging container:
docker run -it --name=debug --pid=container:webserver raesene/alpine-containertools /bin/bash
Now if we run ps -ef we will be able to see the processes from the web server container.
ps -ef

PID   USER     TIME  COMMAND
    1 root      0:00 nginx: master process nginx -g daemon off;
   28 101       0:00 nginx: worker process
   29 101       0:00 nginx: worker process
   30 root      0:00 /bin/bash
   35 root      0:00 ps -ef
This is also possible to do in Kubernetes if u provide the option shareProcessNamespace: true in your pod specification
Network
net namespace is responsible for providing a process’s network environment (interfaces, routing, etc).
We can interact with nsenter using the flag -n:
sudo nsenter --target <process_id> -n ip addr
The ip command is being sources from the host machine and doesn’t have to exist inside the container
The same way of PID, it’s possible to run a debugging container to connect with the network of the target container
docker run -it --name=debug-network --network=container:webserver raesene/alpine-containertools /bin/bash
In K8s you can use the ephemeral containers feature to dynamically add a container to the pod’s network namespace
Example in K8s:
kubectl run webserver --image=nginx
Giving the ephemeral container access to the network namespace of the target container:
kubectl debug webserver -it --image=raesene/alpine-containertools -- /bin/bash
If want to add the PID namespace too – just add the flag –target pods_name
Cgroup
Control groups are designed to help control a process’s resource usage on a Linux system.
We can calculate entries from inside a container and to the host, to spot the difference:
/sys/fs/cgroup
You can test that by using something like:
docker run ubuntu:22.04 ls -R /sys/fs/cgroup | wc -l
for a container that uses the host’s cgroup namespace it will show a lot more information:
docker run --cgroupns=host ubuntu:22.04 ls -R /sys/fs/cgroup | wc -l
This directory below contains information about system services running on the host but it is contained if we use an isolated cgroup namespace.
/sys/fs/cgroup/system.slice/
IPC
The IPC namespace is enabled by default on container runtimes to provide isolation for certain types of resources like POSIX message queues, shared memory (/dev/shm), semaphores.
UTS
The UTS namespace purpose is setting the hostname used by process.
For example if we run a docker with --uts=host it will keep the hostname of the host machine.
Time
The time namespace allows for groups of processes to have different time settings than the underlying host, which can be useful for certain purposes, such as testing or stopping time from jumping forward when a container has been snapshotted and then restored.
Docker does not yet support the Time namespace natively (as of mid-2025)
This is useful for:
- Time-based testing (e.g., testing token expiry or certificate validation).
- Simulating clock drift or leap seconds.
- Isolating time in sandboxed environments (e.g., for security research).
you can manually use it via:
sudo unshare --time --mount-proc bash
inside the shell:
date
sudo date -s "2030-01-01"
date
This change won’t affect the host — just the shell inside the time namespace.
Note: You need Linux kernel 5.6+, and setting
CLOCK_REALTIMErequires CAP_SYS_TIME.
User
The user namespace is one of the most powerful and security-critical namespaces in Linux containers. It helps with UID/GID remapping, enabling containers to run as root inside but unprivileged outside.
In Podman this is default behavior, but in Docker you need to set up. This is not possible in K8s
We can test this isolation with unshare:
unshare --fork --pid --mount-proc -U -r bash
unshare	Start a process in new namespaces
--fork	Fork a new process (so namespaces are properly initialized)
--pid	Create a new PID namespace — ps inside shows only child processes
--mount-proc	Mount a fresh /proc for the new PID namespace
-U	Create a User namespace
-r	Map UID and GID 0 (root) inside to your real user ID outside
Even tho we are root inside this shell, we can’t delete a host root file for example. Because the process is running as our normal user outside.
To enable the usage on docker edit Docker Daemon Config (/etc/docker/daemon.json)
{
  "userns-remap": "default"
}
Restart docker:
sudo systemctl restart docker
Verify:
docker info | grep userns
try:
docker run --rm -it alpine id
Capabilities
Linux capabilities are a security mechanism that breaks down the all-powerful root privileges into fine-grained, discrete privileges that can be individually enabled or disabled for processes.
Why Capabilities Exist
Traditionally, UID 0 (root) meant full system control — but that’s often overkill.
Capabilities split root’s powers into manageable pieces so:
- You can give processes just the minimal privileges they need.
- Even if a process runs as root, you can limit what it can actually do.
Example
Instead of giving a process full root, you can give it just:
CAP_NET_BIND_SERVICE— so it can bind to ports <1024.CAP_SYS_ADMIN— needed for mounting filesystems.CAP_SETUID/CAP_SETGID— to change user/group IDs.
If we have a web server compiled in Go for example, it wouldnt work without root because it need the capability CAP_NET_BIND_SERVICE.
We can apply the cap in Linux like this:
sudo setcap 'cap_net_bind_service=+ep' ./webserver
And to check the cap (linux):
getcap /path/webserver
Common Linux Capabilities
| Capability | Purpose |
|---|---|
CAP_CHOWN |
Change file ownership (even without permission) |
CAP_NET_ADMIN |
Network config (ifconfig, iptables, etc.) |
CAP_NET_BIND_SERVICE |
Bind to ports below 1024 |
CAP_SYS_ADMIN |
🛑 Huge set: mounting, namespaces, etc. (dangerous) |
CAP_SETUID |
Change effective UID |
CAP_SETGID |
Change effective GID |
CAP_SYS_PTRACE |
Attach to other processes (e.g., gdb) |
CAP_DAC_OVERRIDE |
Bypass file permission checks |
CAP_SYS_TIME |
Set system clock |
CAP_MKNOD |
Create device nodes |
🔥
CAP_SYS_ADMINis called the “god capability” — it grants so much that many privilege escalations start there.
Capabilities in Containers (Docker)
Docker drops many dangerous capabilities by default, and you can control them:
Drop all except safe defaults:
docker run --rm -it alpine
Drop specific capabilities:
docker run --rm --cap-drop=NET_RAW alpine ping 127.0.0.1
pingwill now fail, because it needsCAP_NET_RAW.
Add specific capabilities:
docker run --rm --cap-add=SYS_PTRACE alpine
Add all capabilities (⚠️ dangerous):
docker run --rm --cap-add=ALL alpine
If we wanna check which cap we need to drop or set, we could for example:
sysctl net.ipv4.ip_unprivileged_port_start
# output: net.ipv4.ip_unprivileged_port_start = 1024
This will show by default 1024, which is the ports that need privilege access.
Inside container if this number is 0 we can drop NET_RAW and NET_BIND_SERVICE caps for example, and we still could open service in that port, because we already have permission to do so.
View Current Capabilities
To inspect a running process:
ps aux | grep <pid>
#capsh --pid=<pid> --print
List capabilities:
getpcaps <pid>
Or:
#sudo apt install libcap-ng-utils
pscap
We can also use the filecap util from the same package:
sudo filecap -a 2>/dev/null
This is used to investigate where caps have been added to specific programs.
View capabilities from the inside
We can check capabilities a container has by using amicontained:
docker run -it raesene/alpine-containertools /bin/bash
amicontained
Cgroups
cgroups (control groups) are a core part of Linux and container isolation. They provide resource control — the ability to limit, measure, and isolate resource usage (CPU, memory, disk I/O, etc.) for processes.
cgroups v1 vs v2
| Feature | cgroups v1 | cgroups v2 |
|---|---|---|
| Structure | Per-resource hierarchy | Unified hierarchy |
| Kernel version | Older systems (< 4.x) | Kernel 4.5+ (stable in 5.x) |
| Flexibility | Complex and fragmented | Simplified and unified |
| Preferred today? | ❌ Legacy | ✅ Yes (Kubernetes supports it since v1.25+) |
You can check your system’s version with:
stat -fc %T /sys/fs/cgroup/
If it says
cgroup2fs, you’re on cgroups v2
Or:
mount | grep cgroup
NOTES: In cgroup v2, a non-root user can control a subtree of the cgroup hierarchy if properly delegated by systemd or the kernel.
That means:
- A rootless container can limit its own CPU, memory, PIDs, etc.
- No special privileges required — real resource isolation without root.
How Cgroups Work in Linux
We can check which Cgroups are in place for a specific process.
First get the process id:
ps -fC bash
Then use that to discover the cgroup session:
cat /proc/[PID]/cgroup
# output: 0::/user.slice/user-1000.slice/session-1.scope
Now you can check what available resources can be modified for that process:
ls /sys/fs/cgroup/user.slice/user-1000.slice/session-1.scope
Output:
cgroup.controllers      cgroup.threads       memory.low           memory.swap.events
cgroup.events           cgroup.type          memory.max           memory.swap.high
cgroup.freeze           cpu.pressure         memory.min           memory.swap.max
cgroup.kill             cpu.stat             memory.numa_stat     memory.swap.peak
cgroup.max.depth        cpu.stat.local       memory.oom.group     pids.current
cgroup.max.descendants  io.pressure          memory.peak          pids.events
cgroup.pressure         memory.current       memory.pressure      pids.max
cgroup.procs            memory.events        memory.reclaim       pids.peak
cgroup.stat             memory.events.local  memory.stat
cgroup.subtree_control  memory.high          memory.swap.current
Tools
We can see the same information with better visualization with:
systemd-cgls
And for examining cgroup info:
lscgroup
# sudo apt install cgroup-tools
Applying Cgroup
- Mount a cgroup filesystem
for example:
mount -t cgroup2 none /sys/fs/cgroup
- Create a cgroup (directory):
mkdir /sys/fs/cgroup/mygroup
- Move processes into it:
echo <PID> > /sys/fs/cgroup/mygroup/cgroup.procs
- Apply limits:
echo 100000 > /sys/fs/cgroup/mygroup/cpu.max
# in microseconds
echo 500M > /sys/fs/cgroup/mygroup/memory.max
This tells the kernel: “This process can only use 500 MB of RAM and 10% CPU.”
How Cgroups Work in Containers (Docker)
In Containers:
Every container is a cgroup-managed process group.
When you run:
docker run -m 512m --cpus=0.5 ubuntu
Docker:
- Creates a new cgroup for the container.
- Applies memory and CPU limits.
- Starts the container process inside that cgroup.
So:
- Your container can’t exceed 512 MB of RAM.
- It can only use 50% of 1 CPU.
You can verify the Cgroup info applied to the container by getting the process ID from that container:
docker inspect -f '' [CONTAINER]
Some examples for Docker Cgroup v2 — Resource Control Support
| Docker Flag | Resource | Control Example / cgroup v2 Support |
|---|---|---|
--cpus |
CPU | Limit CPU time (--cpus=0.5 for 50%) — maps to cpu.max in cgroup v2 |
--memory or -m |
Memory | Set memory cap (--memory=512m) — maps to memory.max |
--memory-swap |
Memory Swap | Controls memory.swap.max (when used with --memory) |
--blkio-weight (deprecated in v2) |
Block I/O | Ignored in v2 — use --device-read-bps/iops instead |
(no flag; use tc or external tools) |
Network (TC) | Not supported directly in Docker — requires tc, bpf, or third-party tools |
--pids-limit |
PIDs | Limit number of processes — maps to pids.max |
(no flag; use sysctl or mount manually) |
HugePages | Only manageable via /sys/fs/cgroup/.../hugetlb.* or sysctl |
No direct flag (--cgroupns ≠ freezer) |
Freeze | Not exposed in Docker — must manually write to cgroup.freeze in host |
--device-read-bps, --device-write-bps |
Block I/O | Limit read/write bytes/sec per device — maps to io.max |
--device-read-iops, --device-write-iops |
Block I/O | Limit read/write IOPS per device — maps to io.max |
--device |
Devices | Applies at container level, but not enforced by cgroup v2 — eBPF required |
We can test for example limiting the amount of processes the container can execute:
docker run -it --pids-limit 10 alpine sh
fork bomb example:
:(){ :|: & };:
The –pids-limit 10 will mitigate the DoS attack
Extra info
Devices control (
--device): In cgroup v2, the kernel no longer usesdevices.allow. Docker still lets you configure device access, but it does not enforce device restrictions via cgroups. For actual enforcement, you’d need to use eBPF viabpftool.
Block I/O:
--blkio-weightis a cgroup v1 concept and does nothing in v2. Use the per-device I/O flags instead.
Freeze: There’s no Docker flag to pause/resume via the cgroup freezer (
cgroup.freeze). You’d need to manually writeFROZENto/sys/fs/cgroup/<container>/cgroup.freeze
Kubernetes uses cgroups under the hood too
When you define in a Pod spec:
resources:
  limits:
    memory: "1Gi"
    cpu: "1"
Kubernetes configures cgroups via the container runtime (e.g., containerd) to enforce those limits.
Monitoring Cgroups
You can see cgroup usage via:
cat /sys/fs/cgroup/<controller>/<group>/memory.current
cat /sys/fs/cgroup/<controller>/<group>/cpu.stat
Or tools like:
tophtopsystemd-cglscgroup2utilities
AppArmor & SELinux
AppArmor and SELinux are Linux security modules (LSMs) that enforce Mandatory Access Control (MAC) policies — unlike traditional discretionary access control (DAC), which relies on user/group permissions. In the context of containers (Docker/Kubernetes), they provide fine-grained control over what processes inside containers are allowed to do.
While it is possible to use either AppArmor or SELinux on any Linux host, there is typically only one default MAC system enabled, which varies based on the distribution. By default, Debian-derived systems have AppArmor and Red Hat-based systems use SELinux.
AppArmor (Path-based)
- Applies rules to specific paths (e.g.,
/usr/bin/nginx) - Profiles define what a program can read/write/execute
- Operates in either:
- Enforce mode: Block disallowed actions
- Complain mode: Log violations but allow
Easy to use and manage on Ubuntu.
We can see how it’s configured:
sudo aa-status
Lets run a container and check the command again to see how many processes are in enforce mode:
docker run -d nginx
Apparmor Custom Profiles
Think like this, with applied apparmor we could restrict even the root running the container to access certain directories.
Profile example:
#include <tunables/global>
profile docker-block-bin flags=(attach_disconnected, mediate_deleted) {
  #include <abstractions/base>
  file,
  deny /etc/** wl,
}
This will block writes access to /etc/ directory recursively.
Save this to:
/etc/apparmor.d/containers/docker-block-etc
Load it into Kernel:
sudo apparmor_parser -r /etc/apparmor.d/containers/docker-block-etc
Now create a new container with –security-opt flag to apply the policy:
docker run --rm -it --name block-etc --security-opt "apparmor=docker-block-etc" ubuntu:22.04 /bin/bash
In the container, try to write to /etc:
touch /etc/test
# Permission Denied
Use the tool Bane to create profiles easier
SELinux (Label-based)
- Applies labels to files, processes, ports, etc.
- Every interaction must match an allowed policy based on labels
- Example:
nginx_tprocess accessing a file labeledhttpd_sys_content_t
Used in Red Hat-based systems. More flexible but harder to manage.
We can check how it’s configured:
sestatus
How it handle standard user processes:
sudo semanage login -l
List information about the labels by adding a -Z
Processes:
pf -efZ
File systems:
ls -alZ
SELinux Policies
The general profile applies the same policy to every container
Example
docker run --rm -it --name home-test -v /home/user:/hosthome fedora /bin/bash
To check the general policy, we can run the same docker command with –security-opt label:disable
docker run --rm -it --name home-test -v /home/user:/hosthome --security-opt label:disable fedora /bin/bash
With the police disabled we can create a file inside the home directory
To create a custom policy there is the tool: udica
AppArmor & SELinux in Kubernetes
Kubernetes supports LSMs via security profiles in the Pod spec.
AppArmor Example (Kubernetes):
apiVersion: v1
kind: Pod
metadata:
  annotations:
    container.apparmor.security.beta.kubernetes.io/nginx: localhost/my-apparmor-profile
spec:
  containers:
  - name: nginx
    image: nginx
Requires AppArmor enabled on the host and the profile loaded at
/etc/apparmor.d/.
SELinux Example (Kubernetes):
Enable by setting the correct labels using the CRI runtime (e.g., containerd, CRI-O):
securityContext:
  seLinuxOptions:
    level: "s0:c123,c456"
    type: "spc_t"
SELinux integration requires:
SELinuxenabled on the host- Compatible container runtime (
CRI-Oorcontainerdwith SELinux support)
Seccomp
Seccomp is a Linux kernel feature that allows you to filter system calls (syscalls) made by a process. It’s a sandboxing mechanism that reduces the kernel’s attack surface.
- Think of it as a firewall for syscalls.
- It uses BPF (Berkeley Packet Filter) rules to allow, deny, trap, or log specific syscalls.
Seccomp in Containers (Docker)
Docker uses Seccomp by default to limit the syscalls containers can make.
Default Behavior:
- Docker ships with a default seccomp profile.
- It blocks around 60+ dangerous syscalls, e.g.:
keyctl,mount,ptrace,clonewith specific flags.
Testing default filter
create a ubuntu container:
docker run -it ubuntu:22.04 /bin/bash
Try to use unshare (creates a namespace) that is blocked by default:
unshare
# unshare failed: Operation not permitted
Disable seccomp and try again:
docker run --security-opt seccomp=unconfined -it ubuntu /bin/bash
unshare
# now it works
Custom Seccomp Profile Example:
In case the default filter is not enough, we could create custom profile to apply other set of restrictions.
Create a JSON like that to block all calls:
{
  "defaultAction": "SCMP_ACT_ERRNO",
  "architectures": [
    "SCMP_ARCH_X86_64",
    "SCMP_ARCH_X86",
    "SCMP_ARCH_X32"
  ],
  "syscalls": [
  ]
}
defaultAction option means that if the syscall doesn’t match the policy, we will get an error and the call will be denied.
checkout seccomp_rule_add
docker run \
  --security-opt seccomp=/path/to/custom-profile.json \
  ubuntu
But we dont want to restrict All the syscalls, that’s not very practical.
A recommendation is to start with the default policy and remove the ones that you want to block.
For example the io_uring related syscalls:
"io_uring_enter",
"io_uring_register",
"io_uring_setup",
but How do I know which one to block?
An option would be to audit the syscall your applications use and then use this audit log to create a custom profile that allows only those syscalls.
Tools that helps to automate this process: Inspektor Gadget
There are various ways to run the tool!
Example with docker:
docker run -ti --rm --privileged -v /:/host --pid=host ghcr.io/inspektor-gadget/ig:latest run trace_open:latest
Tools for Seccomp
| Tool/Method | Use Case |
|---|---|
seccomp-tools |
Inspect and debug syscall behavior |
strace |
Trace syscalls made by a binary |
bpftrace, bcc |
Advanced dynamic tracing of syscalls |
auditd + ausearch |
Log blocked syscalls via audit subsystem |
jq + JSON editor |
Modify seccomp profiles easily |
| Docker profile | default.json is a good base to customize |
| Inspektor Gadget | Log syscall behavior |
Install seccomp-tools (Debian/Ubuntu):
sudo apt install seccomp-tools
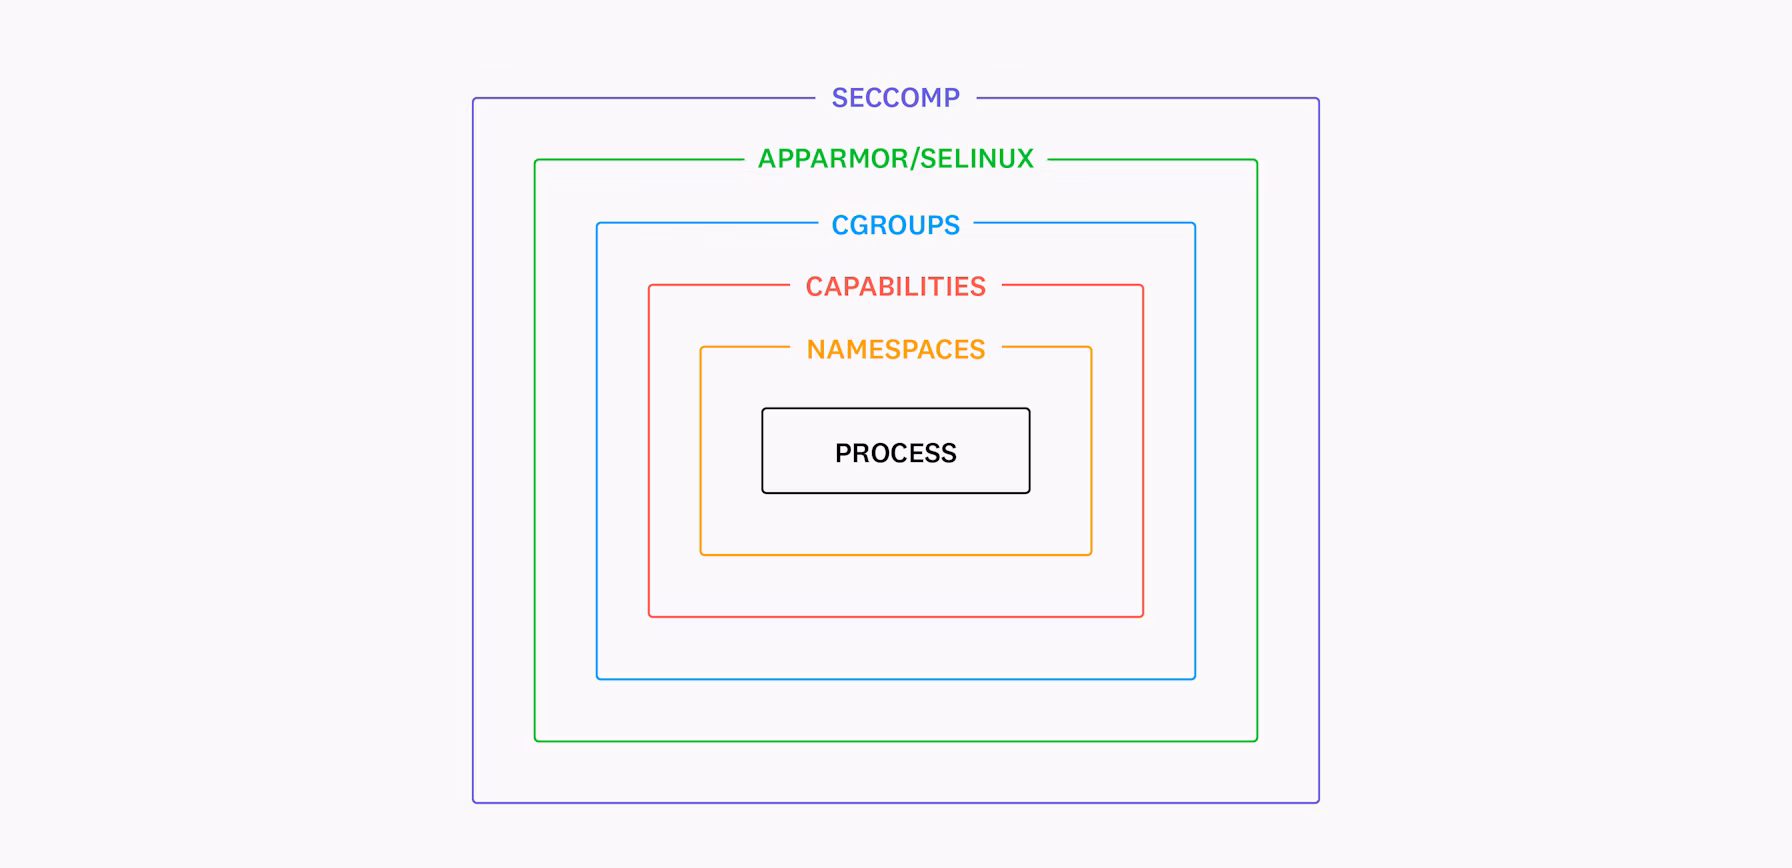
Conclusion
Container security isn’t built on a single wall — it’s a defense-in-depth model layered across the Linux kernel. Namespaces isolate what a container can see, cgroups limit what it can consume, capabilities restrict what it can do, while Seccomp filters how it behaves at the syscall level. Add AppArmor or SELinux to define access policies, and you have a layered sandbox that protects both the host and other containers. Each layer has limits, but together they form a powerful isolation model — and understanding how they work is key to hardening modern containerized environments.